メインコンテンツにスキップ

MacBook Air 13インチ Late 2010の上部ケースの交換

必要な工具と部品

  1. MacBook Air 13インチ Late 2010の上部ケースの交換, 下部ケース: 手順 1、 1の画像 1
    この手順で使用する道具:
    P5 Pentalobe Screwdriver Retina MacBook Pro and Air
    $5.99
    購入する
    • 作業を始める前に、デバイスの電源を切り、デバイス本体を閉じて裏返し、タオルなど柔らかい表面上に載せてください。

    • 次のネジを10本外します。

    • 9 mm 星形ペンタローブネジー2本

    • 2.6 mm 星形ペンタローブネジー8本

    • この星形ペンタローブネジを外すには特殊ドライバーが必要です。こちらからご購入できます。

  2. MacBook Air 13インチ Late 2010の上部ケースの交換: 手順 2、 1の画像 1
    • 指をディスプレイと下部ケースの間に差し込み、Airから下部ケースを持ち上げます。

    • 下部ケースを取り出して、傍に置きます。

  3. MacBook Air 13インチ Late 2010の上部ケースの交換, バッテリー: 手順 3、 1の画像 1
    • 念のため放電を避けるため、ロジックボードからバッテリコネクタを外すことをお勧めします。 この手順はオプションであり、必須ではありません。

    • バッテリコネクタに付いている透明プラスチックのプルタブをつかみ、Airの前方に向けて引っ張り、ロジックボードからバッテリーを外します。

    • コネクタを外すときにコネクタを上に持ち上げないでください。

  4. MacBook Air 13インチ Late 2010の上部ケースの交換, I/Oボードケーブル: 手順 4、 1の画像 1
    • スパッジャーの平面側先端を使って、I/Oボード上のソケットからI/Oボードケーブルコネクタを持ち上げます。

    Die nachfolgenden Schritte sind nicht erforderlich. Bitte bei Schritt 11 weitermachen.

    Volker - 返信

    Es ist nicht erforderlich, IO-Board, Akku und Logic-Board auszubauen. Es genügt, die Antennen- das Kamera- und das Displaykabel zu entfernen und die Scharniere abzumontieren. Die Kabel können leicht an den vorhandenen Komponenten vorbeigezogen werden.

    Volker - 返信

  5. MacBook Air 13インチ Late 2010の上部ケースの交換: 手順 5、 2の画像 1 MacBook Air 13インチ Late 2010の上部ケースの交換: 手順 5、 2の画像 2
    • 次のコネクタには特にディープソケットが付いています。接続を外す際は、慎重に作業を行なってください。

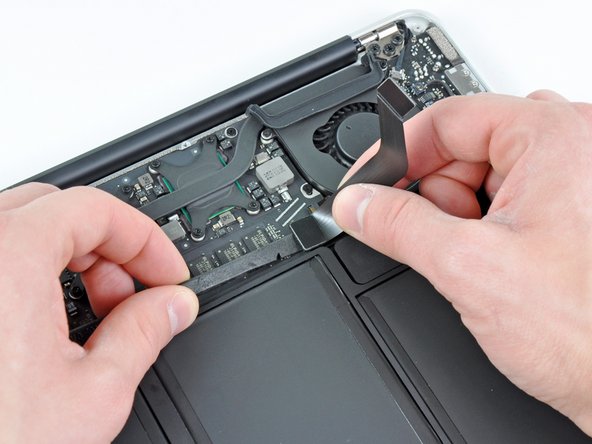
    • I/O ボードケーブルをファン上部から慎重に剥がします。

    • 慎重にロジックボードに接続された付近のI/O ボードケーブルを上方に引き上げながら、スパッジャーの先端を使って、ソケットからコネクタ両側を上側に少しずつこじ開けて外します。

    • I/O ボードケーブルを外します。

  6. MacBook Air 13インチ Late 2010の上部ケースの交換, ファン: 手順 6、 1の画像 1
    • スパッジャーの先端を使って、ファンケーブルのZIFソケット上の固定フラップを持ち上げます。

    • ソケット自体ではなく、ヒンジの固定フラップをこじ開けているか確認してください。

  7. MacBook Air 13インチ Late 2010の上部ケースの交換: 手順 7、 1の画像 1
    • ファン上部の接着剤からゴム製ガスケットを剥がします。

  8. MacBook Air 13インチ Late 2010の上部ケースの交換: 手順 8、 1の画像 1
    • 上部ケースにファンを固定している3本のネジを外します。

    • 3.6 mm T5トルクスネジー1本

    • 2.7 mm T5トルクスネジー1本

    • 3.6 mm T5トルクスネジ(小頭ネジ)ー1本

  9. MacBook Air 13インチ Late 2010の上部ケースの交換: 手順 9、 1の画像 1
    • 上部ケースからファンを持ち上げ、慎重にファンリボンケーブルのソケットからケーブルを外して、Airから取り出します。

  10. MacBook Air 13インチ Late 2010の上部ケースの交換, I/O ボード: 手順 10、 1の画像 1
    • ロジックボード上のソケットから電源ケーブルを引っ張り、I/Oボードの接続を外します。

    • ケーブルをAir本体右側端に向けて、ロジックボードの表面に並行してケーブルを引きます。

    When assemble, Step9 fan connector first

    taizoy0725 - 返信

  11. MacBook Air 13インチ Late 2010の上部ケースの交換: 手順 11、 1の画像 1
    • スパッジャーの先端を使って、コネクタをソケットから押し出しながら、カメラケーブルをI / Oボードの面と平行にAirの角に向かって引き、ソケットから外します。

    • このケーブルを取り外すときは、このケーブルを上に持ち上げないでください。ソケットがロジックボードから外れる恐れがあります。

    Die nachfolgenden Schritte sind nicht erforderlich. Einfach bei Schritt 20 weitermachen.

    Volker - 返信

  12. MacBook Air 13インチ Late 2010の上部ケースの交換: 手順 12、 2の画像 1 MacBook Air 13インチ Late 2010の上部ケースの交換: 手順 12、 2の画像 2
    • スパッジャーの平面側先端を使って、I/Oボード上のソケットから左側スピーカーのケーブルコネクタを跳ね上げます。

    • ワイヤの下から引き上げます。

    • I/Oボード上のリテイナーから左側スピーカーケーブルを巻き戻します。

  13. MacBook Air 13インチ Late 2010の上部ケースの交換: 手順 13、 1の画像 1
    • スパッジャーの平面側先端を使って、I/Oボード上のソケットよりマイクケーブルコネクタを跳ね上げます。

    • ワイヤの下から引き上げてください。

  14. MacBook Air 13インチ Late 2010の上部ケースの交換: 手順 14、 1の画像 1
    • I/Oボードを上部ケースに固定している3.6 mm T5トルクスネジを1本外します。

    When inserting new board, make sure the headphones jack socket rim is registered properly with the case hole before tightening T5 screw.

    sutherlandralph - 返信

  15. MacBook Air 13インチ Late 2010の上部ケースの交換: 手順 15、 1の画像 1
    • 上部ケースからロジックボード付近の端からI/Oボードを慎重に持ち上げ、取り出します。

  16. MacBook Air 13インチ Late 2010の上部ケースの交換, バッテリー: 手順 16、 1の画像 1
    • 上部ケースにバッテリーを固定している5本のネジを外します。

    • 6.3 mm T5トルクスネジー3本

    • 2.4 mm T5 トルクスネジー2本

  17. MacBook Air 13インチ Late 2010の上部ケースの交換: 手順 17、 1の画像 1
    • バッテリーを取り扱う際は、露出した4つのリチウムポリマーセルを触ったり、握らないようご注意ください。

    • ロジックボード付近の端からバッテリーを持ち上げて、上部ケースから取り出します。

  18. MacBook Air 13インチ Late 2010の上部ケースの交換, Logic Board: 手順 18、 2の画像 1 MacBook Air 13インチ Late 2010の上部ケースの交換, Logic Board: 手順 18、 2の画像 2
    • スパッジャーの先端もしくは指先を使って、トラックパッドのリボンケーブルZIFソケット上の固定フラップを持ち上げます。

    • ソケット自体ではなく、ヒンジのついた固定プラップをこじ開けているか確認してください。

    • トラックパッドのリボンケーブルをAirの正面端に向けて、ソケットからまっすぐ引き抜きます。

  19. MacBook Air 13インチ Late 2010の上部ケースの交換: 手順 19、 1の画像 1
    • スパッジャーの平面側先端を使って、右側スピーカーのケーブルコネクタを持ち上げて、ロジックボード上のソケットから外します。

    • ケーブルの下からこじ開けます。

  20. MacBook Air 13インチ Late 2010の上部ケースの交換: 手順 20、 2の画像 1 MacBook Air 13インチ Late 2010の上部ケースの交換: 手順 20、 2の画像 2
    • 慎重にスパッジャーの先端を、ディスプレイケーブルのロックに繋がっている黒いプラスチックのフラップを押し込んで、ロックを上に跳ね上げて、ソケットから外します。

    • ロックをソケットから離しながら、スパッジャーの先端もしくは指先を使って、Airのコーナーに向けてスライドしながら、ソディスプレイデータケーブルをソケットから慎重に外します。

    • ディスプレイデータケーブルの接続を外す際に、ソケットを上向きに引っ張らないでください。ソケットがロジックボードにダメージを与えてしまうことがあります。

  21. MacBook Air 13インチ Late 2010の上部ケースの交換: 手順 21、 2の画像 1 MacBook Air 13インチ Late 2010の上部ケースの交換: 手順 21、 2の画像 2
    • スパッジャーの平面側先端を使って、両側のアンテナケーブルコネクタをこじ開けて、AirPort/Bluetoothカードから外します。

    When you are assembleIng , you shoud this phase at settin mother board

    taizoy0725 - 返信

  22. MacBook Air 13インチ Late 2010の上部ケースの交換: 手順 22、 1の画像 1
    • 慎重に、アンテナケーブルをロジックボード中にある切り欠きを通して外します。

    Schritt 23 bis 25 kann man sich auch schenken.

    Volker - 返信

  23. MacBook Air 13インチ Late 2010の上部ケースの交換: 手順 23、 1の画像 1
    • ロジックボードにSSDを固定している、2.85 mm T5トルクネジを1本外します。

    2.85 and Large head screw

    taizoy0725 - 返信

  24. MacBook Air 13インチ Late 2010の上部ケースの交換: 手順 24、 1の画像 1
    • SSDの先端を過度に持ち上げないでください。

    • ドライブをソケットから引き抜いて、ロジックボードから取り出します。

    • 固定ネジを取り付ける前に、SSDが正しい位置に揃っているか確認してください。

  25. MacBook Air 13インチ Late 2010の上部ケースの交換: 手順 25、 1の画像 1
    • 上部ケースにロジックボードを固定している6.3 mm T5 トルクネジを6本外します。

    Actually the screws are 3.6mm (not 6.3mm).

    toliqdoi - 返信

  26. MacBook Air 13インチ Late 2010の上部ケースの交換: 手順 26、 1の画像 1
    • アンテナケーブルのリテイナーと左側のクラッチヒンジを上部ケースに固定している4.9 mm T8トルクネジの内側2本を外します。

    Schritt 27 bis 29 sind nicht erforderlich.

    Volker - 返信

  27. MacBook Air 13インチ Late 2010の上部ケースの交換: 手順 27、 1の画像 1
    • アンテナケーブルのリテイナーをわずかに押し出して、上部ケースにヒートシンクの先端を固定している3 mm T5 トルクネジを1本外します。

  28. MacBook Air 13インチ Late 2010の上部ケースの交換: 手順 28、 1の画像 1
    • アンテナケーブルを作業の邪魔にならない位置に固定して、ロジックボードのヒートシンクの端を持ち上げて上部ケースから外します。

  29. MacBook Air 13インチ Late 2010の上部ケースの交換: 手順 29、 1の画像 1
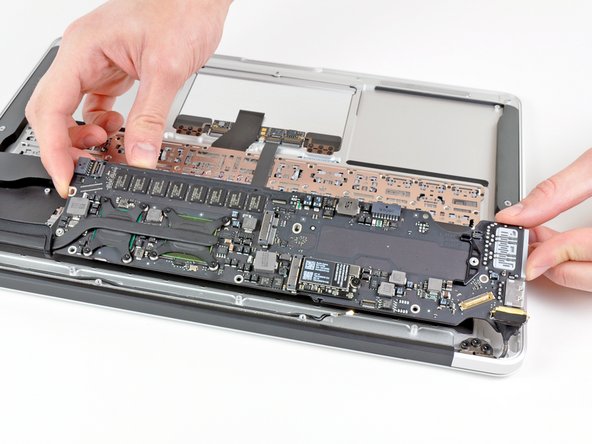
    • ケーブルが巻き込まれないよう注意しながら、上部ケースからロジックボードアセンブリを注意深く取り外します。

    Really great guide!!!

    My only issue was the removal of the logic board was a bit nerve wracking.

    The speaker wire was stressed heavily as the board tilted up. Removing the speakers before the board would solve this.

    I did it in that order during reassembly, and it worked great.

    gifts1000 - 返信

    I also had an issue with the logic board installation as the above comment mentioned. I found easiest way is to just remove the speaker that you just re-installed. It's 1 screw - take that speaker out and now that wire that was bumping logic board is out of the way, and just then re-install the speaker.

    Rich Davies - 返信

    When replacing the logic board, make sure the two rf connectors are out of the way before you put the screws back.

    Andrew Burroughs - 返信

  30. MacBook Air 13インチ Late 2010の上部ケースの交換, ディスプレイアセンブリ: 手順 30、 1の画像 1
    • 上部ケースに刻まれた溝からアンテナケーブルを慎重に巻き戻して外します。

  31. MacBook Air 13インチ Late 2010の上部ケースの交換: 手順 31、 1の画像 1
    • ディスプレイのヒンジと上部ケースを固定している内側の4.9 mm T8トルクネジを2本外します。

    • 最後の1本は次の手順まで意図的に残しておきます。

  32. MacBook Air 13インチ Late 2010の上部ケースの交換: 手順 32、 1の画像 1
    • ディスプレイを上部ケースに対して直角に開き、画像のようにテーブル上に載せます。

    • Airを手でしっかりと抑えながら、下部ディスプレイのブラケットから最後の4.9 mm T8トルクネジを外します。

  33. MacBook Air 13インチ Late 2010の上部ケースの交換: 手順 33、 1の画像 1
    • 最後のディスプレイ用ネジを外す前に、ディスプレイと上部ケースをもう一方の手でしっかりと固定してください。落下させてしまうと、高額なダメージにつながってしまう恐れがあります。

    • ディスプレイを上部ケースに固定している4.9 mm T8トルクネジを外します。

  34. MacBook Air 13インチ Late 2010の上部ケースの交換: 手順 34、 2の画像 1 MacBook Air 13インチ Late 2010の上部ケースの交換: 手順 34、 2の画像 2
    • ディスプレイアセンブリ側に向けて、上部ケースを若干押し出します。すると、ディスプレイアセンブリの正面から上部ケースが外れます。

    • 2つのディスプレイヒンジが上部ケースから外れたら、ディスプレイを取り出して、脇に置いてください。

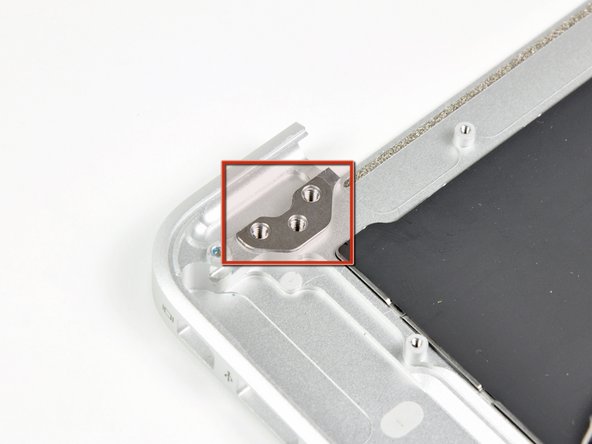
    • 2つあるディスプレイブラケット下にあるシムをきちんと保管してください。ディスプレイをインストールする際は、2番目の図に示すように、各ディスプレイブラケットの下に(上部ケースに対して)シムを取り付けているか確認してください。

  35. MacBook Air 13インチ Late 2010の上部ケースの交換, 上部ケース: 手順 35、 1の画像 1
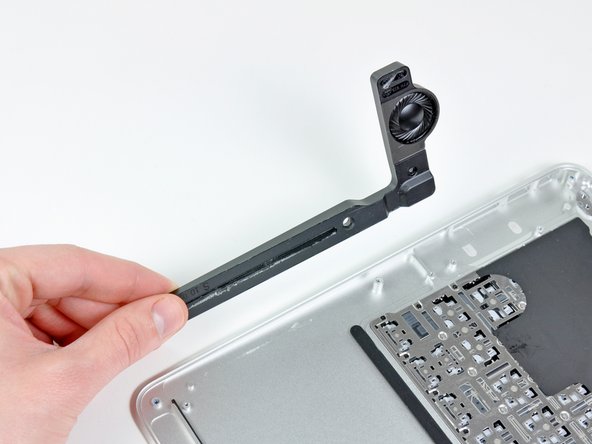
    • 右側スピーカーを上部ケースに固定している2.7mm T5トルクスネジを1本外します。

  36. MacBook Air 13インチ Late 2010の上部ケースの交換: 手順 36、 3の画像 1 MacBook Air 13インチ Late 2010の上部ケースの交換: 手順 36、 3の画像 2 MacBook Air 13インチ Late 2010の上部ケースの交換: 手順 36、 3の画像 3
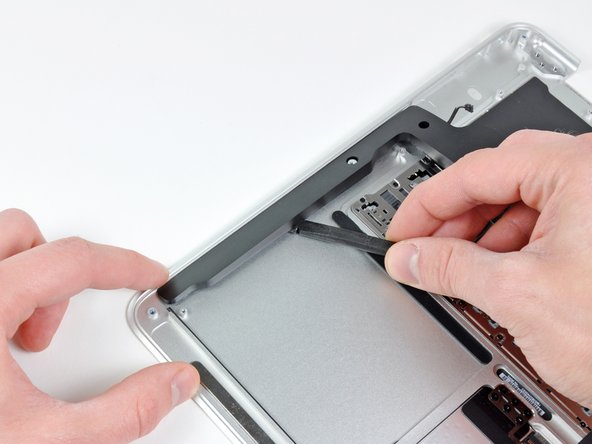
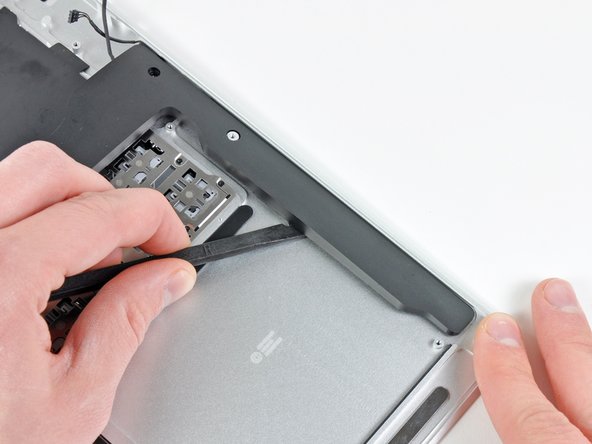
    • スパッジャーの平面側先端を使って、上部ケースに右側スピーカーを固定している接着剤を剥がします。

    • 上部ケースから右側スピーカーを外します。

  37. MacBook Air 13インチ Late 2010の上部ケースの交換: 手順 37、 1の画像 1
    • 左側スピーカーを上部ケースに固定している2.7mm T5トルクスネジを1本外します。

  38. MacBook Air 13インチ Late 2010の上部ケースの交換: 手順 38、 3の画像 1 MacBook Air 13インチ Late 2010の上部ケースの交換: 手順 38、 3の画像 2 MacBook Air 13インチ Late 2010の上部ケースの交換: 手順 38、 3の画像 3
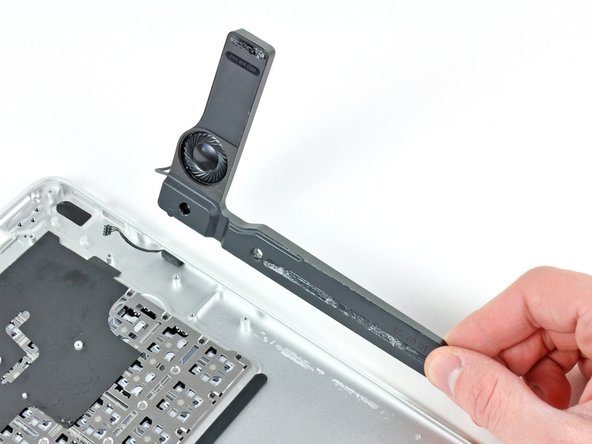
    • スパッジャーの平面側先端を使って、上部ケースに左側スピーカーを固定している接着剤を剥がします。

    • 上部ケースから左側スピーカーを取り出します。

  39. MacBook Air 13インチ Late 2010の上部ケースの交換: 手順 39、 2の画像 1 MacBook Air 13インチ Late 2010の上部ケースの交換: 手順 39、 2の画像 2
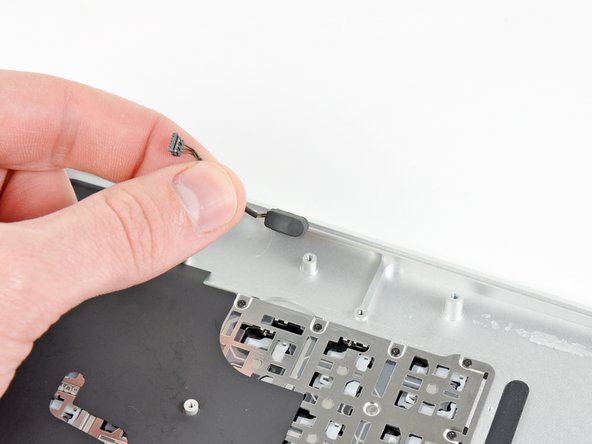
    • スパッジャーの先端を使って、上部ケースの左側からマイクロフォンをこじ開けます。

    • 上部ケースからマイクロフォンを外します。

    • 上部ケースが残ります。

    Thing to note when re-attaching the microphone - make sure that its sensor, which is located at bottom, is aligned with the hole.

    Jaroslaw Lipski - 返信

  40. MacBook Air 13インチ Late 2010の上部ケースの交換: 手順 40、 2の画像 1 MacBook Air 13インチ Late 2010の上部ケースの交換: 手順 40、 2の画像 2
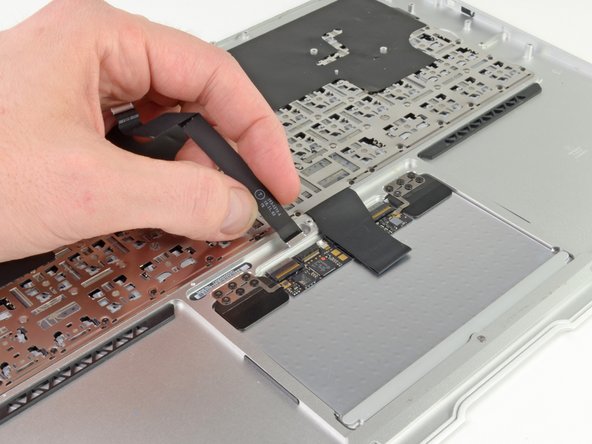
    • スパッジャーの先端もしくは指先を使って、トラックパッドのリボンケーブルZIFソケット上の固定フラップを持ち上げます。

    • ソケット自体ではなく、ヒンジ付きの固定フラップ上をこじ開けてください。

    • トラックパッドのリボンケーブルを、Airの背面端に向けてソケットをまっすぐ引き抜きます。

  41. MacBook Air 13インチ Late 2010の上部ケースの交換: 手順 41、 3の画像 1 MacBook Air 13インチ Late 2010の上部ケースの交換: 手順 41、 3の画像 2 MacBook Air 13インチ Late 2010の上部ケースの交換: 手順 41、 3の画像 3
    • 慎重にキーボードのリボンケーブルを片手で持ち上げながら、スパッジャーの先端もしくは指先を使って、キーボードリボンケーブルのZIFソケット上にある固定フラップを持ち上げます。

    • ソケット自体ではなく、ヒンジのついた固定フラップを持ち上げてください。

    • キーボードリボンケーブルをAirの正面端に向けてソケットからまっすぐ引き抜きます。

  42. MacBook Air 13インチ Late 2010の上部ケースの交換: 手順 42、 1の画像 1
    • 次の7本のネジを外します。

    • トラックパッドを上部ケースに固定している1.6mmプラスネジを6本外します。

    • 上部ケースの正面端付近に留められた1.4 mm T5 トルクネジを1本外します。

    • 再組み立ての際は、ネジをきつく締めすぎないようにご注意ください。ボタンがある時点でクリックしなくなります。トラックパッドの可動側の遊びが最小限になるまで調整してからネジを締めてください。

    Great guide. The only problem was that I didn't have such small Phillips screwdriver for the last step, so I needed to make a quick trip to a shop. Although it's standard tool, perhaps it makes sense to add it to required tools section?

    Jaroslaw Lipski - 返信

    @Jaroslaw Lipski (or anyone else) - I ran into the same problem in that I did not have a small enough Phillips screwdriver for the last step -- Does anyone know what exact screwdriver I need?

    oscarmazariegosfacebook -

    PH00 and push high pressher. but sometime false and cannot screw any more. its too difficult and never back. I cannot and buy keyboard and trackpad.

    taizoy0725 - 返信

  43. MacBook Air 13インチ Late 2010の上部ケースの交換: 手順 43、 1の画像 1
    • キーボードに最も近いトラックパッド端を、上部ケースの奥から慎重に持ち上げます。

    • 上部ケースからトラックパードを取り出します。

終わりに

デバイスを再度組み立てるには、この説明書の逆の順番で組み立ててください。

36 の人々がこのガイドを完成させました。

以下の翻訳者の皆さんにお礼を申し上げます:

en jp

100%

これらの翻訳者の方々は世界を修理する私たちのサポートをしてくれています。 あなたも貢献してみませんか?
翻訳を始める ›

作成者

9人の作成者と共同で作成されました。

Andrew Bookholt

586,109 ポイント

619のガイドは作成済み

7 件のコメント

I'm pretty experienced in dismantling/reassembling Aluminum MacBook Pros, plastic MacBooks, aluminum Powerbooks and various iBooks and this was not bad at all. Mostly just time-consuming.

I'm not sure I'd rate it as "difficult" for those with previous experience. The screw count is particularly low by comparison to other machines I've worked on, and there are only a few different types of screw.

The new top case arrived with the adhesives to re-secure the speakers, new screws to attach the trackpad, and the microphone was pre-installed.

Excellent guide, and a great help as always. Thanks!

charlesveit - 返信

I just repaired my mba after spilling some juice on it... I did it in about 2hours, i kept track of the screws in each step and i must say it wasn't difficult at all, and i have no experience with computer so.. Just be careful with some wires and when you disconnect the monitor but that's all. I'm so happy my mba works again! The upper case and the tools arrived very quick and with adhesives and some extra screws (much appreciated since the stock screws were kind of damaged and i had to break one) for the trackpad. Thanks ifixit!

Bonsaycow - 返信

Right On! I did the whole thing in 2 hours. Great guide and I would rate this task as medium not difficult. Thanks again spot on!!

Son of Raven

Chris - 返信

Just completed the upper case replacement today due to a failed keyboard and also a failed touch pad (due to liquid damage). Took a few hours to take it apart (and be careful as I was doing it) found hardest part was keeping track of screws and parts. I ended up using plastic red/white Solo cups with the Step # written on each cup (so you don't confuse the screws per step). Undoing the retaining clips for ribbon wires was hardest part highly recommend using a spudger with a fine tip as these are very tiny parts.

Rich Davies - 返信

The instructions were great. I used a white plastic ice-tray to hold the screws and fill each cube up sequentially. All you have to do, is work backwards through the recesses to where you started. No way to mix things up and hard to tip over.

Andrew Burroughs - 返信

Photos and descriptions are so good I was able to do this with no experience. My wife and I did it together which was like a cheap date. Two people came in handy mating the display to the hinges while keeping the shims lined up.

We had to temporarily tape the shims in place to get things to line up for screw installation.That was the crux move of this repair.Thank you for the write up.

joseph armistead - 返信

Great guide - ice tray idea was good - wrote numbers of the compartments with a sharpie, and wrote them on the printed guide. Took around 1.5 hours to do a keyboard (ie, bottom half of laptop) swap.

Noted that the rubber gasket around the fan didnt quite go back properly (should be noted it seems to need to be fitted before the logic board goes back).

Also I picked up a replacement bottom half from ebay with the speakers and mike already in place, so that removed the most dubious part of the exercise.

Wouldnt call this hard - id call it medium…. Hard is a screen swap on a 3DS - I failed on that one… RIP 3ds

Also was surprised how easy the screen connector was to open / close, and by how small the flaps are on the other flatflex connectors.

George Styles - 返信

コメントを追加

統計データ:

過去 24時間: 2

過去 7 日: 7

過去 30 日: 23

今までの合計 36,469