はじめに
このガイドを使って、壊れたMacBook Air 11インチ Mid 2012 右側スピーカーを交換します。
必要な工具と部品
-
-
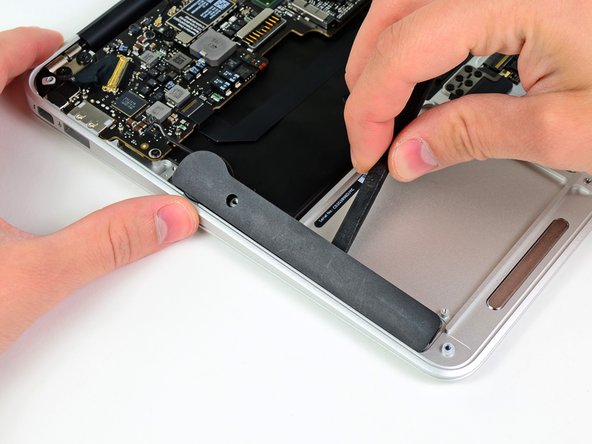
スパッジャーの平面側先端を使って、ロジックボードのソケットからバッテリーコネクターを上に抜き上げて外します。
-
ロジックボードから外したコネクターのケーブルをわずかに曲げて、コネクター部分がが誤ってソケットに接触しないようにします。
I performed this on my MacBook Air (11-inch, Mid 2011), model A1370. Rather than using the spudger to un-attach the batter connector, I gripped either side with my fingers as the second photographs indicated, and gently pry/wiggled it up and out by initially pinching into the side gap with my finger nails. The reason I did it this way is that the spudger works by leverage and I was afraid to rest it against the components surrounding the connector. The photos and instructions are excellent and illustrate the maneuver perfectly.
Hello there... In my case by battery exploded.... Can I still try to change it using these instructions?
The instruction to lift the edges of battery connector before disconnecting is certainly not clear. In my case, the cconnector pins came off the board with the battery, requiring further costly repairs. I would suggest that this instruction be more specific and include a caution.
It worked fine for me, but as others mentioned, you need to be careful to remove the battery connector from the motherboard connector and not accidentally remove the motherboard connector from the motherboard itself.
Additionally, on reassembly, I found that quit a bit of pressure was needed to get the new battery's connector to snap in place. More than I was comfortable applying, but it was necessary and it worked without a problem.
I just used my finger(nails), came off easily (even though i have a full iFixIt set).
-
-
-
-
バッテリーを外すためには、以下の5本のネジを外します:
-
T5 トルクスネジ 5.2mm 2本
-
T5 トルクスネジ 6mm 1本
-
T5 トルクスネジ 2.6mm 2本
-
-
-
バッテッリーは、ロジックボードに近い方から持ち上げ、上部ケースより外します。
-
100%になるまで充電します。充電後も最低2時間はプラグを繋げたままにします。それからプラグを外して、通常通り使用しながら、自然に放電させます。バッテリー残量小のサインが表示されたら、これまでの作業を保存して、スリープ状態になるまで放置してください。スリープ状態に入ったら、少なくとも5時間置きます。それから一気に100%まで充電します。
-
新しいバッテリーを装着後、通常通り作動しない場合は、MacBook ProのSMCをリセットしなければならない可能性があります。
I'm having trouble reconnecting the pins to the new battery cable. Any suggestions?
In my case, the replacement battery cable was quite stiff. In order to properly connect it to the logic board, BEFORE screwing the battery into the board, I carefully bent the cable and I connected it to the board. AFTER connecting the cable, carefully move the part of the batter closest to the logic board into place, and take care of those screws first.
Chris 1000 - 返信
Followed the instructions and everything went smoothly. Less than 20 minutes later everything assembled and my MacBook Air working very well.
Thanks
Luis Lopes - 返信
As with Chris 1000, the replacement battery cable is stiff. First position the battery loosely into it's slot, then align the cable connector over the pins & press gently but firmly to seat the connector. Secondly, seat the battery to line up with all of it's screw fasteners for the reassembly.
Instructions did not mention the plastic film on top of the battery. Similar to a peel away film on a new phone. But it had screws holes in it and does not peel away as easily as a phone Peels away from edge easily enough but had a little "pull" to it over the cells. For now I left it. Quick google searches did not clarify the issue. If anyone can confirm I should pull it off I'll open it up again and remove. The install is easy.
I think I saw a note that said to leave it. But side-note, i'm glad to see someone replacing the battery more recently, as I just purchased myself a new macbook but my son asked if we can replace the battery and I honestly didn't even realize that it was possible for some reason. I think for the minimal cost involved and the fact that my 2011 still works flawlessly he'll enjoy it for a few more years to come as well. I hope the new ones are made as well quality wise!!
-


デバイスを再組立する際は、これらのインストラクションを逆の順番に従って作業を進めてください。
デバイスを再組立する際は、これらのインストラクションを逆の順番に従って作業を進めてください。
12 の人々がこのガイドを完成させました。
以下の翻訳者の皆さんにお礼を申し上げます:
100%

Midori Doiさんは世界中で修理する私たちを助けてくれています! あなたも貢献してみませんか?
翻訳を始める ›

When you say:
Remove the following ten screws:
Two 8 mm 5-point Pentalobe screws
Eight 2.5 mm 5-point Pentalobe screws
Do the 8mm & 2.5mm dimensions refer to the LENGTH of those screws, or the size of the pentalobe? That is, are there other sizes of pentalobe drivers like there are for hex, phillips and torx? When only one dimension is provided, it is usually the socket/driver size, not the screw length, maybe since the length cannot be seen when the screw is installed.
Can I suggest that you clarify your instructions so folks are confident they are only in need of _one_ pentalobe driver?
Nerdily yours,
Larry (whose iPhone 4S can now get through a day without 6 recharges thanks to ifixit.com ;-)
larryleveen - 返信
The 8mm and 2.5mm are the length of the screws. One pentalobe P5 screwdriver suffices for all the screws (P5 is implicitly the size of the pentalobe screw heads).
Michael Welham -
I sourced all the parts from ifixit, plus a magnetic project mat which I found to be very useful for organising the teardown and reassembly.
Allen - 返信
The magnetic mat is
GERARD SZAREK -
Keep the 2.5mm tiny screws away from the MagSafe connector as they will be attracted and sucked in to the magnet.
Frank O'Carroll - 返信
A tip an old bench tech taught me that has saved me many times: I put clear “Scotch” tape over the case screws as they became “free”. The tape kept them in place while I lifted the lid off, cleaned it etc.
Michael Mee - 返信
Thank you for a really smart tip! I will be using that countless more times!
Lilljedahl -
I’m confused about internet recovery and installing MacOS. Is all of this done before placing in the new ssd card or after. I don’t have any files that I would like to safe/transfer, is all of this necessary, if I don’t do it before placing new ssd, will I still be able to instal/upgrade macOS afterwards.
It’s an old Mac and now it won’t start or charge, I know I will have to replace battery and put new battery first and turn on Mac before doing the ssd stuff. Since it won’t effing start.
I’m really clueless about backing up old ssd, since I don’t need any files, besides MacOS(software) ,and is that related to the ssd?
AMG - 返信
The answer to your question: You need to insert your SSD into the computer before internet recovery. If you start the recovery before inserting SSD, it won’t affect the setup, you won’t damage anything. But your SSD will not be detected (as there isn’t one inserted.)
Also, a little tip: If you bought a used SSD, go into Disk Utility and format the drive with the highest security level to permanently remove all of the previous files.
Also a FYI: Internet Recovery will load up Mac OS X 10.9.5 Mavericks, so I would recommend making a recovery drive from a Big Sur (or desired version) through another Mac, and a USB. You can visit this support doc: https://support.apple.com/en-us/HT201372
Hope this helps! -Dan
danielwen -
I got a macbook air with a damaged and swollen battery. I could remove all screws, except one 2,5 mm screw. I’m afraid it got damaged while attempting to remove it, I have no grip with the P5 pentalobe screwdriver. How can I proceed?
Robert Hermans - 返信
Hi Robert!
Try some techniques found in this stripped screw removal guide. Good luck!
Arthur Shi -
Hello I have a macbook air they are say they do not have parts for my laptop macbook air 11 inches 2013 mid need to replace battery which one to buy
vensilver - 返信
Hello! This is the part you want—maybe we’re not able to ship it to you if you’re out of the United States. The battery in your MacBook Air should be the same for all 11” between mid-2011 to early-2015.
Arthur Shi -
The smaller screws went in more easily when I put back all the screws along the hinge edge first.
Rachel Slatkin - 返信