はじめに
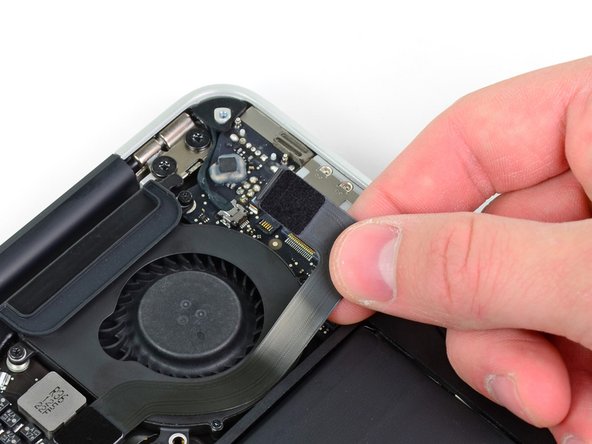
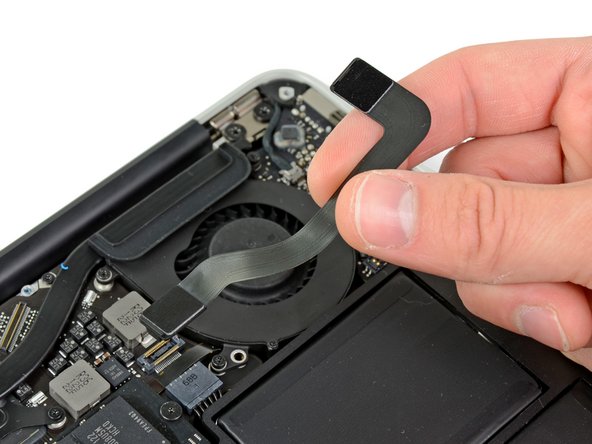
損傷したI/Oボードのリボンケーブルを交換するにはこのガイドを使用してください
必要な工具と部品
-
-
-
スパッジャーの平面側先端を使用して、バッテリーコネクター両側の短辺を持ち上げて、ロジックボードのソケットから外します。
-
アクシデントでコネクタがソケットに接触しないように、バッテリケーブルをロジックボードから少し離して反対側に折り曲げます。
My macbook air's configuration (Mid-2011 core i5) has a different battery connector. It slides into a receptacle on the logic board. If your battery connector does not look like the one pictured, use the pointy end of a spudger to depress the small indentation in the middle of the battery connector cable terminal, and pull aft to release the clasp mechanism.
Maybe your battery connector doesn't match the picture because these instructions are for the mid-2012 model and yours is mid-2011.
-
デバイスを再組み立てする際は、これらの手順を逆の順番に従って作業を進めてください。
デバイスを再組み立てする際は、これらの手順を逆の順番に従って作業を進めてください。
3 の人々がこのガイドを完成させました。
以下の翻訳者の皆さんにお礼を申し上げます:
100%
sfukukawaさんは世界中で修理する私たちを助けてくれています! あなたも貢献してみませんか?
翻訳を始める ›
コメント 1 件
I had no sound (input/output), no video, no ability to work on battery. I followed the steps and discovered that both the battery and the i/o board where not properly connected. So following this manual fixed it all. Many thanks!


When you say:
Remove the following ten screws:
Two 8 mm 5-point Pentalobe screws
Eight 2.5 mm 5-point Pentalobe screws
Do the 8mm & 2.5mm dimensions refer to the LENGTH of those screws, or the size of the pentalobe? That is, are there other sizes of pentalobe drivers like there are for hex, phillips and torx? When only one dimension is provided, it is usually the socket/driver size, not the screw length, maybe since the length cannot be seen when the screw is installed.
Can I suggest that you clarify your instructions so folks are confident they are only in need of _one_ pentalobe driver?
Nerdily yours,
Larry (whose iPhone 4S can now get through a day without 6 recharges thanks to ifixit.com ;-)
larryleveen - 返信
The 8mm and 2.5mm are the length of the screws. One pentalobe P5 screwdriver suffices for all the screws (P5 is implicitly the size of the pentalobe screw heads).
Michael Welham -
I sourced all the parts from ifixit, plus a magnetic project mat which I found to be very useful for organising the teardown and reassembly.
Allen - 返信
The magnetic mat is
GERARD SZAREK -
Keep the 2.5mm tiny screws away from the MagSafe connector as they will be attracted and sucked in to the magnet.
Frank O'Carroll - 返信
A tip an old bench tech taught me that has saved me many times: I put clear “Scotch” tape over the case screws as they became “free”. The tape kept them in place while I lifted the lid off, cleaned it etc.
Michael Mee - 返信
Thank you for a really smart tip! I will be using that countless more times!
Lilljedahl -
I’m confused about internet recovery and installing MacOS. Is all of this done before placing in the new ssd card or after. I don’t have any files that I would like to safe/transfer, is all of this necessary, if I don’t do it before placing new ssd, will I still be able to instal/upgrade macOS afterwards.
It’s an old Mac and now it won’t start or charge, I know I will have to replace battery and put new battery first and turn on Mac before doing the ssd stuff. Since it won’t effing start.
I’m really clueless about backing up old ssd, since I don’t need any files, besides MacOS(software) ,and is that related to the ssd?
AMG - 返信
The answer to your question: You need to insert your SSD into the computer before internet recovery. If you start the recovery before inserting SSD, it won’t affect the setup, you won’t damage anything. But your SSD will not be detected (as there isn’t one inserted.)
Also, a little tip: If you bought a used SSD, go into Disk Utility and format the drive with the highest security level to permanently remove all of the previous files.
Also a FYI: Internet Recovery will load up Mac OS X 10.9.5 Mavericks, so I would recommend making a recovery drive from a Big Sur (or desired version) through another Mac, and a USB. You can visit this support doc: https://support.apple.com/en-us/HT201372
Hope this helps! -Dan
danielwen -
I got a macbook air with a damaged and swollen battery. I could remove all screws, except one 2,5 mm screw. I’m afraid it got damaged while attempting to remove it, I have no grip with the P5 pentalobe screwdriver. How can I proceed?
Robert Hermans - 返信
Hi Robert!
Try some techniques found in this stripped screw removal guide. Good luck!
Arthur Shi -
Hello I have a macbook air they are say they do not have parts for my laptop macbook air 11 inches 2013 mid need to replace battery which one to buy
vensilver - 返信
Hello! This is the part you want—maybe we’re not able to ship it to you if you’re out of the United States. The battery in your MacBook Air should be the same for all 11” between mid-2011 to early-2015.
Arthur Shi -
The smaller screws went in more easily when I put back all the screws along the hinge edge first.
Rachel Slatkin - 返信