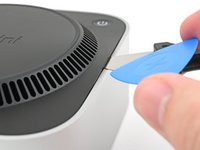
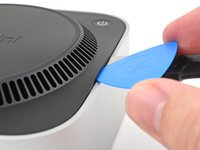
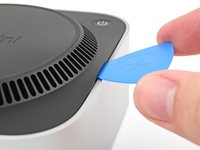
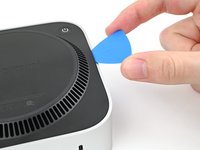
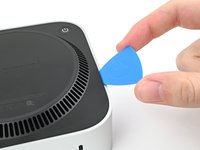
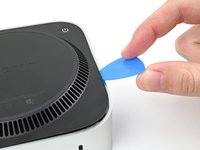
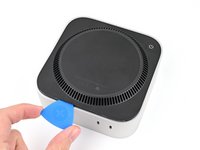
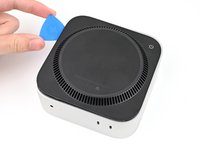
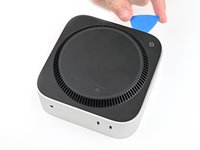
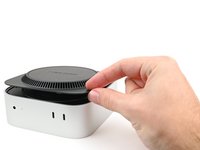
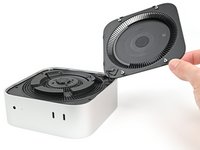
メインコンテンツにスキップ

Mac mini (2024) 底面カバーの交換

必要な工具と部品

  1. Mac mini (2024) 底面カバーの交換, 作業を始める前に: 手順 1、 2の画像 1 Mac mini (2024) 底面カバーの交換, 作業を始める前に: 手順 1、 2の画像 2
    • Mac miniを完全にシャットダウンし、すべてのケーブルを取り外します。

    • Mac miniを裏返し、シャーシに傷がつかないよう、きれいで平らな面に置きます。

  2. Mac mini (2024) 底面カバーの交換, 隙間を作る: 手順 2、 3の画像 1 Mac mini (2024) 底面カバーの交換, 隙間を作る: 手順 2、 3の画像 2 Mac mini (2024) 底面カバーの交換, 隙間を作る: 手順 2、 3の画像 3
    • この手順でJimmyやその他のメタル工具を使用すると、アルミニウムシャーシに傷がつく可能性があります。ただし、これが最も簡単な方法です。アルミニウムに傷をつけたくない場合は、この下に記載されている代わりの手順に従ってください。

    • Jimmyを底面カバーとシャーシの隙間に挿入します。

    • 底面カバーをこじ上げて隙間を作ります。

    • 別の方法として、スパッジャーの先端をプラスチック製通気孔の1つに差し込み、こじ上げて隙間を作り、開け棒を挿入できる十分な大きさの隙間を作ります。

    • Jimmyは底面カバーの下に差し込んだままにしておきます。

  3. Mac mini (2024) 底面カバーの交換, オープニングピックを挿入する: 手順 3、 3の画像 1 Mac mini (2024) 底面カバーの交換, オープニングピックを挿入する: 手順 3、 3の画像 2 Mac mini (2024) 底面カバーの交換, オープニングピックを挿入する: 手順 3、 3の画像 3
    • オープニングピックを、Jimmyで作った隙間に挿入します。

    • Jimmyを取り出します。

  4. Mac mini (2024) 底面カバーの交換, ピンを外す: 手順 4、 3の画像 1 Mac mini (2024) 底面カバーの交換, ピンを外す: 手順 4、 3の画像 2 Mac mini (2024) 底面カバーの交換, ピンを外す: 手順 4、 3の画像 3
    • オープニングピックがピンに引っかかるまで、底面カバーに沿ってスライドします。

    • ピンは、底面カバーの各コーナーに1つずつ、合計4つあります。

    • ピックをひねってピンをスロットから持ち上げます。

  5. Mac mini (2024) 底面カバーの交換: 手順 5、 3の画像 1 Mac mini (2024) 底面カバーの交換: 手順 5、 3の画像 2 Mac mini (2024) 底面カバーの交換: 手順 5、 3の画像 3
    • 底部カバーの周囲に沿ってピックをスライドして、こじ開けながら残りのピンを外します。

    • 電源ボタンの近くをスライドさせるときは、ケーブルを破損しないように、ピックを2㎝以上差し込まないでください。

    • 再組み立ての際は、4つのピンがすべてカチッと音がして所定の位置に装着するのを感じるまで、底面の周囲に沿って押しこんでください。

  6. Mac mini (2024) 底面カバーの交換: 手順 6、 2の画像 1 Mac mini (2024) 底面カバーの交換: 手順 6、 2の画像 2
    • 底面カバーは外さないでください。まだMac miniとケーブルで繋がっています。

    • 電源ボタンの反対側にある底面カバーの端を持ち上げて裏返し、電源ボタンケーブルを露出させます。

  7. Mac mini (2024) 底面カバーの交換, 電源ボタンの接続を外す: 手順 7、 2の画像 1 Mac mini (2024) 底面カバーの交換, 電源ボタンの接続を外す: 手順 7、 2の画像 2
    • 電源ボタンケーブルは非常に壊れやすいです! 内部へアクセスするためにケーブルを外す必要はありませんが、底面カバーを支えて電源ボタンケーブルが切れないようにしておく必要があります。

    • ケーブルを外して底面カバーを外すには以下の2つのステップに従ってください。

    • ケーブルを外さない場合は、ケーブルに負荷を掛けないよう底面カバーを立てかけて、次の2ステップはスキップしてください。

    • 電源ボタンケーブルをヘッドの近くで掴み、ソケットから引き離して外します。

  8. Mac mini (2024) 底面カバーの交換, 底面カバーを外す: 手順 8、 1の画像 1
    • 底面カバーを外します。

終わりに

デバイスを再組み立てするには、以下の順序を逆にたどってください。

修理が計画通りに進まなかった場合、基本的なトラブルシューティングを試すか、Mac mini (2024)のアンサーコミュニティに助けを求めてください。

3 の人々がこのガイドを完成させました。

以下の翻訳者の皆さんにお礼を申し上げます:

en jp

100%

これらの翻訳者の方々は世界を修理する私たちのサポートをしてくれています。 あなたも貢献してみませんか?
翻訳を始める ›

Alex Diaz-Kokaisl

メンバー登録日: 01/16/22

212,584 ポイント

1,039のガイドは作成済み

チーム

iFixit iFixit人のメンバー

Staff

123 メンバー

23,608のガイドは作成済み

3件のガイドコメント

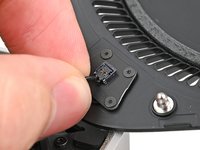
I ripped the crimps off of my power cable because I was pulling out instead of up. Is a new power button cable available for sale somewhere?

Adam Davenport - 返信

@alexdk I created a draft update to the guide with some text with an easier way to open this without potentially marring the aluminum with the Jimmy.

Can you take a look and maybe reword it and give it a test yourself using just a pair of normal spudgers, one in a vent slot to gently lift the edge and one to pry close to the "pins" next to the edge alignment plastic clips (which is a misnomer because they are only for alignment and don't clip anything, only the pins hold things together)?

You can always determine the correct orientation to pry near the pins because they are on the "ends" of the mac mini text, aka left and right as you are reading the words.

dragon788 - 返信

Hello!

Thank you for the suggestions! I tried out the double spudger technique, and it worked somewhat well. I had to really dig the tip of a spudger into the vent, which will have varying mileage for people with dull tips. It was also difficult to get a good enough angle so I could pry up on the edge of the Mac Mini without holding it down with another hand. With that said, I'll incorporate it as alternative procedure for people who want to avoid marring the aluminum (because you're 100% right it will probably happen). I'll make that clear.

Alex Diaz-Kokaisl -

コメントを追加

統計データ:

過去 24時間: 5

過去 7 日: 61

過去 30 日: 347

今までの合計 3,927