メインコンテンツにスキップ

Mac mini (PowerPC) Fan Replacement

必要な工具と部品

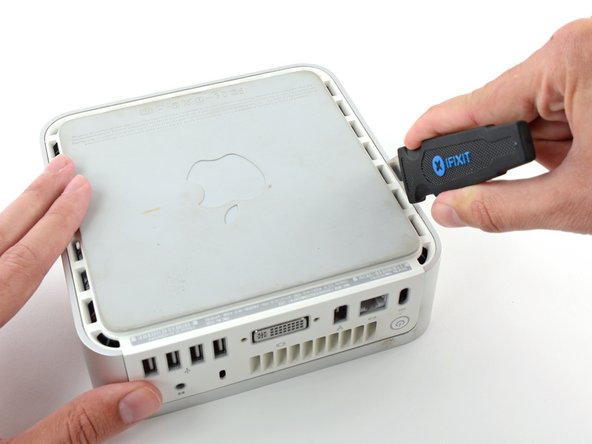
  1. Mac mini (PowerPC) Fan Replacement, Top Housing: 手順 1、 2の画像 1 Mac mini (PowerPC) Fan Replacement, Top Housing: 手順 1、 2の画像 2
    • Power down your Mac mini, disconnect all of the cables, and flip it over.

    • Insert the Jimmy into the crack between the aluminum top housing and the plastic lower housing.

    • The Jimmy should reach a stop about 3/8" down.

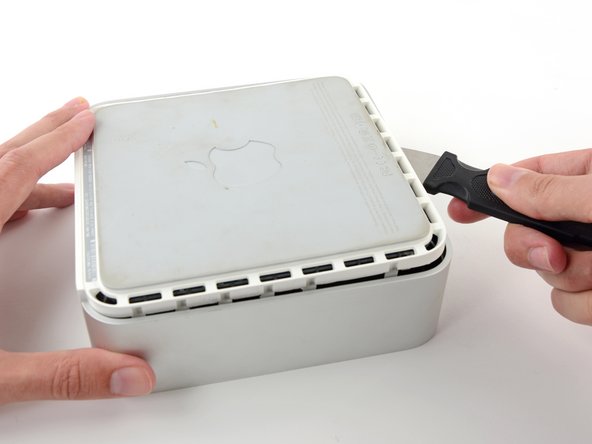
  2. Mac mini (PowerPC) Fan Replacement: 手順 2、 3の画像 1 Mac mini (PowerPC) Fan Replacement: 手順 2、 3の画像 2 Mac mini (PowerPC) Fan Replacement: 手順 2、 3の画像 3
    • Gently bend the Jimmy outwards to pry the crack open a little larger and lift the lower housing up a small amount.

    • There are several plastic clips on the lower housing that fit into a channel in the aluminum top housing. Your goal is to use the Jimmy to push these clips inward enough to free them from the channel, while gently pulling up on the lower housing.

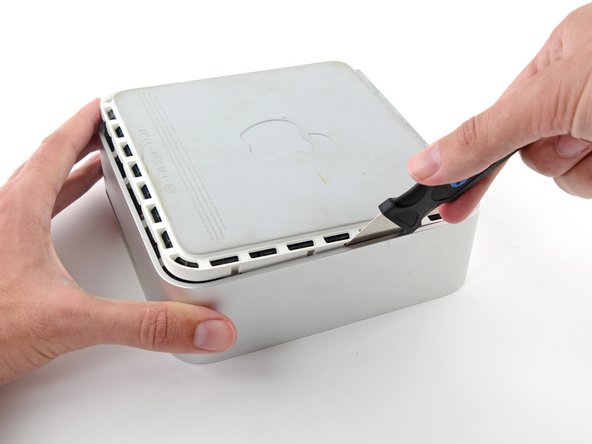
  3. Mac mini (PowerPC) Fan Replacement: 手順 3、 2の画像 1 Mac mini (PowerPC) Fan Replacement: 手順 3、 2の画像 2
    • Once you have the first side free, rotate the Mac mini and start prying up on the front edge.

    • Use the same prying motion to both bend the clips inward and lift the lower housing up out of the top housing.

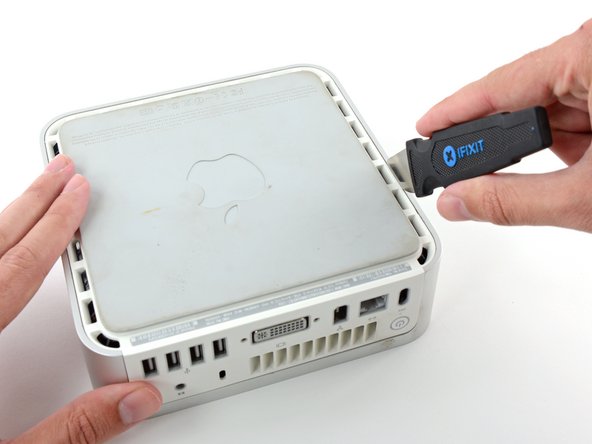
  4. Mac mini (PowerPC) Fan Replacement: 手順 4、 2の画像 1 Mac mini (PowerPC) Fan Replacement: 手順 4、 2の画像 2
    • You may need to move the Jimmy along the edge to pry up all of the clips. Be patient and do a little bit at a time.

  5. Mac mini (PowerPC) Fan Replacement: 手順 5、 2の画像 1 Mac mini (PowerPC) Fan Replacement: 手順 5、 2の画像 2
    • Keep working around the perimeter, freeing the clips along the final edge.

  6. Mac mini (PowerPC) Fan Replacement: 手順 6、 2の画像 1 Mac mini (PowerPC) Fan Replacement: 手順 6、 2の画像 2
    • Flip the Mac mini back over and lift the top housing off of the lower housing.

  7. Mac mini (PowerPC) Fan Replacement, Mass Storage Unit: 手順 7、 1の画像 1
    • If your mini does not have Airport installed, then skip this step.

    • Grasp the Airport antenna board and lift it off of the two plastic posts holding it in place. You may need to push back the black plastic tab jutting through the lower left corner of the board.

  8. Mac mini (PowerPC) Fan Replacement: 手順 8、 1の画像 1
    • Remove the yellow tape securing the power button cable to the black plastic framework.

  9. Mac mini (PowerPC) Fan Replacement: 手順 9、 1の画像 1
    • Remove the three black Phillips screws securing the plastic framework to the logic board and lower case.

  10. Mac mini (PowerPC) Fan Replacement: 手順 10、 1の画像 1
    • Grasp the optical drive and mass storage unit in one hand and lift up enough so that you can see beneath it.

  11. Mac mini (PowerPC) Fan Replacement: 手順 11、 1の画像 1
    • If your mini has neither an Airport card nor a Bluetooth board, you can simply lift the optical drive up and away. Otherwise, you need to disconnect the Airport and/or Bluetooth antenna cables first.

    • With your free hand, pull the Bluetooth cable up from Bluetooth board and unplug the Airport antenna cable from the right of the Airport card. Caution: both of these connections are very small. When re-assembling unit after repair, you may want to remove the two screws holding the airport card to the assembly and lift the card up and out to re-attach the cables.

  12. Mac mini (PowerPC) Fan Replacement, Fan: 手順 12、 1の画像 1
    • Flip the mass storage assembly over so that the fan faces up.

    • Remove the three long, black Phillips screws from the corners of the fan. These screws are strongly threaded, and will offer significant resistance.

    • There is no screw in the bottom left corner.

  13. Mac mini (PowerPC) Fan Replacement: 手順 13、 1の画像 1
    • Lift the fan up and deroute its cable from the plastic framework and the bottom of the hard drive, removing tape as necessary.

  14. Mac mini (PowerPC) Fan Replacement: 手順 14、 1の画像 1
    • The cable you're about to remove is very fragile - do not pull directly on the wires. Instead, try to pry up the connector directly, using your fingernails or a small flathead screwdriver if necessary.

    • Disconnect the fan connector from the interface board.

終わりに

To reassemble your device, follow these instructions in reverse order.

4 の人々がこのガイドを完成させました。
作成者

4人の作成者と共同で作成されました。

iRobot

メンバー登録日: 09/24/09

1 ポイント

636のガイドは作成済み

0 件のコメント

コメントを追加

統計データ:

過去 24時間: 1

過去 7 日: 3

過去 30 日: 12

今までの合計 12,229