メインコンテンツにスキップ

必要な工具と部品

この分解は修理ガイドでは ありません。 お持ちのMac Pro 2009-2012を修理する際は、iFixitの修理ガイドをご利用ください。

  1. Mac Pro Mediados 2009 Desmontaje, Mac Pro Mediados 2009 Desmontaje: 手順 1、 1の画像 1
    • Saqué el Mac Pro aparte

  2. Mac Pro Mediados 2009 Desmontaje: 手順 2、 1の画像 1
    • Añadido el PSU

  3. Mac Pro Mediados 2009 Desmontaje: 手順 3、 1の画像 1
    • Se a añadido la placa de plano

    I believe the image in step 3 is the graphics card and not the backplane.

    tpisellijr - 返信

    yeah this is the graphics card.

    Ssamydla - 返信

  4. Mac Pro Mediados 2009 Desmontaje: 手順 4、 1の画像 1
    • Tablero del panel frontal

  5. Mac Pro Mediados 2009 Desmontaje: 手順 5、 1の画像 1
    • Aquí puede ver los LEDs del Mac Pro y el fondo DIAG_LED

  6. Mac Pro Mediados 2009 Desmontaje: 手順 6、 1の画像 1
    • El tablero del panel frontal al cable del tablero de la placa

  7. Mac Pro Mediados 2009 Desmontaje: 手順 7、 1の画像 1
    • Otra vista de la junta del panel frontal

  8. Mac Pro Mediados 2009 Desmontaje: 手順 8、 1の画像 1
    • Otra vista del tablero de la placa

  9. Mac Pro Mediados 2009 Desmontaje: 手順 9、 1の画像 1
    • Tablero de la placa y tablero del panel ligado por el tablero del panel al cable del tablero

  10. Mac Pro Mediados 2009 Desmontaje: 手順 10、 1の画像 1
    • Antena Bluetooth conectada a la tarjeta en el tablero de la placa. Uno debe tener cuidado por que si no esta conectada la antena necesita ser conectada para no causar cortocircuito en el panel del tablero de la placa.

  11. Mac Pro Mediados 2009 Desmontaje: 手順 11、 1の画像 1
    • Una vista a las ranura PCI del Mac Pro Mediados 2009

  12. Mac Pro Mediados 2009 Desmontaje: 手順 12、 1の画像 1
    • Cables del impulsión ópticos en el tablero de la placa de plano.

  13. Mac Pro Mediados 2009 Desmontaje: 手順 13、 1の画像 1
    • Una vista del botón del encendido que se necesita conectar en el panel frontal.

  14. Mac Pro Mediados 2009 Desmontaje: 手順 14、 1の画像 1
    • Jaula del Procesador

  15. Mac Pro Mediados 2009 Desmontaje: 手順 15、 1の画像 1
    • Ventilador izquierdo en la jaula del procesador con el altavoz.

  16. Mac Pro Mediados 2009 Desmontaje: 手順 16、 1の画像 1
    • Ventilador derecho en la jaula del procesador. Recuerde, dos clips para separar el ventilador. Arriba y abajo.

    What size are the fans?

    Luis Trejjo - 返信

  17. Mac Pro Mediados 2009 Desmontaje: 手順 17、 1の画像 1
    • Unidad con el PSU, tablero plano, tablero de placa, tablero del panel frontal.

    At this point, will it start power up? with only PSU and Boards.

    I'm trying to troubleshoot 2010 PSU/Processor issue.

    Ssamydla - 返信

  18. Mac Pro Mediados 2009 Desmontaje: 手順 18、 1の画像 1
    • Piezas pequeñas que cubren los cables de la PSU Y la Super Drive.

  19. Mac Pro Mediados 2009 Desmontaje: 手順 19、 1の画像 1
    • Disipador Térmicos del Procesador 8 Core

  20. Mac Pro Mediados 2009 Desmontaje: 手順 20、 1の画像 1
    • Disipador Térmico del Procesador 4 Core

    hola, me podrían apoyar con decir cual es el desarmador que se utiliza para desmontar los procesadores, saludos

    atomo182 - 返信

  21. Mac Pro Mediados 2009 Desmontaje: 手順 21、 1の画像 1
    • Realmente podemos ver la diferencia entre el núcleo 8 y el núcleo 4.

  22. Mac Pro Mediados 2009 Desmontaje: 手順 22、 1の画像 1
    • Jaula del Procesador y altavoces izquierdos y derechos.

  23. Mac Pro Mediados 2009 Desmontaje: 手順 23、 1の画像 1
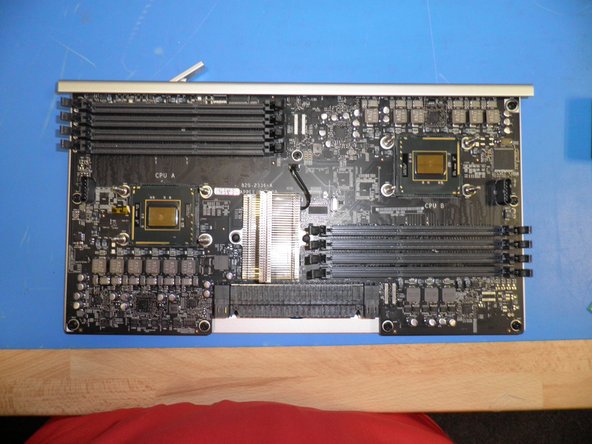
    • Una bonita vista de la placa del procesador 8 Core.

  24. Mac Pro Mediados 2009 Desmontaje: 手順 24、 1の画像 1
    • CPU B de la placa procesadora.

  25. Mac Pro Mediados 2009 Desmontaje: 手順 25、 1の画像 1
    • CPU B del tablero del procesador.

  26. Mac Pro Mediados 2009 Desmontaje: 手順 26、 1の画像 1
    • Procesador y disipador térmico.

  27. Mac Pro Mediados 2009 Desmontaje: 手順 27、 1の画像 1
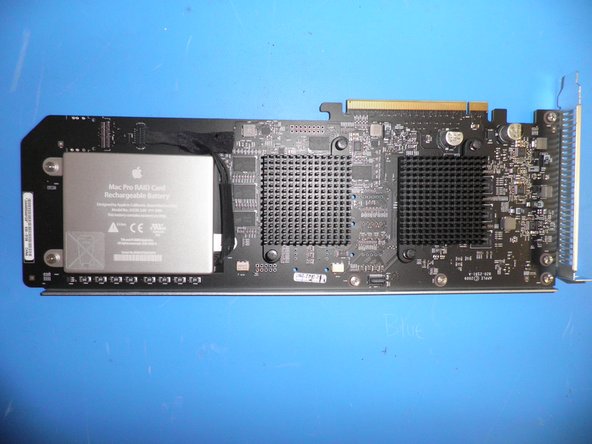
    • Tarjeta RAID par Mac Pro Mediados 2009.

  28. Mac Pro Mediados 2009 Desmontaje: 手順 28、 1の画像 1
    • Tarjeta Gráfica.

  29. Mac Pro Mediados 2009 Desmontaje: 手順 29、 1の画像 1
    • Tarjeta Fibre Channel.

  30. Mac Pro Mediados 2009 Desmontaje: 手順 30、 1の画像 1
    • Finalmente la maquina se reconstruyo.

以下の翻訳者の皆さんにお礼を申し上げます:

en es

100%

Miguelさんは世界中で修理する私たちを助けてくれています! あなたも貢献してみませんか?
翻訳を始める ›

作成者

7人の作成者と共同で作成されました。

zongo

メンバー登録日: 11/24/09

453 ポイント

1ガイドが承認済み

23 件のコメント

Hello,

I have Mac Pro 5,1 intel Xeon W3565 at 3.2 GHz Quad-Core.

It is easy to upgrade in W3565 at 3.33 GHz 6-Core ???

Any intel Xeon W3565 fit in my Mac Pro ?

What CPU sockets supported for ?

Thank you,

Stefanos.

StefMacGR - 返信

It is socket-b(LGA 1366)

I think it is easy to upgrade your CPU

sendercustom - 返信

It should be easy to upgrade a single-cpu Pro, they use standard lidded Xeons. I am planning on upgrading to W3690s in a couple of 4,1 machines that have had their firmware flashed to 5,1.

tobiasboyd - 返信

Please let me know how you handle that upgrade!! Or add a tutorial id vey much like to see that and maybe follow suit but im not very savy with these upgrades

Will -

Is it possible to easily remove and service right processor fan (the back one)? It makes too much noise, so needs some oil apparently. I didn't find any way to remove it.

Andriy Tevelyev - 返信

I replaced sockets in motherboard 820-2336-А and lose two resistors R5400 and R3613.Prompt please resistors face values.Thanks!

fpiteful - 返信

Is it possible to replace the fans with quieter fans?

Patrick van Bavel - 返信

I have acquired a MacPro 4,1 from my friend who no longer needed it and couldn't get it working anyway. The weirdest thing is none of the internal drives show up, not even when booting off an external OS drive, and the ethernet ports as well. Everything else seems to work, installed a fresh copy of El Capitan on an external and all works but these two items. Makes me believe that there may be a disconnected or bad cable to the backplane but I am having a hard time finding the info online and any pictures on what to look for. Any ideas or suggestions?

Allen Berrebbi - 返信

Hello barrebbi, I just had the same problem happen to me the macpro was working well and all of the sudden the drives disappear and the internet connection was gonne too . I try to unplug everything and do a pram clean and nothing, the next thing I will do is run the ahd diagnose utility for this computer. what I am missing is the internal drivers the 4 internal sata’s but the optical drives are working fine, also I lost the wifi, ethernet and the optical audio port. the external audio is fine. I was browsing online nothing really taxing for the computer. if I cannot fix it I will install a pci usb 3 port to run external drives and a usb3 to ethernet port to get the network and internet back and a usb bluetooth dongle. If anyone can help or guide us to find a solution I will great appreciated. Berrebbi if you find anything please advice I will do so too. Thanks in advance.

Titaniumark -

Sorry, I have not been able to get an answer yet. And for some reason, this model won’t upgrade bootcamp to Windows 10 (or 8) either, black screen. I’ve updated older models but not this one.

Allen Berrebbi - 返信

Still no answer for me

Allen Berrebbi -

Missing connection of HDD bays and, more importantly, the connections between the HDD bays and the logic board.

Konrad Skeri Ekblad - 返信

Still haven’t figured it out yet

Allen Berrebbi - 返信

I’m lost as to why this is titled as a “Teardown” when it is in fact an “Assembly”…

Chatbox - 返信

Is the Bluetooth connector on the motherboard a standard USB single port [Vcc, D-, D+, GND] connector ?

dan.streaman - 返信

Nope, there’s a picture in step 10- I think it’s a PCI-E connector of some type. Definitely not USB though.

Josh Calvetti -

Anyone ever figured out how to “teardown” the fan-cage assembly from the PCI lane area (the one hovering that has the PCI lock bar mechanism). The assembly is easy to remove, but !&&* if I can figure out how to free the fan from it.

I got as far as being able to release the female plug so that it could slide through the plastic, and the fan appears seated on rubber type posts, just can’t separate the two cage elements to get to it. (at least not without worrying amounts of force).

clickykbd - 返信

I need to know how you removed the bottom case with the fans. I cant find any documentation on it. Thanks

’’

marcussunde - 返信

Hello,

I disassembled my mac pro 2009 for cleaning, and putted it back together. Everything works fine, except for the power button LED. It not longer lights up. I tried reconnecting everything and resetting SMC and PRAM with no success.

KANG LOBSTAH - 返信

Hi !

Is it possible to show where is the SMC Controller Chip on the board ?

Thanks

Sly - 返信

Is the logicboard of those type same ? Can I change the quad-core logicboard with 8-core logicboard or vice versa ? Thanks.

Lazuardi Deril - 返信

You can swap the trays with another model of the same generation, yes. 2010/2012 are interchangeable , but you have to swap 2009 with 2009 parts, otherwise the fans will run at full speed due to differing low-level firmware between the 2009 and 2010 models.

Josh Calvetti -

How to connect the WiFi card to the board? Cables to connect. Screws to use? Thanks

LAB - 返信

コメントを追加

統計データ:

過去 24時間: 9

過去 7 日: 36

過去 30 日: 158

今までの合計 116,085