メインコンテンツにスキップ

Mac Pro Late 2013 ファンの交換

必要な工具と部品

  1. Mac Pro Late 2013 ファンの交換, アウターケース: 手順 1、 2の画像 1 Mac Pro Late 2013 ファンの交換, アウターケース: 手順 1、 2の画像 2
    • ロックスイッチを右側にスライドして、ロックを解除します。

  2. Mac Pro Late 2013 ファンの交換: 手順 2、 3の画像 1 Mac Pro Late 2013 ファンの交換: 手順 2、 3の画像 2 Mac Pro Late 2013 ファンの交換: 手順 2、 3の画像 3
    • Mac Proからアウターケースをまっすぐ持ち上げます。

    • ファンの中央を押し込みながら、ケースを持ち上げると上手くいきます。

  3. Mac Pro Late 2013 ファンの交換, ファンアセンブリ: 手順 3、 3の画像 1 Mac Pro Late 2013 ファンの交換, ファンアセンブリ: 手順 3、 3の画像 2 Mac Pro Late 2013 ファンの交換, ファンアセンブリ: 手順 3、 3の画像 3
    • 5.1 mmT10トルクスネジをファンアセンブリアウターケースから外します。

    You don't have to remove the fan assy to get to the wifi board & card. It can be done with the fan assy still attached.

    Fat Mango - 返信

    Fat Mango is correct. That said. If you do pull the fan assembly note that the screws are all held in with blue Permatex and breaking them free takes a fair amount of effort. Getting a good set of Torx screwdrivers is a must.

    Jim WIlson - 返信

    Hey guys, what would happen if you only replace one card.. I have a D300 but the plan is to upgrade to D500 or D600. So If I can afford and install one instead of the pair would it increase something? or will it cause any conflict? I guess I don’t understand if I the Mac Pro has 2 D300 graphic cards that means each has 1GB? Same as If I would Install 1 D600 that would increase 3GB only? Thanks.

    marcotamayo - 返信

    D300 = 2GB each card. Very few apps uses two cards at the same time.

    Gio Cas -

    The (5) Screws are Apple part number 923-0713

    Steven Gier - 返信

  4. Mac Pro Late 2013 ファンの交換: 手順 4、 2の画像 1 Mac Pro Late 2013 ファンの交換: 手順 4、 2の画像 2
    • ファンアセンブリは、IO ボード側の2つのケーブルによってコンピューターの残り部分に装着されています。

    • アセンブリをIOボードから若干斜めにします。

    • ファンアセンブリを完全に外さないでください。2本のケーブルで繋がったままです。

  5. Mac Pro Late 2013 ファンの交換: 手順 5、 1の画像 1
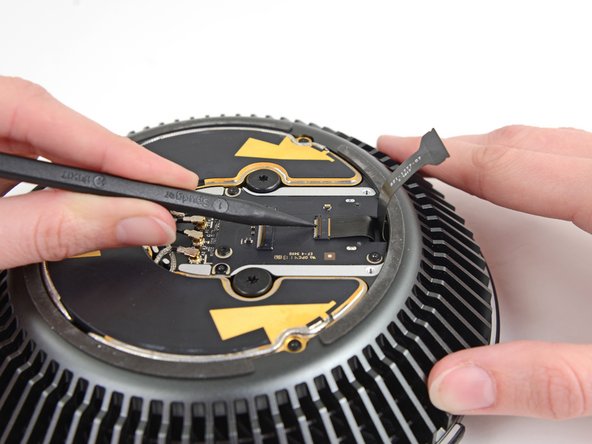
    • ファンアセンブリを片手で支えながら、ファンケーブルのブラケットに留められたT8非脱落型ネジを緩めます。

    • これらのネジはMac Proに固定されています。取り出そうとしないでください。

    On my Mac Pro (assembled mid-2017) these are T8 screws. In fact, there were no T7 screws anywhere in my machine.

    mark33 - 返信

    There was no bracket on top of the cable at all, so I got a bit confused, so I had to skip step 5 and 6.

    Rakesh - 返信

    On my machine, a TR7 worked to remove them due to the weird angle.

    Wilson Gaberino - 返信

  6. Mac Pro Late 2013 ファンの交換: 手順 6、 1の画像 1
    • ピンセットを使って、ファンアセンブリからファンケーブルブラケットを引き出します。

  7. Mac Pro Late 2013 ファンの交換: 手順 7、 2の画像 1 Mac Pro Late 2013 ファンの交換: 手順 7、 2の画像 2
    • スパッジャーの平面側先端を使って、ファンアセンブリのリボンケーブルをIOボードから接続を外します。

  8. Mac Pro Late 2013 ファンの交換: 手順 8、 1の画像 1
    • IOボードからファンアセンブリのアンテナケーブルの接続を外します。

    • Mac Proからファンアセンブリを取り外します。

    You don't have to remove the fan assy to do the steps below. They can be done with the fan assy still attached.

    Fat Mango - 返信

  9. Mac Pro Late 2013 ファンの交換, ファンアセンブリ天板: 手順 9、 3の画像 1 Mac Pro Late 2013 ファンの交換, ファンアセンブリ天板: 手順 9、 3の画像 2 Mac Pro Late 2013 ファンの交換, ファンアセンブリ天板: 手順 9、 3の画像 3
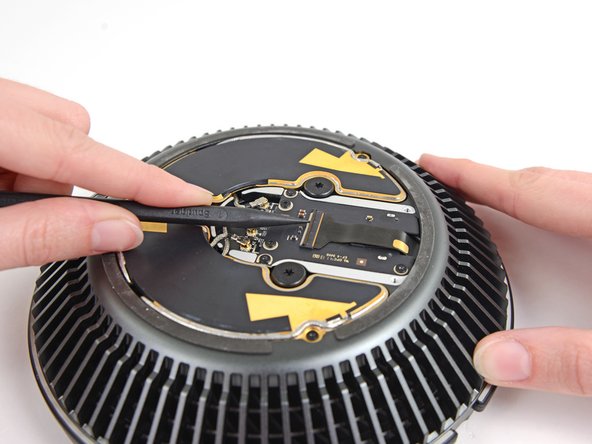
    • スパッジャーの平面側先端を使って、ファンアセンブリからファンアセンブリの天板を持ち上げます。

    • ファンアセンブリの天板を取り外します。

    There is a thin circle of double sided adhesive that must be loosened in order to remove the plastic cover.

    somethingorother - 返信

  10. Mac Pro Late 2013 ファンの交換, AirPortボード: 手順 10、 1の画像 1
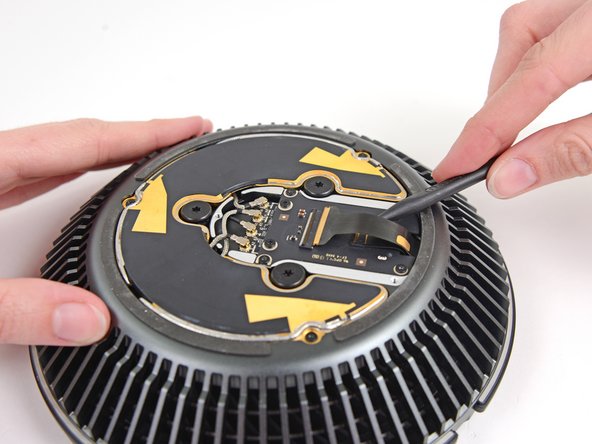
    • メタル製カバーをAirPortボードベイに固定している3.7mm T4ネジを3本外します。

    I had better luck using a T5 driver.

    somethingorother - 返信

    Same here. Mine were T5, not T4.

    Carsten Clark - 返信

    t4 was good for me

    Arden De Cuir - 返信

  11. Mac Pro Late 2013 ファンの交換: 手順 11、 1の画像 1
    • AirPortボードベイからメタル製カバーを持ち上げて外します。

  12. Mac Pro Late 2013 ファンの交換: 手順 12、 3の画像 1 Mac Pro Late 2013 ファンの交換: 手順 12、 3の画像 2 Mac Pro Late 2013 ファンの交換: 手順 12、 3の画像 3
    • スパッジャーの先端を使って、ファンアセンブリのリボンケーブルコネクタ上のZIF固定タブを跳ね上げます。

    • ZIFソケットからファンアセンブリのリボンケーブルを取り外します。

  13. Mac Pro Late 2013 ファンの交換: 手順 13、 3の画像 1 Mac Pro Late 2013 ファンの交換: 手順 13、 3の画像 2 Mac Pro Late 2013 ファンの交換: 手順 13、 3の画像 3
    • スパッジャーの先端を使って、ファンリボンケーブル上のZIF固定タブを跳ね上げます。

    • ファンリボンケーブルの接続を外します。

  14. Mac Pro Late 2013 ファンの交換, ファン: 手順 14、 1の画像 1
    • ファンベゼルをファンアセンブリに固定している3.7mm T4ネジを3本外します。

  15. Mac Pro Late 2013 ファンの交換: 手順 15、 2の画像 1 Mac Pro Late 2013 ファンの交換: 手順 15、 2の画像 2
    • ファンベゼルを取り外します。

  16. Mac Pro Late 2013 ファンの交換: 手順 16、 1の画像 1
    • ファンアセンブリの上部から次のネジを外します:

    • 10.4 mm T10ネジ 1本

    • 3.7 mm T4ネジ 3本

    'T4' screws here VERY tight - iFixit T4 bit spun out on 2, but managed to get them to turn with T5 bit and firm downward pressure....

    vbob - 返信

  17. Mac Pro Late 2013 ファンの交換: 手順 17、 2の画像 1 Mac Pro Late 2013 ファンの交換: 手順 17、 2の画像 2
    • AirPortボードを裏返します。

  18. Mac Pro Late 2013 ファンの交換: 手順 18、 1の画像 1
    • ファンをファンアセンブリに固定している残り2本の10.4mm T10ネジを外します。

  19. Mac Pro Late 2013 ファンの交換: 手順 19、 3の画像 1 Mac Pro Late 2013 ファンの交換: 手順 19、 3の画像 2 Mac Pro Late 2013 ファンの交換: 手順 19、 3の画像 3
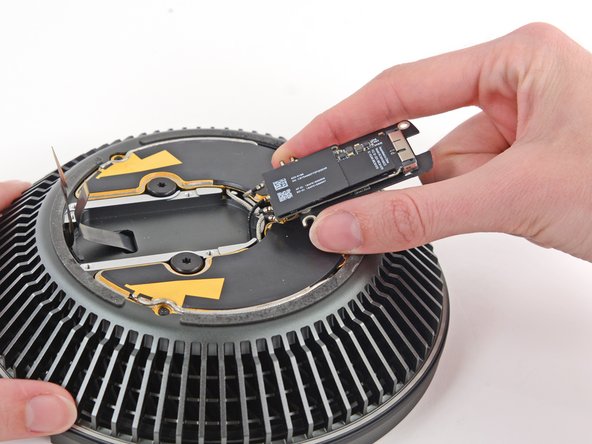
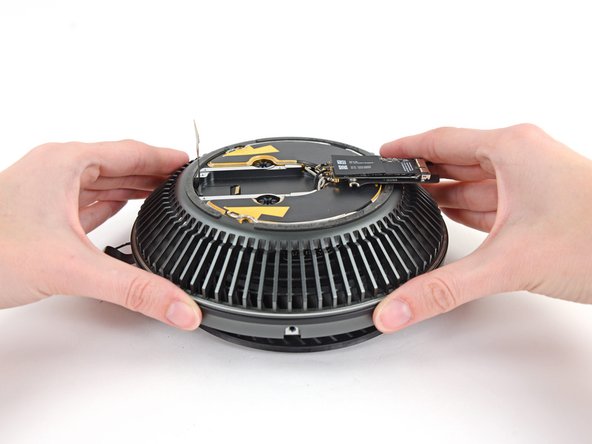
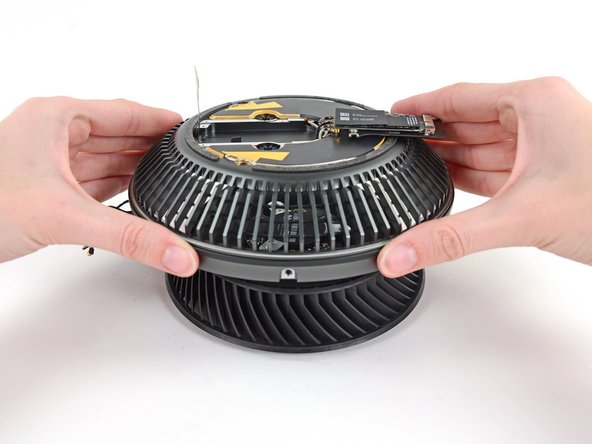
    • ファンからファンアセンブリを持ち上げます。

    No way to install that last ribbon of a new fan is actually put on the last ribbon is attached

    themichaelguy - 返信

    I would be happy to pay 100 dollars to find the solution for the last ribbon coennection when a new fan is actually put on

    themichaelguy - 返信

    THANK YOU, now I know how to connect the ribbon to the fan again.

    Darius Zendeh - 返信

終わりに

デバイスを再組み立てする際は、これらの手順を逆の順番に従って作業を進めてください。

14 の人々がこのガイドを完成させました。

以下の翻訳者の皆さんにお礼を申し上げます:

en jp

100%

これらの翻訳者の方々は世界を修理する私たちのサポートをしてくれています。 あなたも貢献してみませんか?
翻訳を始める ›

作成者

1人の作成者と共同作成されました。

Andrew Optimus Goldheart

メンバー登録日: 10/17/09

502,749 ポイント

407のガイドは作成済み

チーム

iFixit iFixit人のメンバー

Staff

135 メンバー

16,732のガイドは作成済み

5 件のコメント

using my iFixit bit set, I'd have to say that the tiny screws for Airport card & cover, as well as fan bezel, are actually T5, not T4 - came very close to stripping the heads on two of the Airport card screws with the recommended T4 bit, but firm pressure and a steady hand with T5 bit got them out. Thanks for the guide - many careful steps to get a scrap of scotch tape out of the fan where its gentle ticks-ticka was driving us crazy thinking something far worse was going wrong.....

vbob - 返信

Ha! I wondered what would happen if some tiny flotsam was dropped in through the top - terrible! Thanks for the tip!

Wagon Fixin - 返信

Likewise, I've had a random noise in the fan at startup, and finally took the fan assembly apart to grab it. It was some even tinier screw from somewhere that had lodged in part of the fan housing. All is very, very well now!!!!

Colin Wright - 返信

Hey Colin, I have same fan startup nois in my MP. Can you help me and tell how to fix in few steps?

Deny -

Using Macs Fan Control, I noticed the baseline fan speed of my “trashcan” slowly creeping up from 790 RPM (the usual) to 8 or 900 RPM. Using this guide I took the fan assembly off, and vacuumed and dusted everything with a vacuum, soft brush and canned air. It wasn’t necessary to disassemble the fan unit itself. That did the trick - fan speed is back down to 790 RPM after putting it back together.

PS - in Step 5, a Torx T8 screwdriver seemed to fit just fine for the fan cable bracket screws.

isonno - 返信

コメントを追加

統計データ:

過去 24時間: 10

過去 7 日: 73

過去 30 日: 235

今までの合計 26,142