メインコンテンツにスキップ

Mac Pro Late 2013のAirPortカードの交換

必要な工具と部品

  1. Mac Pro Late 2013のAirPortカードの交換, アウターケース: 手順 1、 2の画像 1 Mac Pro Late 2013のAirPortカードの交換, アウターケース: 手順 1、 2の画像 2
    • ロックスイッチを右側にスライドして、ロックを解除します。

  2. Mac Pro Late 2013のAirPortカードの交換: 手順 2、 3の画像 1 Mac Pro Late 2013のAirPortカードの交換: 手順 2、 3の画像 2 Mac Pro Late 2013のAirPortカードの交換: 手順 2、 3の画像 3
    • Mac Proからアウターケースをまっすぐ持ち上げます。

    • ファンの中央を押し込みながら、ケースを持ち上げると上手くいきます。

  3. Mac Pro Late 2013のAirPortカードの交換, ファンアセンブリ: 手順 3、 3の画像 1 Mac Pro Late 2013のAirPortカードの交換, ファンアセンブリ: 手順 3、 3の画像 2 Mac Pro Late 2013のAirPortカードの交換, ファンアセンブリ: 手順 3、 3の画像 3
    • 5.1 mmT10トルクスネジをファンアセンブリアウターケースから外します。

    You don't have to remove the fan assy to get to the wifi board & card. It can be done with the fan assy still attached.

    Fat Mango - 返信

    Fat Mango is correct. That said. If you do pull the fan assembly note that the screws are all held in with blue Permatex and breaking them free takes a fair amount of effort. Getting a good set of Torx screwdrivers is a must.

    Jim WIlson - 返信

    Hey guys, what would happen if you only replace one card.. I have a D300 but the plan is to upgrade to D500 or D600. So If I can afford and install one instead of the pair would it increase something? or will it cause any conflict? I guess I don’t understand if I the Mac Pro has 2 D300 graphic cards that means each has 1GB? Same as If I would Install 1 D600 that would increase 3GB only? Thanks.

    marcotamayo - 返信

    D300 = 2GB each card. Very few apps uses two cards at the same time.

    Gio Cas -

    The (5) Screws are Apple part number 923-0713

    Steven Gier - 返信

  4. Mac Pro Late 2013のAirPortカードの交換: 手順 4、 2の画像 1 Mac Pro Late 2013のAirPortカードの交換: 手順 4、 2の画像 2
    • ファンアセンブリは、IO ボード側の2つのケーブルによってコンピューターの残り部分に装着されています。

    • アセンブリをIOボードから若干斜めにします。

    • ファンアセンブリを完全に外さないでください。2本のケーブルで繋がったままです。

  5. Mac Pro Late 2013のAirPortカードの交換: 手順 5、 1の画像 1
    • ファンアセンブリを片手で支えながら、ファンケーブルのブラケットに留められたT8非脱落型ネジを緩めます。

    • これらのネジはMac Proに固定されています。取り出そうとしないでください。

    On my Mac Pro (assembled mid-2017) these are T8 screws. In fact, there were no T7 screws anywhere in my machine.

    mark33 - 返信

    There was no bracket on top of the cable at all, so I got a bit confused, so I had to skip step 5 and 6.

    Rakesh - 返信

    On my machine, a TR7 worked to remove them due to the weird angle.

    Wilson Gaberino - 返信

  6. Mac Pro Late 2013のAirPortカードの交換: 手順 6、 1の画像 1
    • ピンセットを使って、ファンアセンブリからファンケーブルブラケットを引き出します。

  7. Mac Pro Late 2013のAirPortカードの交換: 手順 7、 2の画像 1 Mac Pro Late 2013のAirPortカードの交換: 手順 7、 2の画像 2
    • スパッジャーの平面側先端を使って、ファンアセンブリのリボンケーブルをIOボードから接続を外します。

  8. Mac Pro Late 2013のAirPortカードの交換: 手順 8、 1の画像 1
    • IOボードからファンアセンブリのアンテナケーブルの接続を外します。

    • Mac Proからファンアセンブリを取り外します。

    You don't have to remove the fan assy to do the steps below. They can be done with the fan assy still attached.

    Fat Mango - 返信

  9. Mac Pro Late 2013のAirPortカードの交換, ファンアセンブリ天板: 手順 9、 3の画像 1 Mac Pro Late 2013のAirPortカードの交換, ファンアセンブリ天板: 手順 9、 3の画像 2 Mac Pro Late 2013のAirPortカードの交換, ファンアセンブリ天板: 手順 9、 3の画像 3
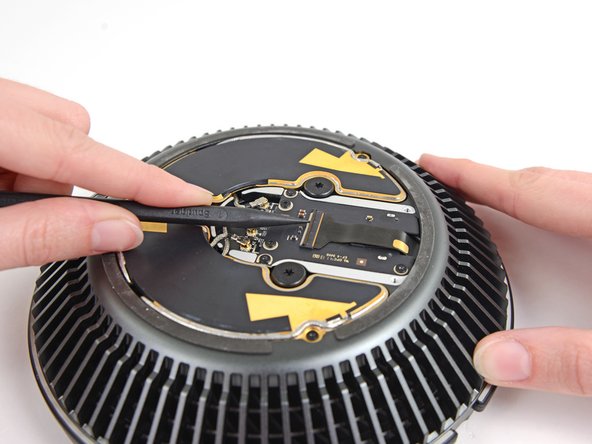
    • スパッジャーの平面側先端を使って、ファンアセンブリからファンアセンブリの天板を持ち上げます。
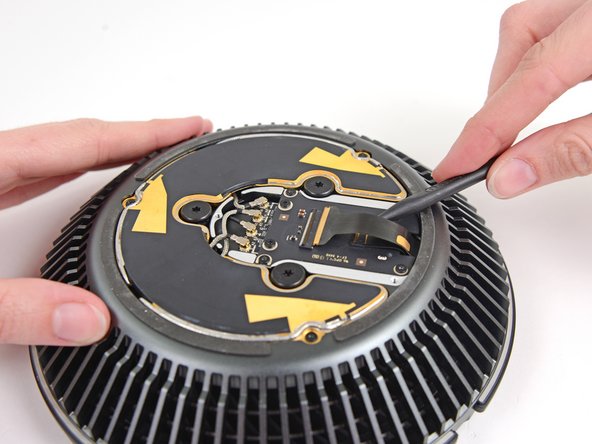
    • ファンアセンブリの天板を取り外します。

    There is a thin circle of double sided adhesive that must be loosened in order to remove the plastic cover.

    somethingorother - 返信

  10. Mac Pro Late 2013のAirPortカードの交換, AirPortボード: 手順 10、 1の画像 1
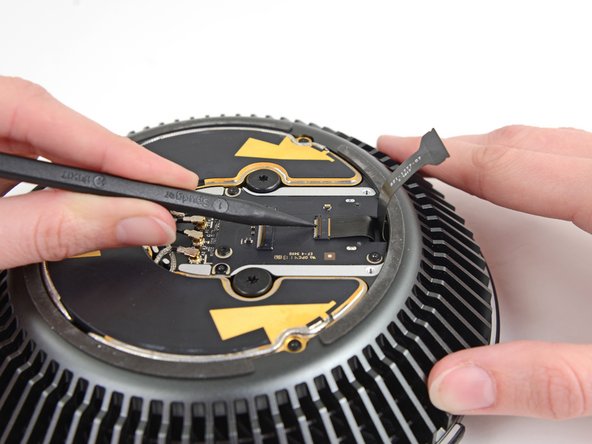
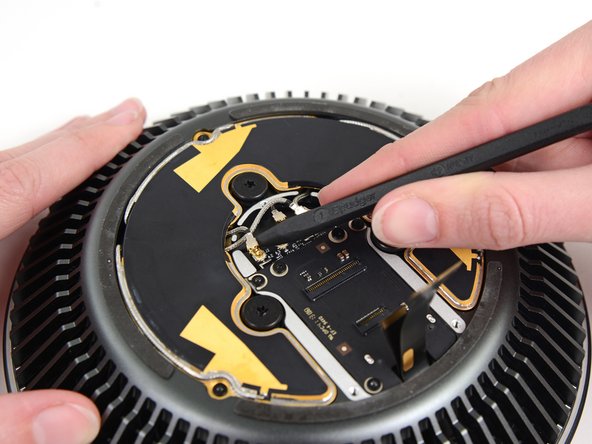
    • メタル製カバーをAirPortボードベイに固定している3.7mm T4ネジを3本外します。

    I had better luck using a T5 driver.

    somethingorother - 返信

    Same here. Mine were T5, not T4.

    Carsten Clark - 返信

    t4 was good for me

    Arden De Cuir - 返信

  11. Mac Pro Late 2013のAirPortカードの交換: 手順 11、 1の画像 1
    • AirPortボードベイからメタル製カバーを持ち上げて外します。

  12. Mac Pro Late 2013のAirPortカードの交換: 手順 12、 3の画像 1 Mac Pro Late 2013のAirPortカードの交換: 手順 12、 3の画像 2 Mac Pro Late 2013のAirPortカードの交換: 手順 12、 3の画像 3
    • スパッジャーの先端を使って、ファンアセンブリのリボンケーブルコネクタ上のZIF固定タブを跳ね上げます。

    • ZIFソケットからファンアセンブリのリボンケーブルを取り外します。

  13. Mac Pro Late 2013のAirPortカードの交換: 手順 13、 3の画像 1 Mac Pro Late 2013のAirPortカードの交換: 手順 13、 3の画像 2 Mac Pro Late 2013のAirPortカードの交換: 手順 13、 3の画像 3
    • スパッジャーの先端を使って、ファンリボンケーブル上のZIF固定タブを跳ね上げます。

    • ファンリボンケーブルの接続を外します。

  14. Mac Pro Late 2013のAirPortカードの交換, AirPortカード: 手順 14、 3の画像 1 Mac Pro Late 2013のAirPortカードの交換, AirPortカード: 手順 14、 3の画像 2 Mac Pro Late 2013のAirPortカードの交換, AirPortカード: 手順 14、 3の画像 3
    • スパッジャーの先端を使って、AirPortカードから4本のAirPortアンテナケーブルの接続を外します。

  15. Mac Pro Late 2013のAirPortカードの交換: 手順 15、 1の画像 1
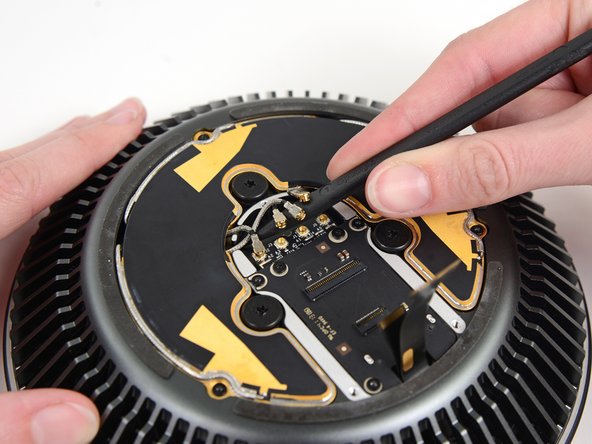
    • AirPortボードをファンアセンブリに固定している3.7 mm T4ネジを3本外します。

    These screws were also T5, not T4, for me.

    Carsten Clark - 返信

  16. Mac Pro Late 2013のAirPortカードの交換: 手順 16、 1の画像 1
    • ファンアセンブリからAirPortボードとカードを取り外します。

  17. Mac Pro Late 2013のAirPortカードの交換: 手順 17、 1の画像 1
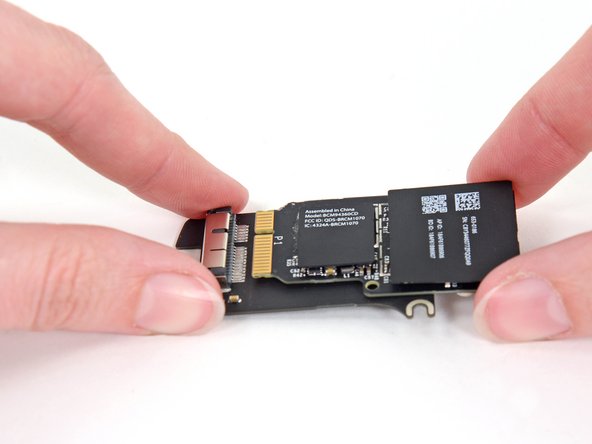
    • AirPortカードをAirPortボードに固定している3.7 mm T4トルクスネジを2本外します。

    And, finally, so were these!

    Carsten Clark - 返信

  18. Mac Pro Late 2013のAirPortカードの交換: 手順 18、 2の画像 1 Mac Pro Late 2013のAirPortカードの交換: 手順 18、 2の画像 2
    • AirPortボードのソケットからAirPortカードをスライドして、取り出します。

終わりに

デバイスを再度組み立てるには、この説明書の逆の順番で組み立ててください。

3 の人々がこのガイドを完成させました。

以下の翻訳者の皆さんにお礼を申し上げます:

en jp

100%

railgunさんは世界中で修理する私たちを助けてくれています! あなたも貢献してみませんか?
翻訳を始める ›

作成者

1人の作成者と共同作成されました。

Andrew Optimus Goldheart

メンバー登録日: 10/17/09

502,807 ポイント

407のガイドは作成済み

チーム

iFixit iFixit人のメンバー

Staff

135 メンバー

16,767のガイドは作成済み

4 件のコメント

Is there a way to replace the Mac Pro Airport card with a more recent one, like when you insert a recent one in an old macbook pro to get new features such as "unlock my mac with my apple watch" ? This is an interesting question that remains unanswered (until now ?)

Vincent Monteil - 返信

You show how to replace it but I can’t buy it from ifixit….why?

Sanong - 返信

Why not start at step 9 and leave the lid attached?

dillonrw - 返信

I wondered the exact same thing. I can see zero reason to remove the fan assembly from the top of the machine just to replace the wifi card. The only reason I can see for doing it would be if you drop a screw it’s at least easy to get to, because everything is separate from the core unit.

David Orriss Jr -

コメントを追加

統計データ:

過去 24時間: 3

過去 7 日: 34

過去 30 日: 107

今までの合計 10,184