メインコンテンツにスキップ

このバージョンは誤った内容を含んでいる可能性があります。最新の承認済みスナップショットに切り替えてください。

必要な工具と部品

  1. , ケースパネル: 手順 1、 1の画像 1
    • レバーを持ち上げて、ケースをアンロックします。

  2. : 手順 2、 1の画像 1
    • Mac Proのサイドパネルを取り外します。

    • 内部コンポーネントの作業を始める前に、接地された表面上に触れて、静電気を放電してください。

  3. この手順は未翻訳です。 翻訳を手伝う。

    : 手順 3、 3の画像 1 : 手順 3、 3の画像 2 : 手順 3、 3の画像 3
    • The optical drive must be removed to access the power supply unit

    • Firmly grasp the handles of the shown compartment and pull out firmly to remove the optical drive bay.

  4. この手順は未翻訳です。 翻訳を手伝う。

    : 手順 4、 2の画像 1 : 手順 4、 2の画像 2
    • Firmly hold each of the two connectors and pull them out of their respective sockets.

  5. この手順は未翻訳です。 翻訳を手伝う。

    : 手順 5、 2の画像 1 : 手順 5、 2の画像 2
    • Remove the 4 marked 6-32 hex screws with a 2mm Phillips hex screwdriver.

    • There are a number of Phillips head screws underneath. These don't need to be removed to remove the power supply.

    • Note the different PSU for Mac Pro 1,1 through 3,1 versus Mac Pro 4,1 and 5,1.

  6. この手順は未翻訳です。 翻訳を手伝う。

    : 手順 6、 3の画像 1 : 手順 6、 3の画像 2 : 手順 6、 3の画像 3
    • Be careful when pulling the power supply out, as it has several attached cables which don't have much slack.

    • Grip the handle on the left side of the power supply casing while gripping the right side of the power supply casing and pull upwards firmly to to take it out.

  7. この手順は未翻訳です。 翻訳を手伝う。

    : 手順 7、 2の画像 1 : 手順 7、 2の画像 2
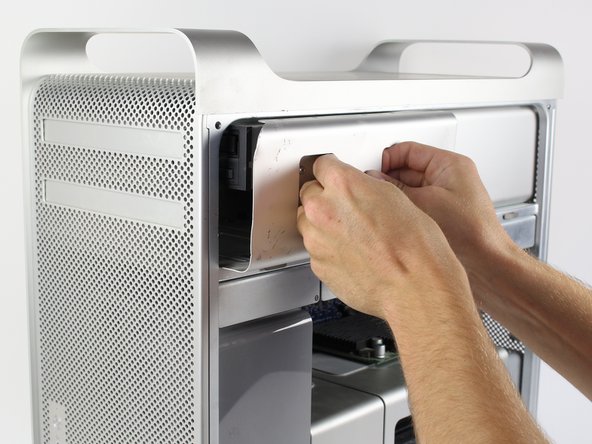
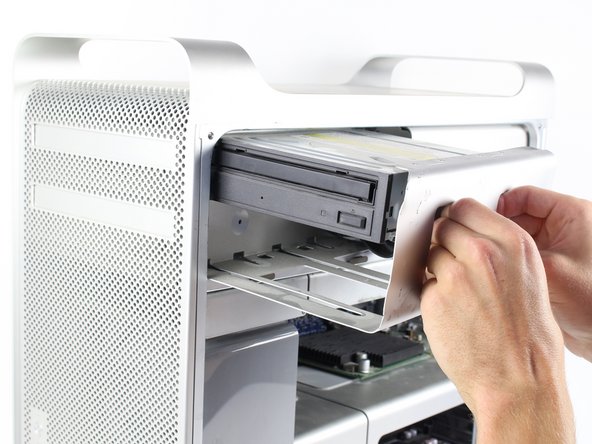
    • For the Mac Pro (Early 2008/9), a.k.a. MacPro3,1 In the MacPro3,1, the power supply screws are 2.5mm hex, not T-10. Also, there is a cover plate behind the superdrive that has to be removed (2 phillips screws) to expose the power cable connections and those connectors must be detached and slid under fan before the power supply can be removed.

  8. この手順は未翻訳です。 翻訳を手伝う。

    : 手順 8、 2の画像 1 : 手順 8、 2の画像 2
    • Locate the four marked cables

    • Push down on the clip that is above each cable connector while firmly grasping each connector and pull each one back to remove each clip.

ゴール

76 の人々がこのガイドを完成させました。

作成者

7人の作成者と共同で作成されました。

Eric Kuhta

メンバー登録日: 10/12/14

1,201 ポイント

1ガイドが承認済み

チーム

Cal Poly, Team 6-24, Maness Fall 2014 Cal Poly, Team 6-24, Maness Fall 2014人のメンバー

CPSU-MANESS-F14S6G24

4 メンバー

13のガイドは作成済み

23 件のコメント

15 min power on after off

Manish Kumar - 返信

Hi

Very difficult to find the exact size of the bit for the screwdriver. And it is very tight to unscrew one of the screws.

Maybe I had spoiled the head of the screw.

What is the solution?

Thank you in advance.

Michel

Michel - 返信

missing a very crucial step before step 6. if you don't remove the cover (where cd rom is) and unplug the PSU cable, you'll damage something.

for screws, 2.5mm didn't work for me, but i used a 3/32 hex with ball end, and at an angle, it will loosen screws.

Tino - 返信

Doesn't work for a micron. Step 6 is impossible. Can't get the power supply out of its place more than a few centimeters. The side closest to the backplate of the casing can't come up only some millimeters, while also the fixed!! power cord is a serious obstruction.

Moreover there are nowhere cover plates left, so this is not a comparable situation as described in step 7.

Hugo Walg - 返信

My last remark should be forgotten. The power cord has been connected to the Mac pro to give the impression that it's mounted fixedly to the power supply. But if you pull with very much force (an attempt of despair), it then again appears to be a 3-hole connector like is the case for common computers. If you don't know these systems, this is very treacherous.

Hugo Walg - 返信

コメントを追加

統計データ:

過去 24時間: 9

過去 7 日: 66

過去 30 日: 261

今までの合計 81,175