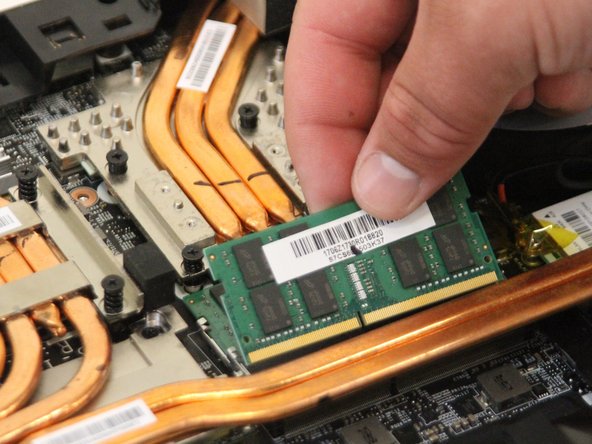
メインコンテンツにスキップ

MSI GT75VR 7RF Titan Pro RAM Card Replacement

必要な工具と部品

  1. MSI GT75VR 7RF Titan Pro RAM Card Replacement, RAM Card: 手順 1、 1の画像 1
    • Unscrew each of the four screws using the Phillips #0 head on the back of the laptop case. The screws are 0.5 inches in length.

  2. MSI GT75VR 7RF Titan Pro RAM Card Replacement: 手順 2、 2の画像 1 MSI GT75VR 7RF Titan Pro RAM Card Replacement: 手順 2、 2の画像 2
    • Pop the back cover off of the laptop using the black nylon spudger.

  3. MSI GT75VR 7RF Titan Pro RAM Card Replacement: 手順 3、 1の画像 1
    • Disconnect the battery cable.

  4. MSI GT75VR 7RF Titan Pro RAM Card Replacement: 手順 4、 2の画像 1 MSI GT75VR 7RF Titan Pro RAM Card Replacement: 手順 4、 2の画像 2
    • Pry the battery pack up with the black nylon spudger.

  5. MSI GT75VR 7RF Titan Pro RAM Card Replacement: 手順 5、 1の画像 1
    • Pop the metal tabs on each side of the RAM using the black nylon spudger.

  6. MSI GT75VR 7RF Titan Pro RAM Card Replacement: 手順 6、 1の画像 1
    • Lift and remove RAM card by hand. Replace each RAM card and test them individually. If your computer encounters a RAM error with only one card inserted, you can confirm that card is corrupted.

終わりに

To reassemble your device, follow these instructions in reverse order.

作成者

3人の作成者と共同で作成されました。

Jack Crumpton

メンバー登録日: 08/31/18

241 ポイント

2のガイドは作成済み

チーム

Western Carolina University, Team S1-G5, Virtue Fall 2018 Western Carolina University, Team S1-G5, Virtue Fall 2018人のメンバー

WCU-VIRTUE-F18S1G5

3 メンバー

5のガイドは作成済み

0 件のコメント

コメントを追加

統計データ:

過去 24時間: 0

過去 7 日: 4

過去 30 日: 10

今までの合計 647