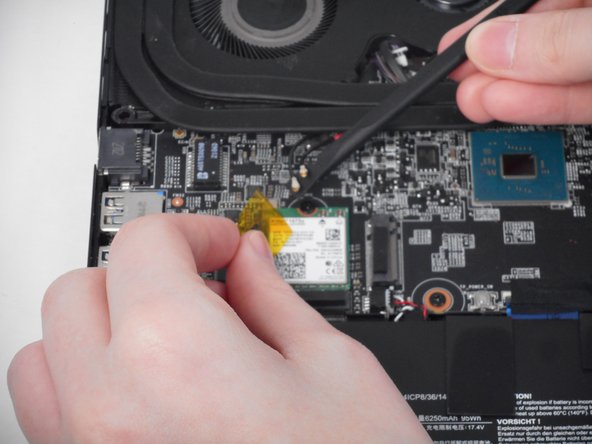
メインコンテンツにスキップ

MSI GS66 Stealth 11UE-007 CPU Thermal Paste Replacement

必要な工具と部品

  1. MSI GS66 Stealth 11UE-007 CPU Thermal Paste Replacement, MSI GS66 Stealth 11UE-007 CPU Thermal Paste Replacement: 手順 1、 1の画像 1
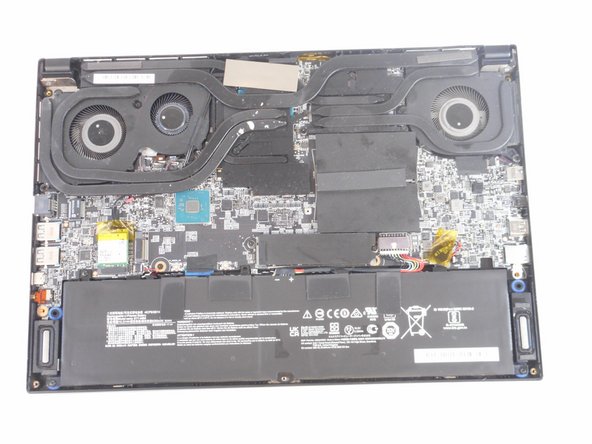
    • Orient your laptop so that the bottom is facing up and the hinge is away from yourself.

    • Make sure to unplug device for any outlet.

  2. MSI GS66 Stealth 11UE-007 CPU Thermal Paste Replacement: 手順 2、 3の画像 1 MSI GS66 Stealth 11UE-007 CPU Thermal Paste Replacement: 手順 2、 3の画像 2 MSI GS66 Stealth 11UE-007 CPU Thermal Paste Replacement: 手順 2、 3の画像 3
    • Identify the nine screws around the perimeter. One screw will be under the factory seal sticker.

    • Remove eight 10mm Phillips J1 screws.

    • Remove one 7mm Philips J1 screw from the center bottom of backplate.

  3. MSI GS66 Stealth 11UE-007 CPU Thermal Paste Replacement: 手順 3、 3の画像 1 MSI GS66 Stealth 11UE-007 CPU Thermal Paste Replacement: 手順 3、 3の画像 2 MSI GS66 Stealth 11UE-007 CPU Thermal Paste Replacement: 手順 3、 3の画像 3
    • Use the tip of the blue plastic opening tool to slip between the backplate and the body of the laptop at the hinge side.

    • Wiggle the blue plastic opening tool as you slide it around the perimeter of the backplate to separate is from the body of the laptop.

  4. MSI GS66 Stealth 11UE-007 CPU Thermal Paste Replacement: 手順 4、 2の画像 1 MSI GS66 Stealth 11UE-007 CPU Thermal Paste Replacement: 手順 4、 2の画像 2
    • Disconnect the wires from the cooling fan.

  5. MSI GS66 Stealth 11UE-007 CPU Thermal Paste Replacement: 手順 5、 2の画像 1 MSI GS66 Stealth 11UE-007 CPU Thermal Paste Replacement: 手順 5、 2の画像 2
    • Disconnect the two wires from the Wi-Fi card.

  6. MSI GS66 Stealth 11UE-007 CPU Thermal Paste Replacement: 手順 6、 3の画像 1 MSI GS66 Stealth 11UE-007 CPU Thermal Paste Replacement: 手順 6、 3の画像 2 MSI GS66 Stealth 11UE-007 CPU Thermal Paste Replacement: 手順 6、 3の画像 3
    • Remove the nine 6 mm screws.

  7. MSI GS66 Stealth 11UE-007 CPU Thermal Paste Replacement: 手順 7、 2の画像 1 MSI GS66 Stealth 11UE-007 CPU Thermal Paste Replacement: 手順 7、 2の画像 2
    • Remove the tape connecting the fans to the fan housing.

  8. MSI GS66 Stealth 11UE-007 CPU Thermal Paste Replacement: 手順 8、 1の画像 1
    • Lift up the cooling unit like it is hinged at the back.

    • Replace thermal paste.

終わりに

To reassemble your device, follow these instructions in reverse order.

ある他の人がこのガイドを完成しました。

作成者

3人の作成者と共同で作成されました。

Alex Robinson

メンバー登録日: 09/06/23

1,027 ポイント

6のガイドは作成済み

チーム

University of Memphis, Team 1-4, Sneed Fall 2023 University of Memphis, Team 1-4, Sneed Fall 2023人のメンバー

UM-SNEED-F23S1G4

4 メンバー

6のガイドは作成済み

2 件のコメント

When putting the heatsink back on, do we only need to reapply cpu thermal paste, or do we have to replace the pink stuff? If so, what is the pink stuff, and where can I get it?

Alexandru - 返信

If you only have issues with thermals on your cpu then I would just replace the gray thermal paste directly on the cpu. The “pink stuff” is also thermal paste for the other components. It would normally have thermal pads but there must not have been enough room for them in the design.

Scott Brooks - 返信

コメントを追加

統計データ:

過去 24時間: 3

過去 7 日: 14

過去 30 日: 56

今までの合計 280