メインコンテンツにスキップ

MSI GS60 6QE GHOST PRO 4K LCD Screen Replacement

必要な工具と部品

  1. MSI GS60 6QE GHOST PRO 4K LCD Screen Replacement, LCD Screen: 手順 1、 1の画像 1
    • Remove the eleven 5mm screws with a Phillips #1 screwdriver.

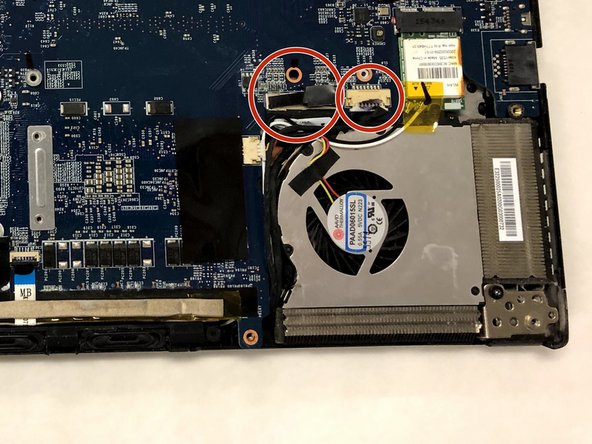
    • Remove the four 2.5mm screws with a Phillips #1 screwdriver.

  2. MSI GS60 6QE GHOST PRO 4K LCD Screen Replacement: 手順 2、 1の画像 1
    • Remove the bottom plate from the laptop. Using a prying tool to slide between the bottom plate and chassis will result in easier removal.

  3. MSI GS60 6QE GHOST PRO 4K LCD Screen Replacement: 手順 3、 1の画像 1
    • Remove the four 2.5mm screws using a Phillips #1 bit.

  4. MSI GS60 6QE GHOST PRO 4K LCD Screen Replacement: 手順 4、 1の画像 1
    • Carefully pry the screen assembly from the chassis on both sides. Use caution as the cable to the screen is located on the right bracket.

  5. MSI GS60 6QE GHOST PRO 4K LCD Screen Replacement: 手順 5、 2の画像 1 MSI GS60 6QE GHOST PRO 4K LCD Screen Replacement: 手順 5、 2の画像 2
    • Lay the components out as shown.

    • The rightmost of the two cable connections is located under sticky tape. Remove the tape to access it and unseat from the connection.

    • The other connection is removed by gently pulling up on the black grip tape.

  6. MSI GS60 6QE GHOST PRO 4K LCD Screen Replacement: 手順 6、 2の画像 1 MSI GS60 6QE GHOST PRO 4K LCD Screen Replacement: 手順 6、 2の画像 2
    • Gently feed both connections under the red, white, and yellow cables from the fan.

    • Note that both cables will meet and form a singular cable.

  7. MSI GS60 6QE GHOST PRO 4K LCD Screen Replacement: 手順 7、 2の画像 1 MSI GS60 6QE GHOST PRO 4K LCD Screen Replacement: 手順 7、 2の画像 2
    • Gently lift up on the back of the fan and remove the routed cable.

  8. MSI GS60 6QE GHOST PRO 4K LCD Screen Replacement: 手順 8、 3の画像 1 MSI GS60 6QE GHOST PRO 4K LCD Screen Replacement: 手順 8、 3の画像 2 MSI GS60 6QE GHOST PRO 4K LCD Screen Replacement: 手順 8、 3の画像 3
    • Using a prying tool, find the seam where the two pieces of screen meet and begin separating them.

    • Use caution, as there is glue and snapping clips holding them together.

    • Work around the perimeter, separating the pieces with the prying tool as you go.

  9. MSI GS60 6QE GHOST PRO 4K LCD Screen Replacement: 手順 9、 1の画像 1
    • Locate the metal bracket the cable is woven through.

    • Unweave the cable from the bracket. This will give you extra length to work with the screen.

  10. MSI GS60 6QE GHOST PRO 4K LCD Screen Replacement: 手順 10、 1の画像 1
    • Remove two 2.5mm screws with a Phillips #1 screwdriver.

  11. MSI GS60 6QE GHOST PRO 4K LCD Screen Replacement: 手順 11、 2の画像 1 MSI GS60 6QE GHOST PRO 4K LCD Screen Replacement: 手順 11、 2の画像 2
    • Remove the screen.

    • Gently remove the yellow tape and then remove the connector.

  12. MSI GS60 6QE GHOST PRO 4K LCD Screen Replacement: 手順 12、 1の画像 1
    • The defective screen is now completely removed and ready to be replaced.

終わりに

To reassemble your device, follow these instructions in reverse order.

2 の人々がこのガイドを完成させました。

作成者

1人の作成者と共同作成されました。

Coty Mast

メンバー登録日: 11/10/18

259 ポイント

1ガイドが承認済み

チーム

IUPUI, Team S1-G1, Wilson Fall 2018 IUPUI, Team S1-G1, Wilson Fall 2018人のメンバー

IUPUI-WILSON-F18S1G1

4 メンバー

1のガイドは作成済み

0 件のコメント

コメントを追加

統計データ:

過去 24時間: 2

過去 7 日: 7

過去 30 日: 25

今までの合計 1,876