メインコンテンツにスキップ

MSI GE62 7RD RAM Replacement

必要な工具と部品

  1. MSI GE62 7RD RAM Replacement, RAM: 手順 1、 1の画像 1
    • Flip the laptop over so that the bottom is on top.

    • Caution: make sure the laptop is fully powered off (not sleep mode) and not connected to the AC charging adapter before beginning the repair.

  2. MSI GE62 7RD RAM Replacement: 手順 2、 2の画像 1 MSI GE62 7RD RAM Replacement: 手順 2、 2の画像 2
    • Remove the fifteen 6.5 mm Phillips #0 screws from the bottom of the laptop using a Phillips #0 screwdriver.

    • Be sure to remove the two screws in the middle of the laptop, they're easy to miss! They might be under a factory seal label.

  3. MSI GE62 7RD RAM Replacement: 手順 3、 2の画像 1 MSI GE62 7RD RAM Replacement: 手順 3、 2の画像 2
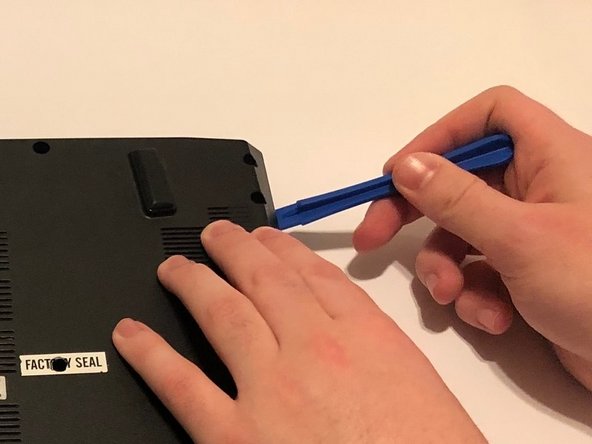
    • Remove the back case from the laptop.

    • If the backing is really stuck, you may use a plastic opening tool or picks to provide leverage.

  4. MSI GE62 7RD RAM Replacement: 手順 4、 2の画像 1 MSI GE62 7RD RAM Replacement: 手順 4、 2の画像 2
    • With both thumbs, pull the silver overhangs on the sides of the RAM until the old stick of RAM pops up.

  5. MSI GE62 7RD RAM Replacement: 手順 5、 1の画像 1
    • Remove the old stick of RAM by pulling back and out.

  6. MSI GE62 7RD RAM Replacement: 手順 6、 2の画像 1 MSI GE62 7RD RAM Replacement: 手順 6、 2の画像 2
    • Place the new stick of RAM in the socket so that the electrical contacts match.

    • Push the top of the stick of RAM down and in until you hear the click of the silver overhangs latch onto the RAM.

終わりに

To reassemble your device, follow these instructions in reverse order.

ある他の人がこのガイドを完成しました。

作成者

1人の作成者と共同作成されました。

William Guyton

メンバー登録日: 10/10/20

157 ポイント

1ガイドが承認済み

チーム

University of Memphis, Team S2-G12, Willis Fall 2020 University of Memphis, Team S2-G12, Willis Fall 2020人のメンバー

UM-WILLIS-F20S2G12

1 メンバー

1のガイドは作成済み

0 件のコメント

コメントを追加

統計データ:

過去 24時間: 0

過去 7 日: 4

過去 30 日: 10

今までの合計 834