メインコンテンツにスキップ

MNT Reform SSD Replacement

必要な工具と部品

  1. MNT Reform SSD Replacement, Remove Bottom Plate Screws: 手順 1、 1の画像 1
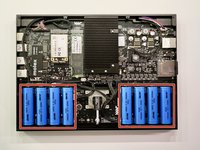
    • Remove the following screws securing the transparent acrylic bottom plate to the main box:

    • Ten M2×6mm silver Phillips screws

  2. MNT Reform SSD Replacement, Remove Bottom Plate: 手順 2、 1の画像 1
    • Lift the bottom plate and set it aside.

    • Before servicing anything on the inside, make sure to remove all battery cells.

  3. MNT Reform SSD Replacement, Remove Battery Cells: 手順 3、 2の画像 1 MNT Reform SSD Replacement, Remove Battery Cells: 手順 3、 2の画像 2
    • Pull out the eight battery cells one by one, and set them aside safely.

    • Do not use a metal tool to remove the batteries. You may accidentally short-circuit the metal pins of the battery holders.

    • When replacing the batteries, pay attention to the polarity! Inserting a cell the wrong way in will damage your device.

    • The circuit board indicates the + and - orientation for each cell.

  4. MNT Reform SSD Replacement, Remove SSD Screw: 手順 4、 1の画像 1
    • Remove the single M2×4 pan head screw securing the SSD to the motherboard.

  5. MNT Reform SSD Replacement, Remove SSD: 手順 5、 3の画像 1 MNT Reform SSD Replacement, Remove SSD: 手順 5、 3の画像 2 MNT Reform SSD Replacement, Remove SSD: 手順 5、 3の画像 3
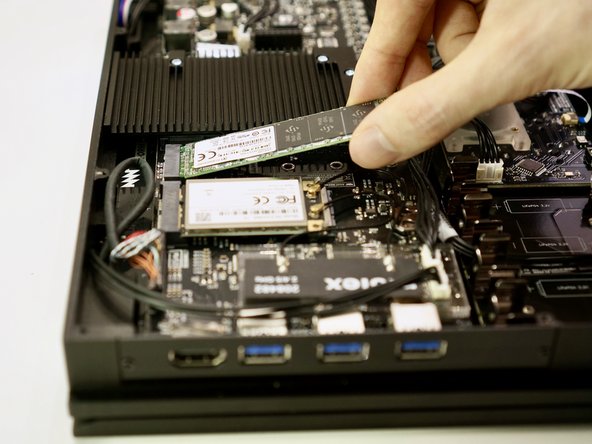
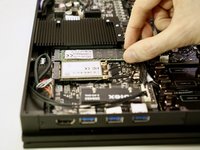
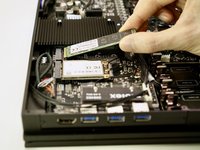
    • Lift the free end of the SSD up slightly and pull the SSD straight out of its M.2 socket on the motherboard.

    • To avoid damaging its socket on the motherboard, do not excessively lift the free end of the SSD.

終わりに

To reassemble your device, follow these instructions in reverse order. Ensure that no cables are squeezed when replacing the bottom plate. Don’t overtighten screws.

ある他の人がこのガイドを完成しました。

作成者

1人の作成者と共同作成されました。

Neelfyn

メンバー登録日: 05/13/14

972 ポイント

9のガイドは作成済み

0件のガイドコメント

コメントを追加

統計データ:

過去 24時間: 1

過去 7 日: 8

過去 30 日: 18

今までの合計 613