はじめに
Scope
The scope of this guide encompasses the Logitech V220 mouse and its owners/users.
必要な工具と部品
-
-
Orient the mouse so you are viewing its base.
-
Using your fingers, gently remove the USB wireless receiver by sliding it towards you.
-
With your fingertip, engage the power switch to its OFF position to ensure the mouse is not powered.
-
-
-
Hold the mouse so your palm is beneath, but not directly contacting, the top-side of the mouse.
-
Still viewing the base of the mouse, locate the button with the battery status logo.
-
Press the button firmly.
-
-
-
-
Place the mouse on a flat surface.
-
Firmly grip the front of the mouse with the fingertips of one hand.
-
Use a fingertip of your other hand to simultaneously push the positive (+) terminal of the battery in and up. Do so until the terminal is completely out of the mouse.
-
Remove the battery by pulling it out of the mouse.
-
Set the battery aside for proper disposal.
-
-
-
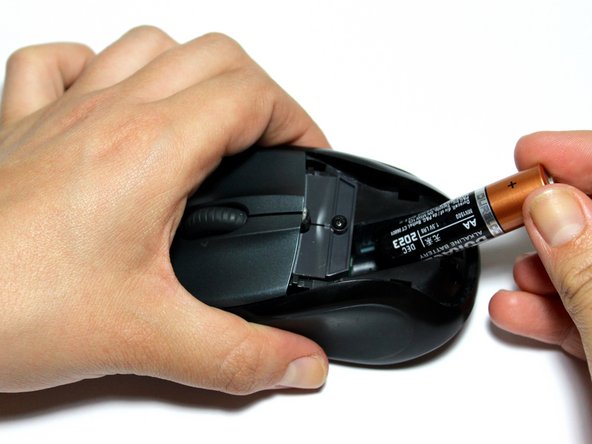
Firmly grip the front of the mouse with the fingertips of one hand.
-
With your other hand, take a new, AA battery.
-
Insert the battery into the slot by its negative (-) terminal end.
-
Push the battery in and down with your fingertip on the edge of the positive (+) side until the battery is fully in the slot.
-
-
-
Maintain your grip on the front of the mouse with your finger tips.
-
Grab the battery cover by its edges with the fingertips of your free hand.
-
Locate the following:
-
Battery cover insertion prongs.
-
Insertion prong holes.
-
Insert the battery cover by placing the insertion prongs into the holes near the middle of the mouse at an angle.
-
Once the prongs are aligned and fully inserted, lower and press the back end of the battery cover until it a snapping sound is heard. The cover should be secured in place.
-


The battery of your mouse has been replaced with one that is fresh and brand new! Let further use of your mouse ensue!
The battery of your mouse has been replaced with one that is fresh and brand new! Let further use of your mouse ensue!
5 の人々がこのガイドを完成させました。
チーム

Cal Poly, Team 6-2, Forte Spring 2014 Cal Poly, Team 6-2, Forte Spring 2014人のメンバー
CPSU-FORTE-S14S6G2
5 メンバー
20のガイドは作成済み
コメント 1 件
Thank you so much! I needed to see how battery went in. My mouse will still not work. I dropped it on the floor and I am sick because I love that mouse! Any Ideas on how to fix? Guy Rogers, Attorney, Jackson, MS. Call me if you will. 601-941.6689
Guy Rogers - 返信