必要な工具と部品
-
-
Unscrew 5 screws, which are partially hidden. Three screws are located under the rubber buffers and one in the battery compartment under the sticker (which should then be loosened beforehand).
-
You can simply push the blue trackball out of its holder. You should also do this occasionally and clean the opening.
-
-
-
After the screws are loosened, the housing can be easily removed. The space for the blue ball is made of its own piece of plastic. The circuit board is held in place with a few screws.
-
-
-
-
Lift the gray latch and pull the flat cable out of the connector. The trackball holder can then be placed to the side.
-
-
-
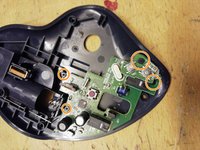
Unscrew four Phillips screws (orange) and lift circuit board out of housing, being careful with the wires holding the battery, but these can be lifted out of the housing without further unscrewing.
-
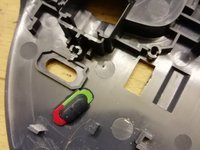
The switch for switching on should not be lost in the process (see second picture)
-
-
-
Properly desolder the microswitch (green) at its three contacts
-
Solder in new microswitch, making sure that it sits flat on the board.
-
-
-
Make sure that the small circuit board with the two buttons with the hole in the middle (green) is placed over the holding pin. Then it is in the correct position.
-


Work through the steps in reverse order to reassemble your device.
3 の人々がこのガイドを完成させました。


5件のガイドコメント
Where I would been able to buy the microswitch?
I soldered it out from an old mouse... but I think you will also get it on ebay
This guy shows replacement switches fixing a newer version of same trackball(I think). It has a built in battery now.
Replacement switches he used from ALIEXPRESS.
I think I'll try those. I've had switches lose there mechanical springy-ness and also get where they don't work reliably on 2 or 3 trackballs.
Ich konnte bei mir im Fundus eine Maus (DELL M-UVDEL1) finden, welche einen sehr ähnlichen Taster verwendet; diesen konnte ich erfolgreich verpflanzen :-)
Michael-01 - 返信
Danke für die Rückmeldung - freut mich, wenn die Infos Menschen auf Ideen bringen bzw. weiter helfen. Viele Grüße!