メインコンテンツにスキップ

このバージョンは誤った内容を含んでいる可能性があります。最新の承認済みスナップショットに切り替えてください。

必要な工具と部品

  1. この手順は未翻訳です。 翻訳を手伝う。

    : 手順 1、 3の画像 1 : 手順 1、 3の画像 2 : 手順 1、 3の画像 3
    • The battery compartment cover is located on the top of the mouse. The seam running horizontally across the mouse is the top of the cover.

    • There is a button to pop off the cover. It is located on the bottom of the mouse. you may need to press hard on this button to pop the cover.

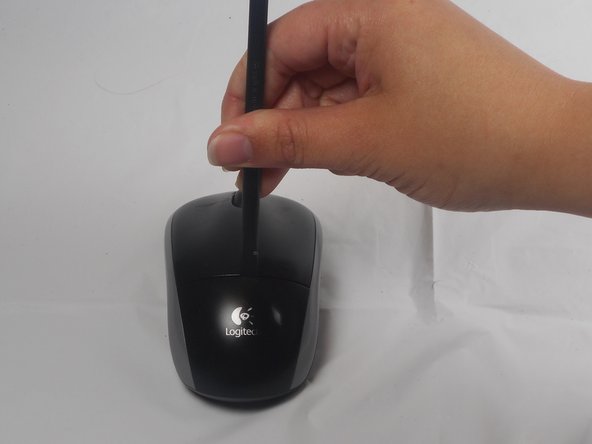
    • If the button does not work, you will need to pry off the cover. You can use your fingernails or a prying tool in order to do this, as seen in the third image.

  2. この手順は未翻訳です。 翻訳を手伝う。

    : 手順 2、 1の画像 1
    • Remember to insert the new battery in the same orientation as the old one. The positive (plus) end should be facing away from the buttons.

  3. この手順は未翻訳です。 翻訳を手伝う。

    : 手順 3、 2の画像 1 : 手順 3、 2の画像 2
    • The pads on the underside of the mouse hide the screws. Remove these first. You may need to use your fingernails or a prying tool.

    • There will be two 0.5mm phillips head screws. Both will be underneath the bottom two pads.

  4. この手順は未翻訳です。 翻訳を手伝う。

    : 手順 4、 1の画像 1
    • Pry the top cover off. You may need to use a pry tool to help.

ゴール

作成者

4人の作成者と共同で作成されました。

Hannah Pate

メンバー登録日: 01/30/15

1,722 ポイント

7のガイドは作成済み

チーム

USF Tampa, Team 1-1, Watkins Winter 2015 USF Tampa, Team 1-1, Watkins Winter 2015人のメンバー

USFT-WATKINS-W15S1G1

4 メンバー

28のガイドは作成済み

0 件のコメント

コメントを追加

統計データ:

過去 24時間: 0

過去 7 日: 1

過去 30 日: 9

今までの合計 2,611