メインコンテンツにスキップ

このバージョンは誤った内容を含んでいる可能性があります。最新の承認済みスナップショットに切り替えてください。

必要な工具と部品

  1. この手順は未翻訳です。 翻訳を手伝う。

    : 手順 1、 1の画像 1
    • Before you begin, flip the keyboard's power switch into the OFF position.

  2. この手順は未翻訳です。 翻訳を手伝う。

    : 手順 2、 2の画像 1 : 手順 2、 2の画像 2
    • Flip the entire keyboard over, keys facing down.

  3. この手順は未翻訳です。 翻訳を手伝う。

    : 手順 3、 3の画像 1 : 手順 3、 3の画像 2 : 手順 3、 3の画像 3
    • The ML2032 rechargeable coin cell battery is located in a tray at the back edge of the keyboard.

    • Insert the flat end of a spudger into the gap between the battery tray and the top surface of the keyboard.

    • Pivot the spudger down, towards the top of the keyboard, to begin to pry the tray out of its cavity.

  4. この手順は未翻訳です。 翻訳を手伝う。

    : 手順 4、 3の画像 1 : 手順 4、 3の画像 2 : 手順 4、 3の画像 3
    • Use the flat end of the spudger to push the battery tray out and away from the keyboard.

    • The tray is held in by small "ears" and may take a significant amount of force to dislodge.

    • Remove the battery tray.

    • During reassembly, firmly push the battery tray into its slot until it clicks into place.

  5. この手順は未翻訳です。 翻訳を手伝う。

    : 手順 5、 3の画像 1 : 手順 5、 3の画像 2 : 手順 5、 3の画像 3
    • Push the battery out of the tray to remove it.

    • Note the battery orientation—it can only go in one way. Set the battery into the tray with side with the text and the "+" sign facing down.

    • Use only a rechargeable ML2032 coin cell battery as a replacement. Although it's the same size and shape as the more common CR2032, CR2032s are not rechargeable.

ゴール

209 の人々がこのガイドを完成させました。

作成者

8人の作成者と共同で作成されました。

Carsten Frauenheim

メンバー登録日: 03/10/20

113,151 ポイント

338のガイドは作成済み

チーム

iFixit iFixit人のメンバー

Staff

135 メンバー

16,767のガイドは作成済み

94 件のコメント

Thank you. Worked perfectly. Gained trust in this site. Lost respect for Logitech.

henry - 返信

My sentiments, exactly!

Melinda Mcvay -

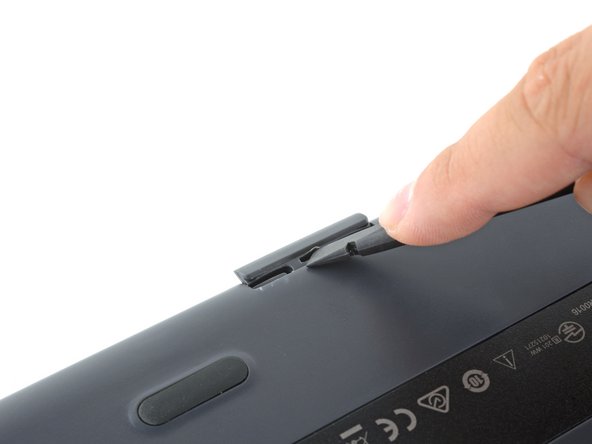
There a better way to open it

put the knife or better a screwdriver on the other side (keys upside); worked for me without damage the keyboard :D

yannick NR - 返信

Thank You! That did work much better!

Matt Anderson -

Here is an even better method.

You can also totally prevent damage by finding a laminated biz card and cutting it into 2 one inch strips and inserting both of them into the slot on the top side (solar side) of the battery compartment.

Then get your tool ( I like small pointed scissors) and pry it out between the cards.

Very easy!

David Powers -

コメントを追加

統計データ:

過去 24時間: 41

過去 7 日: 273

過去 30 日: 1,190

今までの合計 252,540