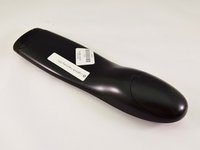
メインコンテンツにスキップ

Logitech Harmony 650 Case Replacement

必要な工具と部品

  1. Logitech Harmony 650 Case Replacement, Case: 手順 1、 2の画像 1 Logitech Harmony 650 Case Replacement, Case: 手順 1、 2の画像 2
    • Remove the battery cover by applying pressure to the indented area and pushing the cover toward the rear of the device.

  2. Logitech Harmony 650 Case Replacement: 手順 2、 1の画像 1
    • Remove the batteries using the silver pull tab.

  3. Logitech Harmony 650 Case Replacement: 手順 3、 1の画像 1
    • Using a J000 Philips head screwdriver remove the four 5mm screws around the rim of the battery chamber.

  4. Logitech Harmony 650 Case Replacement: 手順 4、 1の画像 1
    この手順で使用する道具:
    Flathead 3/32" or 2.5 mm Screwdriver
    $5.49
    購入する
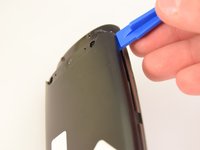
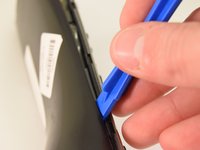
    • Remove the small plastic cover beneath the plastic LED housing by using a 3.0 flathead screwdriver and a spudger to pry it off. It is glued to the case. If you are having trouble removing it try applying some heat to loosen the glue.

  5. Logitech Harmony 650 Case Replacement: 手順 5、 1の画像 1
    • Remove the two 5mm screws located underneath the cover using a J000 Philips screwdriver bit.

  6. Logitech Harmony 650 Case Replacement: 手順 6、 2の画像 1 Logitech Harmony 650 Case Replacement: 手順 6、 2の画像 2
    • Using a plastic opening tool, pry the case off starting from the top of the device (nearest the transmitter). There are 3 tabs along the side of the case and one at the back.

    • The top led protector plastic cover will also be freed once back is removed.

  7. Logitech Harmony 650 Case Replacement: 手順 7、 1の画像 1
    • Remove the rear cover.

終わりに

To reassemble your device, follow these instructions in reverse order.

4 の人々がこのガイドを完成させました。

作成者

4人の作成者と共同で作成されました。

Connor Gallagher

メンバー登録日: 01/11/16

998 ポイント

5のガイドは作成済み

チーム

Eastern Washington University, Team 1-2, Rowley Winter 2016 Eastern Washington University, Team 1-2, Rowley Winter 2016人のメンバー

EWU-ROWLEY-W16S1G2

4 メンバー

5のガイドは作成済み

0 件のコメント

コメントを追加

統計データ:

過去 24時間: 0

過去 7 日: 5

過去 30 日: 20

今までの合計 2,879