メインコンテンツにスキップ

Logitech Harmony 650 Button Replacement

必要な工具と部品

  1. Logitech Harmony 650 Button Replacement, Case: 手順 1、 2の画像 1 Logitech Harmony 650 Button Replacement, Case: 手順 1、 2の画像 2
    • Remove the battery cover by applying pressure to the indented area and pushing the cover toward the rear of the device.

  2. Logitech Harmony 650 Button Replacement: 手順 2、 1の画像 1
    • Remove the batteries using the silver pull tab.

  3. Logitech Harmony 650 Button Replacement: 手順 3、 1の画像 1
    • Using a J000 Philips head screwdriver remove the four 5mm screws around the rim of the battery chamber.

  4. Logitech Harmony 650 Button Replacement: 手順 4、 1の画像 1
    この手順で使用する道具:
    Flathead 3/32" or 2.5 mm Screwdriver
    $5.49
    購入する
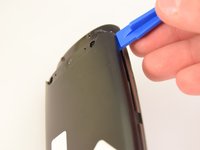
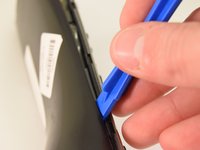
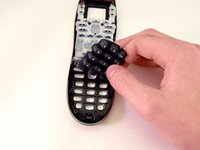
    • Remove the small plastic cover beneath the plastic LED housing by using a 3.0 flathead screwdriver and a spudger to pry it off. It is glued to the case. If you are having trouble removing it try applying some heat to loosen the glue.

  5. Logitech Harmony 650 Button Replacement: 手順 5、 1の画像 1
    • Remove the two 5mm screws located underneath the cover using a J000 Philips screwdriver bit.

  6. Logitech Harmony 650 Button Replacement: 手順 6、 2の画像 1 Logitech Harmony 650 Button Replacement: 手順 6、 2の画像 2
    • Using a plastic opening tool, pry the case off starting from the top of the device (nearest the transmitter). There are 3 tabs along the side of the case and one at the back.

    • The top led protector plastic cover will also be freed once back is removed.

  7. Logitech Harmony 650 Button Replacement: 手順 7、 1の画像 1
    • Remove the rear cover.

  8. Logitech Harmony 650 Button Replacement, Motherboard: 手順 8、 2の画像 1 Logitech Harmony 650 Button Replacement, Motherboard: 手順 8、 2の画像 2
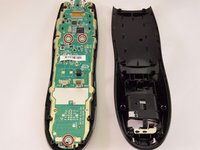
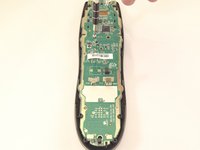
    • Using a J0 screwdriver remove the three 5mm screws holding the motherboard to the front face. Two are located just below the processor in the middle of the device and the third is located at the very bottom.

  9. Logitech Harmony 650 Button Replacement: 手順 9、 1の画像 1
    • Remove the motherboard by gently pulling it away from the case.

  10. Logitech Harmony 650 Button Replacement, Button: 手順 10、 1の画像 1
    • Using a spudger, gently pry the bottom retaining place from the front case.

  11. Logitech Harmony 650 Button Replacement: 手順 11、 2の画像 1 Logitech Harmony 650 Button Replacement: 手順 11、 2の画像 2
    • Peel away both the upper and lower sets of buttons using your fingers.

終わりに

To reassemble your device, follow these instructions in reverse order.

15 の人々がこのガイドを完成させました。

作成者

3人の作成者と共同で作成されました。

Connor Gallagher

メンバー登録日: 01/11/16

998 ポイント

5のガイドは作成済み

チーム

Eastern Washington University, Team 1-2, Rowley Winter 2016 Eastern Washington University, Team 1-2, Rowley Winter 2016人のメンバー

EWU-ROWLEY-W16S1G2

4 メンバー

5のガイドは作成済み

8 件のコメント

Good instructions. Where can I purchase new buttons???

Michael Freeman - 返信

Hello, I would recommend looking on eBay for a broken remote with a good membrane, also check craigslist or potentially amazon. A quick search for one and I couldn't find a membrane.

Austin K -

I also am looking for a new button membrane, any ideas? gimmick73@hotmail.com

gimmick73 - 返信

Hello, I would recommend looking on eBay for a broken remote with a good membrane, also check craigslist or potentially amazon.

Austin K -

Good advice. I bought a used one from ebay to replace the one I bought brand new from bestbuy and promptly broke the screen by dropping it on the kitchen floor. I plan on replacing the worn buttons on the working used replacement with the buttons from my broken one, and perhaps the case as well. Will let you know how it works out.

Jeremiah Behrens - 返信

コメントを追加

統計データ:

過去 24時間: 2

過去 7 日: 16

過去 30 日: 65

今までの合計 13,245