メインコンテンツにスキップ

Logitech Gamepad F310 Case Replacement

必要な工具と部品

  1. Logitech Gamepad F310 Case Replacement, Case: 手順 1、 2の画像 1 Logitech Gamepad F310 Case Replacement, Case: 手順 1、 2の画像 2
    • Use a Phillips #1 screwdriver to remove all seven 3 mm screws that secure the rear case.

  2. Logitech Gamepad F310 Case Replacement: 手順 2、 2の画像 1 Logitech Gamepad F310 Case Replacement: 手順 2、 2の画像 2
    • Press along the seams of the controller and gently pull the front and rear case apart.

    • If necessary, use an opening tool to help pry the front and rear case apart.

    • Make sure to open the controller with the front facing down so that the buttons do not fall out.

  3. Logitech Gamepad F310 Case Replacement: 手順 3、 1の画像 1
    • Separate the front and rear case.

    • There are two side panels on the controller that come apart as well. When putting them back together, they slot into place on the sides of the controller.

  4. Logitech Gamepad F310 Case Replacement, Case: 手順 4、 2の画像 1 Logitech Gamepad F310 Case Replacement, Case: 手順 4、 2の画像 2
    • Use a Phillips #1 screwdriver to remove:

    • Four 3 mm screws

    • One 5 mm screw

    • Remove the central silver screw last.

    • Gently lift the motherboard off of the back case and slide the cord out of the slot on top.

終わりに

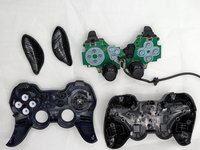
You have successfully taken the case off of your controller! Using the new case, follow these steps in reverse order to assemble your fixed controller.

作成者

3人の作成者と共同で作成されました。

Alan Mendoza DracoKing

メンバー登録日: 02/05/24

191 ポイント

2のガイドは作成済み

チーム

University of North Texas, Team 2-6, Kilpatrick Spring 2024 University of North Texas, Team 2-6, Kilpatrick Spring 2024人のメンバー

UNT-KILPATRICK-S24S2G6

4 メンバー

6のガイドは作成済み

0件のガイドコメント

コメントを追加

統計データ:

過去 24時間: 1

過去 7 日: 9

過去 30 日: 35

今までの合計 489