メインコンテンツにスキップ

Little Wonder GX270 Honda Maximum Output Blower Deflector Chain and Cable Replacement

必要な工具と部品

  1. Little Wonder GX270 Honda Maximum Output Blower Deflector Chain and Cable Replacement, Safety precautions: 手順 1、 2の画像 1 Little Wonder GX270 Honda Maximum Output Blower Deflector Chain and Cable Replacement, Safety precautions: 手順 1、 2の画像 2
    • Before you begin, ensure that the engine is off and cool to the touch.

  2. Little Wonder GX270 Honda Maximum Output Blower Deflector Chain and Cable Replacement: 手順 2、 2の画像 1 Little Wonder GX270 Honda Maximum Output Blower Deflector Chain and Cable Replacement: 手順 2、 2の画像 2
    • Locate the gas cutoff valve and flip the switch to the left to shut it.

  3. Little Wonder GX270 Honda Maximum Output Blower Deflector Chain and Cable Replacement: 手順 3、 2の画像 1 Little Wonder GX270 Honda Maximum Output Blower Deflector Chain and Cable Replacement: 手順 3、 2の画像 2
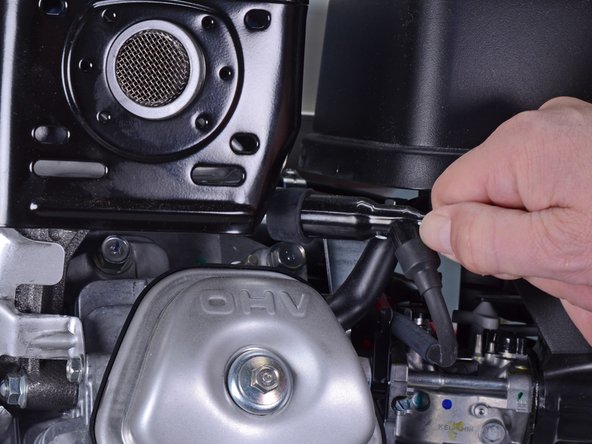
    • Grab the plastic housing at the end of the spark plug wire.

    • Pull firmly to disconnect the wire from the spark plug.

  4. Little Wonder GX270 Honda Maximum Output Blower Deflector Chain and Cable Replacement, Remove the deflector cable: 手順 4、 2の画像 1 Little Wonder GX270 Honda Maximum Output Blower Deflector Chain and Cable Replacement, Remove the deflector cable: 手順 4、 2の画像 2
    • Remove the cotter pin from the clevis.

  5. Little Wonder GX270 Honda Maximum Output Blower Deflector Chain and Cable Replacement: 手順 5、 3の画像 1 Little Wonder GX270 Honda Maximum Output Blower Deflector Chain and Cable Replacement: 手順 5、 3の画像 2 Little Wonder GX270 Honda Maximum Output Blower Deflector Chain and Cable Replacement: 手順 5、 3の画像 3
    • Remove the clevis pin.

  6. Little Wonder GX270 Honda Maximum Output Blower Deflector Chain and Cable Replacement: 手順 6、 3の画像 1 Little Wonder GX270 Honda Maximum Output Blower Deflector Chain and Cable Replacement: 手順 6、 3の画像 2 Little Wonder GX270 Honda Maximum Output Blower Deflector Chain and Cable Replacement: 手順 6、 3の画像 3
    • Slide the ball at the end of the cable through the round opening in the clevis.

    • Remove the clevis from the deflector cable.

  7. Little Wonder GX270 Honda Maximum Output Blower Deflector Chain and Cable Replacement: 手順 7、 2の画像 1 Little Wonder GX270 Honda Maximum Output Blower Deflector Chain and Cable Replacement: 手順 7、 2の画像 2
    • Slide the rubber boot off of the cable housing to the end of the cable.

  8. Little Wonder GX270 Honda Maximum Output Blower Deflector Chain and Cable Replacement: 手順 8、 2の画像 1 Little Wonder GX270 Honda Maximum Output Blower Deflector Chain and Cable Replacement: 手順 8、 2の画像 2
    • Use a 7/16 inch wrench to unscrew the nut securing the cable housing to the bracket.

  9. Little Wonder GX270 Honda Maximum Output Blower Deflector Chain and Cable Replacement: 手順 9、 3の画像 1 Little Wonder GX270 Honda Maximum Output Blower Deflector Chain and Cable Replacement: 手順 9、 3の画像 2 Little Wonder GX270 Honda Maximum Output Blower Deflector Chain and Cable Replacement: 手順 9、 3の画像 3
    • Slide the cable housing out from the deflector lever bracket.

  10. Little Wonder GX270 Honda Maximum Output Blower Deflector Chain and Cable Replacement, Remove the master link: 手順 10、 2の画像 1 Little Wonder GX270 Honda Maximum Output Blower Deflector Chain and Cable Replacement, Remove the master link: 手順 10、 2の画像 2
    • The next two steps will show you how to remove the master link on the deflector chain.

  11. Little Wonder GX270 Honda Maximum Output Blower Deflector Chain and Cable Replacement: 手順 11、 2の画像 1 Little Wonder GX270 Honda Maximum Output Blower Deflector Chain and Cable Replacement: 手順 11、 2の画像 2
    • Use a pair of pliers to unclip the master link.

    • Remove the master link retaining clip.

  12. Little Wonder GX270 Honda Maximum Output Blower Deflector Chain and Cable Replacement: 手順 12、 1の画像 1
    • Remove the outer plate.

  13. Little Wonder GX270 Honda Maximum Output Blower Deflector Chain and Cable Replacement: 手順 13、 1の画像 1
    • Remove the outer plate.

    • Remove the chain from the end of the deflector cable.

    • Repeat steps 11–13 for the upper master link if necessary.

    • During reassembly, follow steps 11-13 in reverse order to reinstall the master links.

  14. Little Wonder GX270 Honda Maximum Output Blower Deflector Chain and Cable Replacement: 手順 14、 3の画像 1 Little Wonder GX270 Honda Maximum Output Blower Deflector Chain and Cable Replacement: 手順 14、 3の画像 2 Little Wonder GX270 Honda Maximum Output Blower Deflector Chain and Cable Replacement: 手順 14、 3の画像 3
    • Squeeze the tabs on either side of the cable pusher with a pair of pliers and slide it through the bracket.

    • Remove the deflector cable.

  15. Little Wonder GX270 Honda Maximum Output Blower Deflector Chain and Cable Replacement, Install the new deflector chain: 手順 15、 2の画像 1 Little Wonder GX270 Honda Maximum Output Blower Deflector Chain and Cable Replacement, Install the new deflector chain: 手順 15、 2の画像 2
    • The following steps show how to install a new deflector chain.

    • Note the center link on the deflector chain.

    • Note the middle tooth of the pivot.

    • The deflector knob has been removed for illustrative purposes.

  16. Little Wonder GX270 Honda Maximum Output Blower Deflector Chain and Cable Replacement: 手順 16、 3の画像 1 Little Wonder GX270 Honda Maximum Output Blower Deflector Chain and Cable Replacement: 手順 16、 3の画像 2 Little Wonder GX270 Honda Maximum Output Blower Deflector Chain and Cable Replacement: 手順 16、 3の画像 3
    • Drop the middle link onto the middle tooth of the pivot.

  17. Little Wonder GX270 Honda Maximum Output Blower Deflector Chain and Cable Replacement, Adjust the deflector cable: 手順 17、 1の画像 1
    • Lift the deflector so that it is horizontal.

    • Turn the deflector knob clockwise to lock the deflector horizontally in the wide-open position.

  18. Little Wonder GX270 Honda Maximum Output Blower Deflector Chain and Cable Replacement: 手順 18、 3の画像 1 Little Wonder GX270 Honda Maximum Output Blower Deflector Chain and Cable Replacement: 手順 18、 3の画像 2 Little Wonder GX270 Honda Maximum Output Blower Deflector Chain and Cable Replacement: 手順 18、 3の画像 3
    • Slide the cable housing back onto the deflector lever bracket.

  19. Little Wonder GX270 Honda Maximum Output Blower Deflector Chain and Cable Replacement: 手順 19、 2の画像 1 Little Wonder GX270 Honda Maximum Output Blower Deflector Chain and Cable Replacement: 手順 19、 2の画像 2
    • Slide the clevis back on to the deflector cable.

  20. Little Wonder GX270 Honda Maximum Output Blower Deflector Chain and Cable Replacement: 手順 20、 2の画像 1 Little Wonder GX270 Honda Maximum Output Blower Deflector Chain and Cable Replacement: 手順 20、 2の画像 2
    • Insert the clevis pin through the clevis and the deflector adjustment lever.

  21. Little Wonder GX270 Honda Maximum Output Blower Deflector Chain and Cable Replacement: 手順 21、 1の画像 1
    • Move the deflector lever into the open position.

  22. Little Wonder GX270 Honda Maximum Output Blower Deflector Chain and Cable Replacement: 手順 22、 2の画像 1 Little Wonder GX270 Honda Maximum Output Blower Deflector Chain and Cable Replacement: 手順 22、 2の画像 2
    • Use an open-ended wrench to tighten the 7/16 inch bolt until the cable is taught.

  23. Little Wonder GX270 Honda Maximum Output Blower Deflector Chain and Cable Replacement: 手順 23、 1の画像 1
    • Slightly loosen the deflector knob to allow the deflector to move freely.

  24. Little Wonder GX270 Honda Maximum Output Blower Deflector Chain and Cable Replacement: 手順 24、 2の画像 1 Little Wonder GX270 Honda Maximum Output Blower Deflector Chain and Cable Replacement: 手順 24、 2の画像 2
    • Use the lever to open and close the deflector to check that cable is properly adjusted.

    • If the deflector does not fully open, the cable needs to be tightened more:

    • Repeat step 17, then step 22 but give the nut an additional clockwise turn.

    • Repeat steps 23–24.

    • If the deflector does not fully close, the cable needs more slack:

    • Repeat step 17, then step 22 but give the nut an addition counterclockwise turn.

    • Repeat steps 23–24.

  25. Little Wonder GX270 Honda Maximum Output Blower Deflector Chain and Cable Replacement: 手順 25、 1の画像 1
    • Use an open-ended wrench to tighten the other 7/16 inch bolt on the cable housing until it is snug against the bracket.

  26. Little Wonder GX270 Honda Maximum Output Blower Deflector Chain and Cable Replacement: 手順 26、 2の画像 1 Little Wonder GX270 Honda Maximum Output Blower Deflector Chain and Cable Replacement: 手順 26、 2の画像 2
    • Slide the rubber boot back onto the end of the cable housing.

    • Install the cotter pin onto the clevis pin.

ゴール

Sam Omiotek

メンバー登録日: 02/25/19

72,866 ポイント

288のガイドは作成済み

0 件のコメント

コメントを追加

統計データ:

過去 24時間: 0

過去 7 日: 1

過去 30 日: 7

今までの合計 644