メインコンテンツにスキップ

Little Tikes Tobi 2 Interactive Karaoke Machine Circuit Board Replacement

必要な工具と部品

  1. Little Tikes Tobi 2 Interactive Karaoke Machine Circuit Board Replacement, Battery: 手順 1、 3の画像 1 Little Tikes Tobi 2 Interactive Karaoke Machine Circuit Board Replacement, Battery: 手順 1、 3の画像 2 Little Tikes Tobi 2 Interactive Karaoke Machine Circuit Board Replacement, Battery: 手順 1、 3の画像 3
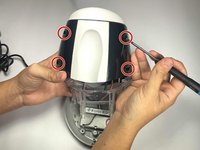
    • Use a Phillips screwdriver to remove the single screw that is holding the cover to the battery compartment.

    • If the screw doesn’t come out right away, use a spudger to gently lift the edge of the battery compartment in the recessed area while continuing to unscrew it with your other hand.

    • Use a spudger to carefully pry off the battery cover.

  2. Little Tikes Tobi 2 Interactive Karaoke Machine Circuit Board Replacement: 手順 2、 2の画像 1 Little Tikes Tobi 2 Interactive Karaoke Machine Circuit Board Replacement: 手順 2、 2の画像 2
    • To easily pop out a battery, use your thumb to push the battery from the flat side down toward the coil and pull the battery outward.

    • Remove all four batteries.

    • Take a new AA alkaline battery and position it in the correct orientation. Insert the flat side of the battery facing the coil first, then press the raised side down. Ensure this second battery is oriented in the opposite direction to the first. Continue replacing the batteries in an alternating pattern.

  3. Little Tikes Tobi 2 Interactive Karaoke Machine Circuit Board Replacement, Case: 手順 3、 1の画像 1
    • Use a Phillips screwdriver to remove four screws from the base of the device.

    • If the screws don't come out, you can gently lift them with the screwdriver tip or push them out from the other side once they're all loosened.

    • Remove the bottom of the karaoke machine.

    • Don't pull it apart roughly as it is attached to internal cables and they may be damaged in the process.

  4. Little Tikes Tobi 2 Interactive Karaoke Machine Circuit Board Replacement: 手順 4、 1の画像 1
    • Use a Phillips screwdriver to remove the four screws from the interior of the white base.

  5. Little Tikes Tobi 2 Interactive Karaoke Machine Circuit Board Replacement: 手順 5、 2の画像 1 Little Tikes Tobi 2 Interactive Karaoke Machine Circuit Board Replacement: 手順 5、 2の画像 2
    • Use a Phillips screwdriver to remove the four screws from the exterior black plastic part of the case.

    • Use a spudger to disassemble the case.

  6. Little Tikes Tobi 2 Interactive Karaoke Machine Circuit Board Replacement, Circuit Board: 手順 6、 1の画像 1
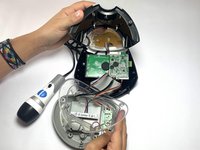
    • Use a Phillips #0 screwdriver to remove the two screws from the green circuit board.

  7. Little Tikes Tobi 2 Interactive Karaoke Machine Circuit Board Replacement: 手順 7、 1の画像 1
    • Use a soldering iron to desolder the wires from the circuit board.

    • Exercise caution when soldering, as the soldering iron is extremely hot and can easily cause burns.

終わりに

To reassemble your device, follow these instructions in reverse order. Take your e-waste to an R2 or e-Stewards certified recycler.

作成者

3人の作成者と共同で作成されました。

Isaiah Eagle

メンバー登録日: 09/04/24

607 ポイント

5のガイドは作成済み

チーム

CSU Los Angeles, Team 5-4, Kershman Fall 2024 CSU Los Angeles, Team 5-4, Kershman Fall 2024人のメンバー

CSULA-KERSHMAN-F24S5G4

4 メンバー

6のガイドは作成済み

0件のガイドコメント

コメントを追加

統計データ:

過去 24時間: 1

過去 7 日: 1

過去 30 日: 8

今までの合計 136