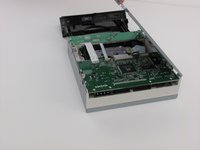
メインコンテンツにスキップ

Lite-On LightScribe SHM-165H6S Chassis Replacement

必要な工具と部品

  1. Lite-On LightScribe SHM-165H6S Chassis Replacement, Chassis: 手順 1、 2の画像 1 Lite-On LightScribe SHM-165H6S Chassis Replacement, Chassis: 手順 1、 2の画像 2
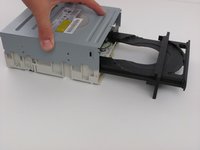
    • Insert an open paper clip into the small hole on the left side of the faceplate.

    • After the tray opens, extend it fully.

  2. Lite-On LightScribe SHM-165H6S Chassis Replacement: 手順 2、 3の画像 1 Lite-On LightScribe SHM-165H6S Chassis Replacement: 手順 2、 3の画像 2 Lite-On LightScribe SHM-165H6S Chassis Replacement: 手順 2、 3の画像 3
    • Use an opening device to push in the black tabs on the left, right and bottom of the outer chassis to unhook the faceplate.

  3. Lite-On LightScribe SHM-165H6S Chassis Replacement: 手順 3、 1の画像 1
    • Pull the faceplate away from the main chassis.

  4. Lite-On LightScribe SHM-165H6S Chassis Replacement: 手順 4、 1の画像 1
    • Unscrew the four 8.5 mm screws on the bottom chassis using a Philips #2 screwdriver.

  5. Lite-On LightScribe SHM-165H6S Chassis Replacement: 手順 5、 2の画像 1 Lite-On LightScribe SHM-165H6S Chassis Replacement: 手順 5、 2の画像 2
    • Lift the top and bottom chassis straight up in order to remove them.

終わりに

To reassemble your device, follow these instructions in reverse order.

2 の人々がこのガイドを完成させました。

作成者

6人の作成者と共同で作成されました。

James Biggs

メンバー登録日: 10/12/11

596 ポイント

3のガイドは作成済み

チーム

Cal Poly, Team 6-5, Regan Fall 2011 Cal Poly, Team 6-5, Regan Fall 2011人のメンバー

CPSU-REGAN-F11S6G5

2 メンバー

6のガイドは作成済み

0 件のコメント

コメントを追加

統計データ:

過去 24時間: 0

過去 7 日: 0

過去 30 日: 6

今までの合計 2,789