はじめに
このガイドを参照して、Lenovo Yoga C930-13IKBラップトップに搭載されているSSDを交換しましょう。 SSDは、一般的なハードディスクドライブ(HDD)と異なり、可動部分のない新しいタイプのデータストレージデバイスです。 SSDはより高速で耐久性があり、消費電力が少ない特徴があります。 SSDが故障している場合、またはアップグレードしたい場合は、SSDを交換できます。
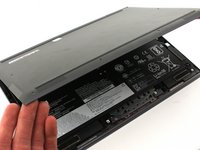
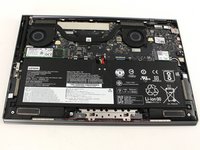
SSDカードはアクセスと取り外しが簡単です。 SSDにアクセスするには、背面カバーを取り外してから、SSDをマザーボードに取り付けている留め具を外すだけです。 このガイドでは、プラスチックの開口ツール、T5 Torxドライバー、および#00プラスネジドライバーが必要です。
必要な工具と部品


デバイスを再組立する際は、これらのインストラクションを逆の順番に従って作業を進めてください。
ある他の人がこのガイドを完成しました。
以下の翻訳者の皆さんにお礼を申し上げます:
100%

Midori Doiさんは世界中で修理する私たちを助けてくれています! あなたも貢献してみませんか?
翻訳を始める ›

チーム

Cal Poly, Team S19-G5, White Winter 2020 Cal Poly, Team S19-G5, White Winter 2020人のメンバー
CPSU-WHITE-W20S19G5
4 メンバー
16のガイドは作成済み
4件のガイドコメント
I need to remove the stripped screw on the SSDs non-slot-end because Lenovo tightened it down with a military grade drill. To replace, it wasn’t mentioned which size screw was there.
Ty for the info but I'm looking to get windows installed onto the blank new hard drive so I can actually run and use it, lol! Unfortunately, the "automatic" registration process didn't work and my product key isn't to be found. In fact, my Microsoft account doesn't even have it registered as a device. But it does have it as a device I loaded apps from the Play Store though. So, there's proof it existed. Anywho, I'm stuck trying to get Windows on it before I re-install the hard drive. Any ideas are more than welcome! Thanks, M.H.
Good guide. I took the following steps and it went quickly and smoothly. Less than an hour start to finish:
1. I purchased a Samsung 980 (not Pro, but should also work).
2. Disabled bitlocker on my old SSD. I also backed up the key for future ref.
3. Downloaded and installed the Samsung SSD Magician and migration tools.
4. Put the new SSD into an external enclosure ($18 on Amazon).
5. Ran the migration software and copied my windows 11 to the new SSD.
6. Shutdown the laptop and swapped the SSDs.
7. Rebooted into windows.
8. Ran the Samsung Magician software and updated the SSD firmware.
9. Done and perfect.
THANK YOU, THOMAS!!! I did exactly these things and now my C930 has been running flawlessly for a week now! It is now, once again, my favorite laptop despite its age. :-) You saved me quite a bit of time.
Notes for others: 1) I didn't do Step 8.
2) Here's the enclosure I ordered: https://www.amazon.com/dp/B0BWXDT8TB?ref...
3) The Samsung Magician software can be found at https://semiconductor.samsung.com/us/con...