メインコンテンツにスキップ

Lenovo Yoga C930-13IKB Motherboard Replacement

必要な工具と部品

  1. Lenovo Yoga C930-13IKB Motherboard Replacement, Back Cover: 手順 1、 1の画像 1
    • Flip the device over so that the underside is facing up.

    • Remove the six 3.5 mm T5 Torx screws.

  2. Lenovo Yoga C930-13IKB Motherboard Replacement: 手順 2、 2の画像 1 Lenovo Yoga C930-13IKB Motherboard Replacement: 手順 2、 2の画像 2
    • Pry off the back cover using the plastic opening tool.

    • Loosen the back cover in multiple spots using the opening tool, then remove the whole back.

    • You may have to run the plastic tool along the edges until you find a small gap to separate the back cover from the laptop.

    • Do not use a metal tool when working with your device.

  3. Lenovo Yoga C930-13IKB Motherboard Replacement: 手順 3、 2の画像 1 Lenovo Yoga C930-13IKB Motherboard Replacement: 手順 3、 2の画像 2
    • Carefully lift the cover off with your hands.

  4. Lenovo Yoga C930-13IKB Motherboard Replacement, SSD: 手順 4、 1の画像 1
    • Remove the screw ( 2 mm with a 5 mm head) that connect the SSD to the motherboard using a Phillips #00 screwdriver.

  5. Lenovo Yoga C930-13IKB Motherboard Replacement: 手順 5、 1の画像 1
    • Pinch the left side of the SSD card.

    • Pull gently to the left, horizontal to the laptop.

  6. Lenovo Yoga C930-13IKB Motherboard Replacement, Wi-Fi Card: 手順 6、 2の画像 1 Lenovo Yoga C930-13IKB Motherboard Replacement, Wi-Fi Card: 手順 6、 2の画像 2
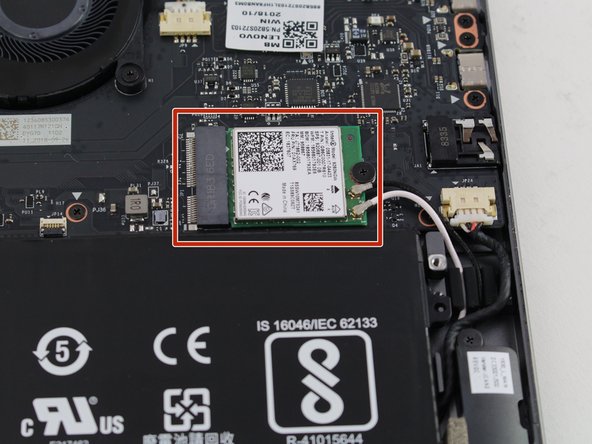
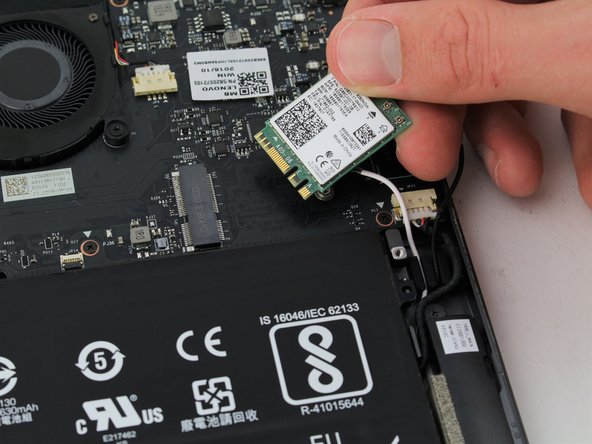
    • Find the Wi-Fi card located on the right just above the battery. It is a green chip with a white label that says "Intel 9260" somewhere on it.

  7. Lenovo Yoga C930-13IKB Motherboard Replacement: 手順 7、 2の画像 1 Lenovo Yoga C930-13IKB Motherboard Replacement: 手順 7、 2の画像 2
    • Use a Phillips #00 screwdriver to remove the single 2 mm screw that attaches the card to the motherboard.

  8. Lenovo Yoga C930-13IKB Motherboard Replacement: 手順 8、 3の画像 1 Lenovo Yoga C930-13IKB Motherboard Replacement: 手順 8、 3の画像 2 Lenovo Yoga C930-13IKB Motherboard Replacement: 手順 8、 3の画像 3
    この手順で使用する道具:
    iFixit Opening Tool
    $1.99
    購入する
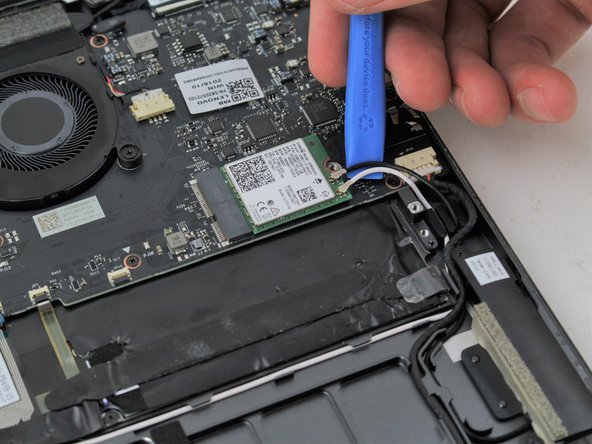
    • Gently pull or use the iFixit opening tool to detach the black and white wires from the card.

    • When reassembling, these wires are difficult to reattach, so be patient. Line the wires up with your fingers and press down on the connections with the opening tool.

  9. Lenovo Yoga C930-13IKB Motherboard Replacement: 手順 9、 2の画像 1 Lenovo Yoga C930-13IKB Motherboard Replacement: 手順 9、 2の画像 2
    • Pinch the card on either side and pull to the right to unplug it from the motherboard.

  10. Lenovo Yoga C930-13IKB Motherboard Replacement, Coolant Fans: 手順 10、 1の画像 1
    • Remove the four 3 mm Phillips #0 screws from the fan assembly.

  11. Lenovo Yoga C930-13IKB Motherboard Replacement: 手順 11、 1の画像 1
    • Remove the four 2 mm Phillips #00 screws from the fans themselves.

  12. Lenovo Yoga C930-13IKB Motherboard Replacement: 手順 12、 1の画像 1
    • Unscrew the three 3 mm Phillips #0 screws on the heatsink.

  13. Lenovo Yoga C930-13IKB Motherboard Replacement: 手順 13、 2の画像 1 Lenovo Yoga C930-13IKB Motherboard Replacement: 手順 13、 2の画像 2
    • Use a plastic opening tool to remove the two small, white power cable connectors for each of the two fans.

  14. Lenovo Yoga C930-13IKB Motherboard Replacement: 手順 14、 1の画像 1
    • Gently lift the fan assembly out of the laptop.

    • Be sure to clean and reapply thermal paste to the heatsink during reassembly.

  15. Lenovo Yoga C930-13IKB Motherboard Replacement, Motherboard: 手順 15、 3の画像 1 Lenovo Yoga C930-13IKB Motherboard Replacement, Motherboard: 手順 15、 3の画像 2 Lenovo Yoga C930-13IKB Motherboard Replacement, Motherboard: 手順 15、 3の画像 3
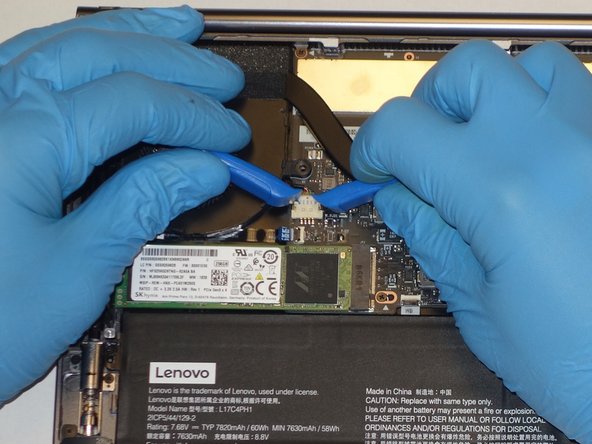
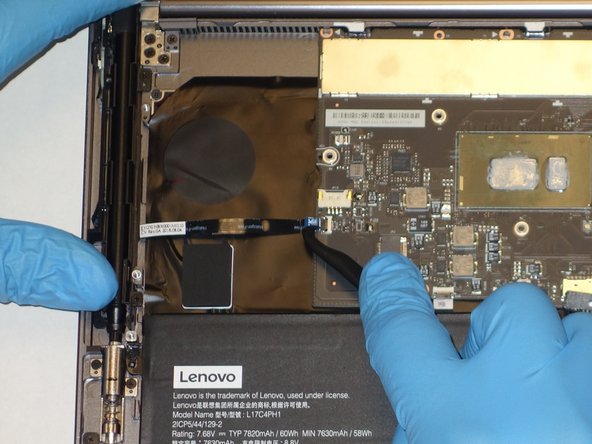
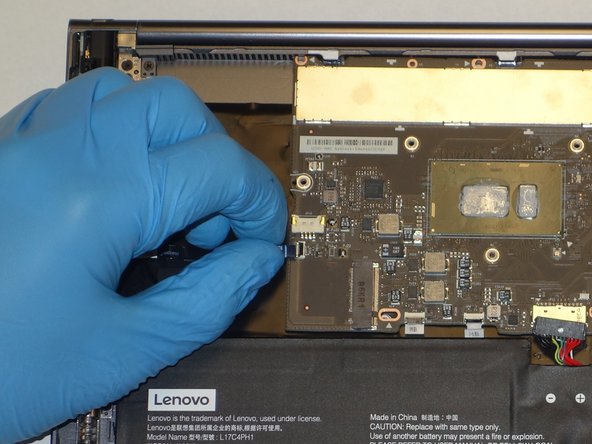
    • Using the Halberd Spudger, gently lift the black tab on top of each of the five ZIF connectors for the ribbon cables. Then pull the cables out from the connectors.

  16. Lenovo Yoga C930-13IKB Motherboard Replacement: 手順 16、 2の画像 1 Lenovo Yoga C930-13IKB Motherboard Replacement: 手順 16、 2の画像 2
    • Using the reverse tweezers, gently pull out the small black cable towards the top right of the motherboard.

  17. Lenovo Yoga C930-13IKB Motherboard Replacement: 手順 17、 2の画像 1 Lenovo Yoga C930-13IKB Motherboard Replacement: 手順 17、 2の画像 2
    • Using two plastic opening tools gently unplug the white speaker cable connector from the bottom left of the motherboard.

  18. Lenovo Yoga C930-13IKB Motherboard Replacement: 手順 18、 2の画像 1 Lenovo Yoga C930-13IKB Motherboard Replacement: 手順 18、 2の画像 2
    • Using the plastic opening tool, gently pry up on the metal tabs of the two display cables to remove the cables from the top right corner of the motherboard.

  19. Lenovo Yoga C930-13IKB Motherboard Replacement: 手順 19、 2の画像 1 Lenovo Yoga C930-13IKB Motherboard Replacement: 手順 19、 2の画像 2
    • Remove the fourteen 3 mm Phillips #00 screws that hold in the motherboard.

  20. Lenovo Yoga C930-13IKB Motherboard Replacement: 手順 20、 1の画像 1
    • While gently grasping each side of the motherboard, carefully lift the assembly out.

終わりに

To reassemble your device, follow these instructions in reverse order.

3 の人々がこのガイドを完成させました。

作成者

2人の作成者と共同で作成されました。

Josiah Grayson Sawyer

メンバー登録日: 09/17/20

514 ポイント

3のガイドは作成済み

2 件のコメント

This is a great step-by-step walk-through. I went into replace a keyboard with all the wrong tools with me and I found out the client ordered the wrong keyboard thankfully no liquid damage inside. I found a few steps that were not required unless you were doing a parts swap to another system. I managed to instead clean out the keys without breaking the key caps and somehow the wrong keyboard had the right donor parts to fix the arrow key.

Can I really say I completed this when I ended up not replacing the keyboard?

FYI keep your liquids away from your computer!

I do have to say this system is pretty serviceable, cough if the manufacturer has parts.

imark7777777 - 返信

Thank you for this step by step. It worked a treat!

Anne Carpenter - 返信

コメントを追加

統計データ:

過去 24時間: 0

過去 7 日: 3

過去 30 日: 31

今までの合計 1,912