はじめに
If your device isn’t properly registering key clicks or if what you type isn’t appearing on your screen, it may be time to replace the keyboard. Follow these instructions to replace the keyboard in the Lenovo Yoga 720-15IKB.
必要な工具と部品
-
-
Power off the device before starting.
-
Flip the device over with the hinges facing away from you.
-
Remove seven 5.0 mm Torx T5 screws.
-
Remove three 9.5 mm Torx T5 screws.
-
-
-
Remove the six 5.2mm Torx T5 screws holding the fan in place.
-
Remove the five 5.0mm Torx T5 screws holding the fan in place.
Only remove the orange set if you don't plan on swapping thermal paste. Red is for thermal paste, orange is for chassis disassembly
-
-
-
Disconnect the two fan wire connectors.
-
Carefully lift the fan up and out.
Thanks for a great explanation!
It is physically possible to remove just one of the fans? Right one (on right side with laptop open).
CurlsCurls - 返信
-
-
-
-
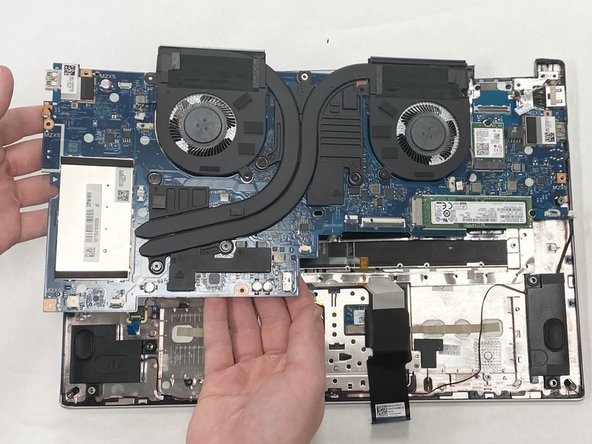
Lift the battery out of the case to remove it.
Before installing the new battery. I recomend doing a battery drain, hold the power button for 30 seconds to discharge any capaciters.
I ran into an issue where once i pulled the battery out and tried to put either the new or old battery back in. When i would try to turn the laptop back on with the power switch, the keyboard back light would blink every few seconds and nothing would come on the screen at all. Doing a battery drain between pulling a battery and puting a new one in fixed the issue.
-
-
-
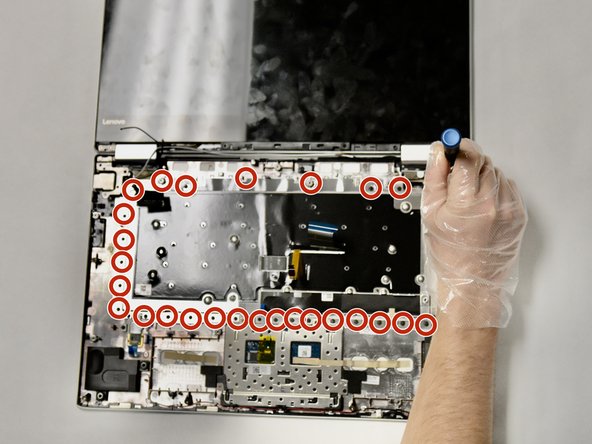
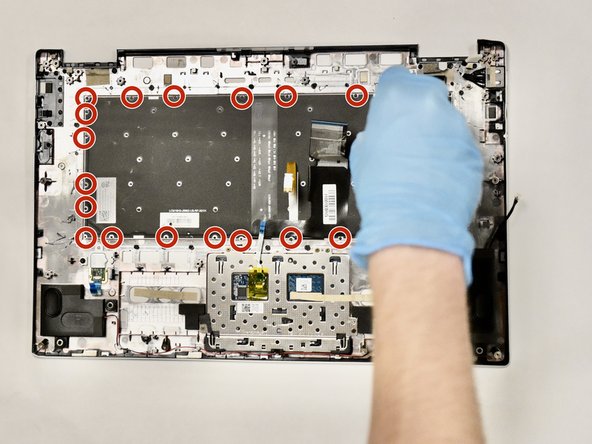
Using the Phillips #000 screwdriver, remove the 39 welded screws holding the keyboard cover in place.
-
Gently lift to remove the keyboard cover.
these plastic screws are like melted into the keyboard cover, and a phillips head screw driver isnt working. How do you suggest i remove it without destroying the laptop, and while still being able to put the cover back on?
I've just followed these instructions (more of a guideline really!) on a Lenovo 720-13IKB (not the 15 that these instructions are for)
As Kareem said, they're not screwed, but instead, plastic pins were formed on the back of the laptop case, the keyboard placed on top, and then each of the plastic posts was pressed down with a heated implement, making something almost like a plastic rivet. The keyboard backing plate was then fitted, and the same was done again.
I used a multi-tool (Vitorinox/Leatherman type) which had a very small chisel blade.
I used it to prise / scrape away (very carefully!) all of the plastic "mushroom" welds on the metal plate, then did the same for the keyboard.
The old keyboard was actually able to pop off the tops of the melted pins leaving the majority of the plastic stem. This meant the new keyboard was able to be positioned correctly.
One the laptop went back together, all of the other components managed to squash the keyboard plate down enough that the keyboard was fine.
Pete Smith - 返信
-
To reassemble your device, follow these instructions in reverse order.
To reassemble your device, follow these instructions in reverse order.
3 の人々がこのガイドを完成させました。
5 件のコメント
Hi, how did you remove the welded screws from the keyboard?
John Brown - 返信
I agree with john brown, how did you manage to remove the welded screws from the keyboard?
This model of laptop is not designed to allow the keyboard to be removed. A very handy (or very lucky) person might be able to get the welded screws out, but they are not designed to be removed. Additionally, DO NOT REMOVE THE FAN! There are a couple of screws at the back of the fans that need to removed to remove the motherboard, but it is not necessary to remove the whole fan in order to remove the motherboard (and if you do, you would then need to re-seat the fan and mess with applying new thermal paste when doing so).
True that the "welded screws" are...... not really screws at all. We broke off the capped bits that hold the keyboard and cover in place. We then replaced the keyboard and used a glue-gun on each of the "screws" to keep them in place, effectively "repairing" each of the screws we had broken off (/ had "un-capped)".
This works like a charm. It was a few years ago, and I am using it still, including right now :)
Never saw such an insane design in a laptop before. It seemed a bit scary to break off dozens of bits in a laptop, but it wasn't in the end. Don't let this hold you back from repairing your (otherwise) awesome laptop!


