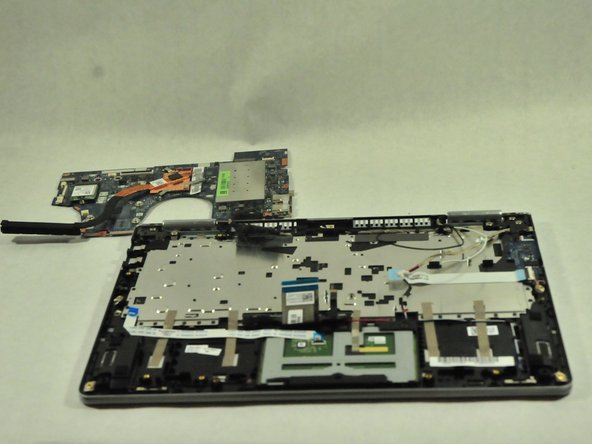
メインコンテンツにスキップ

Lenovo Yoga 710-14IKB Motherboard Replacement

必要な工具と部品

  1. Lenovo Yoga 710-14IKB Motherboard Replacement, Back Cover: 手順 1、 1の画像 1
    • Ensure your device is completely OFF before starting this guide.

    • Use a Torx T4 screwdriver to unscrew the nine 5 mm screws holding the cover in place.

    • Use a Torx T4 screwdriver to unscrew the 8 mm screw in the center.

    • When, reassembling, make sure not to tighten the screws too much or you may risk cracking the plastic cover.

  2. Lenovo Yoga 710-14IKB Motherboard Replacement: 手順 2、 3の画像 1 Lenovo Yoga 710-14IKB Motherboard Replacement: 手順 2、 3の画像 2 Lenovo Yoga 710-14IKB Motherboard Replacement: 手順 2、 3の画像 3
    • Use the plastic opening tool to pry the cover up and away from the laptop, starting at one end and working your way around the cover.

    • The cover is large and flat and made of thin plastic. It cracks easily, so make sure not to pry too hard.

  3. Lenovo Yoga 710-14IKB Motherboard Replacement, Battery: 手順 3、 2の画像 1 Lenovo Yoga 710-14IKB Motherboard Replacement, Battery: 手順 3、 2の画像 2
    • Use a Phillips #00 screwdriver to remove the four 3 mm screws holding the battery in place.

    • Be careful not to cross-thread the screws. Also, don't let the screws fall down into the laptop case.

  4. Lenovo Yoga 710-14IKB Motherboard Replacement: 手順 4、 2の画像 1 Lenovo Yoga 710-14IKB Motherboard Replacement: 手順 4、 2の画像 2
    • Use your fingers or an opening tool to slide the battery connector out of its motherboard socket.

  5. Lenovo Yoga 710-14IKB Motherboard Replacement: 手順 5、 1の画像 1
    • Remove the battery.

  6. Lenovo Yoga 710-14IKB Motherboard Replacement, SSD: 手順 6、 2の画像 1 Lenovo Yoga 710-14IKB Motherboard Replacement, SSD: 手順 6、 2の画像 2
    • Use a Phillips #00 screwdriver to remove the 3mm screw on the SSD.

  7. Lenovo Yoga 710-14IKB Motherboard Replacement: 手順 7、 2の画像 1 Lenovo Yoga 710-14IKB Motherboard Replacement: 手順 7、 2の画像 2
    • Use your fingers to lift up the SSD and pull away from the socket removing it from the laptop.

  8. Lenovo Yoga 710-14IKB Motherboard Replacement, Motherboard: 手順 8、 1の画像 1
    • Use a PH00 screwdriver to remove the nine 3mm screws.

  9. Lenovo Yoga 710-14IKB Motherboard Replacement: 手順 9、 2の画像 1 Lenovo Yoga 710-14IKB Motherboard Replacement: 手順 9、 2の画像 2
    • Disconnect the indicated cables from the motherboard.

    • Be careful when removing cables. Do not pull or yank cables from their slots.

    • Remove the motherboard.

    • If you want to fully remove the motherboard, you must desolder the display cable.

終わりに

To reassemble your device, follow these instructions in reverse order.

3 の人々がこのガイドを完成させました。

作成者

1人の作成者と共同作成されました。

Evan Cruzen

メンバー登録日: 11/01/18

253 ポイント

2のガイドは作成済み

チーム

UMass Dartmouth, Team S5-G8, Gulbrandsen Fall 2018 UMass Dartmouth, Team S5-G8, Gulbrandsen Fall 2018人のメンバー

UMASSD-GULBRANDSEN-F18S5G8

3 メンバー

9のガイドは作成済み

0 件のコメント

コメントを追加

統計データ:

過去 24時間: 0

過去 7 日: 3

過去 30 日: 9

今までの合計 2,835