メインコンテンツにスキップ

Lenovo Yoga 3 11 Wireless Card Replacement

必要な工具と部品

  1. Lenovo Yoga 3 11 Wireless Card Replacement, Lower Case: 手順 1、 1の画像 1
    • Remove the eleven 6 mm T5 Torx screws securing the lower case.

    • Gently lift the lower case up and away from the device.

  2. Lenovo Yoga 3 11 Wireless Card Replacement, Battery: 手順 2、 3の画像 1 Lenovo Yoga 3 11 Wireless Card Replacement, Battery: 手順 2、 3の画像 2 Lenovo Yoga 3 11 Wireless Card Replacement, Battery: 手順 2、 3の画像 3
    • Remove the two 3 mm Phillips #00 screws securing the battery.

    • There are arrows on the battery indicating the location of the screws.

  3. Lenovo Yoga 3 11 Wireless Card Replacement: 手順 3、 1の画像 1
    • Use a pair of tweezers to gently disconnect the battery connector.

  4. Lenovo Yoga 3 11 Wireless Card Replacement: 手順 4、 2の画像 1 Lenovo Yoga 3 11 Wireless Card Replacement: 手順 4、 2の画像 2
    • Use a pair of tweezers to gently disconnect the speaker cable.

    • Remove the wires from underneath the battery tabs using the tweezers.

  5. Lenovo Yoga 3 11 Wireless Card Replacement: 手順 5、 1の画像 1
    • Carefully remove the battery from the device.

  6. Lenovo Yoga 3 11 Wireless Card Replacement, Wireless Card: 手順 6、 1の画像 1
    • Use a pair of tweezers to disconnect the motherboard-size of the trackpad ribbon cable. Gently lift up the black tab, and the cable should come free from the ZIF connector.

  7. Lenovo Yoga 3 11 Wireless Card Replacement: 手順 7、 1の画像 1
    • Use a pair of tweezers to disconnect the keyboard ribbon cable from the motherboard ZIF connector. Gently lift up the white tab, and the cable should come free.

  8. Lenovo Yoga 3 11 Wireless Card Replacement: 手順 8、 1の画像 1
    • Use a pair of tweezers to disconnect the motherboard-side of the SD board ribbon cable. Gently lift up the black tab, and then ribbon cable should come free from the ZIF connector.

  9. Lenovo Yoga 3 11 Wireless Card Replacement: 手順 9、 1の画像 1
    • Use the tweezers to unplug the USB port from the motherboard by gently lifting the white connector up from the black motherboard connector.

  10. Lenovo Yoga 3 11 Wireless Card Replacement: 手順 10、 1の画像 1
    • Use a plastic opening tool to gently pry up the screen cable from the motherboard.

  11. Lenovo Yoga 3 11 Wireless Card Replacement: 手順 11、 3の画像 1 Lenovo Yoga 3 11 Wireless Card Replacement: 手順 11、 3の画像 2 Lenovo Yoga 3 11 Wireless Card Replacement: 手順 11、 3の画像 3
    • Use a pair of tweezers to disconnect the "I/O Side" of the ribbon cable connecting the audio jack/USB port assembly to the motherboard. Gently lift up the black tab, and the ribbon cable should come free from the ZIF connector.

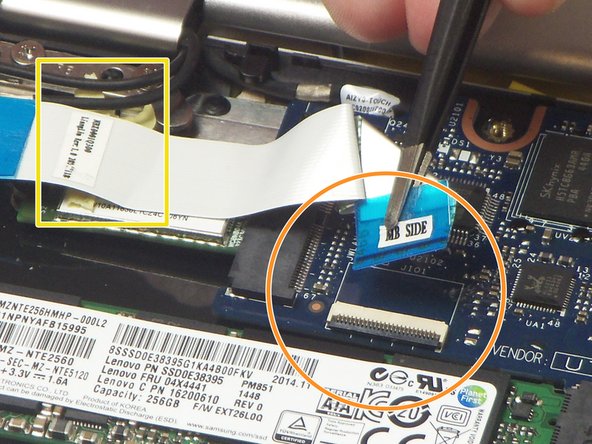
    • Use a pair of tweezers to disconnect the "MB Side" of the ribbon cable connecting the audio jack/USB port assembly to the motherboard. Gently lift up the black tab, and the ribbon cable should come free from the ZIF connector.

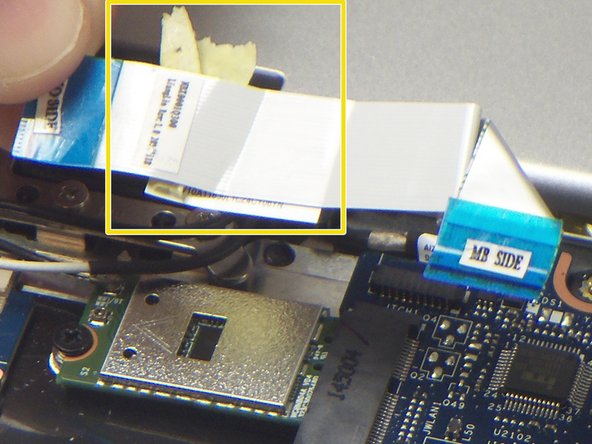
    • Remove the ribbon cable from the device.

  12. Lenovo Yoga 3 11 Wireless Card Replacement: 手順 12、 2の画像 1 Lenovo Yoga 3 11 Wireless Card Replacement: 手順 12、 2の画像 2
    • Remove the single 2 mm Phillips #00 screws securing the wireless card.

    • Use a pair of tweezers to disconnect the black and white antenna cables that are connected to the wireless card.

    • Gently lift the wireless card up and out of the device.

終わりに

To reassemble your device, follow these instructions in reverse order.

3 の人々がこのガイドを完成させました。

Geoff Wacker

メンバー登録日: 09/30/13

89,935 ポイント

89のガイドは作成済み

2 件のコメント

Thanks for the useful views and explanations about what’s there, however I don’t see why the battery has to be removed at all for this procedure?

(The network card appears to be accessible without)

Pete R

Pete Reimann - 返信

Are there any H*ckintosh compatible wireless cards that can be installed in this Lenovo Yoga 3 11 laptop? Asking for a friend. ;)

Jaime Hancock - 返信

コメントを追加

統計データ:

過去 24時間: 1

過去 7 日: 3

過去 30 日: 10

今までの合計 2,622