メインコンテンツにスキップ

Lenovo Thinkpad T440s Display Replacement

必要な工具と部品

  1. Lenovo Thinkpad T440s Display Replacement, Back Panel: 手順 1、 2の画像 1 Lenovo Thinkpad T440s Display Replacement, Back Panel: 手順 1、 2の画像 2
    • Make sure to power down and turn off your device before proceeding with the repair.

    • Flip your laptop over so that the backside is facing you.

  2. Lenovo Thinkpad T440s Display Replacement: 手順 2、 1の画像 1
    • Using a Phillips #1 screwdriver, remove the eight screws securing the backplate.

    • Don’t try to force screws which won't come out. They are held in place by a stopper on the reverse side. This will not prevent you from removing the backplate.

  3. Lenovo Thinkpad T440s Display Replacement: 手順 3、 2の画像 1 Lenovo Thinkpad T440s Display Replacement: 手順 3、 2の画像 2
    • Using the metal spudger, wedge it in the seam where the backplate meets the front plate and run the tool along the seam to separate the backplate.

  4. Lenovo Thinkpad T440s Display Replacement: 手順 4、 1の画像 1
    • Remove the back panel from the device.

  5. Lenovo Thinkpad T440s Display Replacement, Display: 手順 5、 3の画像 1 Lenovo Thinkpad T440s Display Replacement, Display: 手順 5、 3の画像 2 Lenovo Thinkpad T440s Display Replacement, Display: 手順 5、 3の画像 3
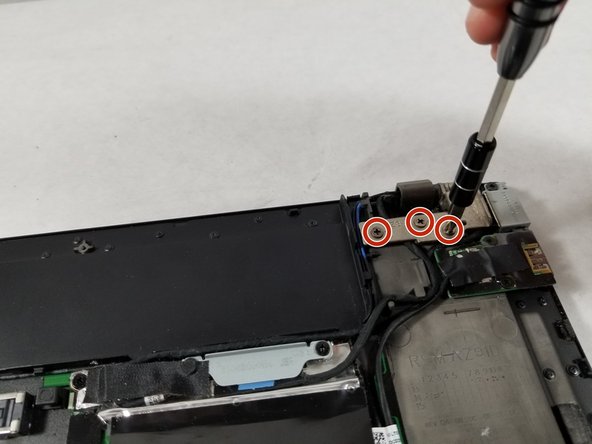
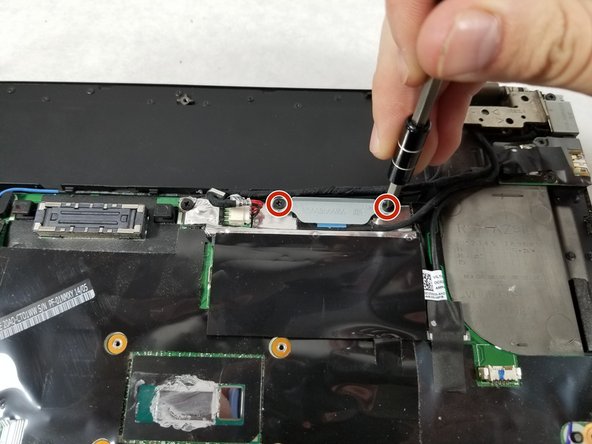
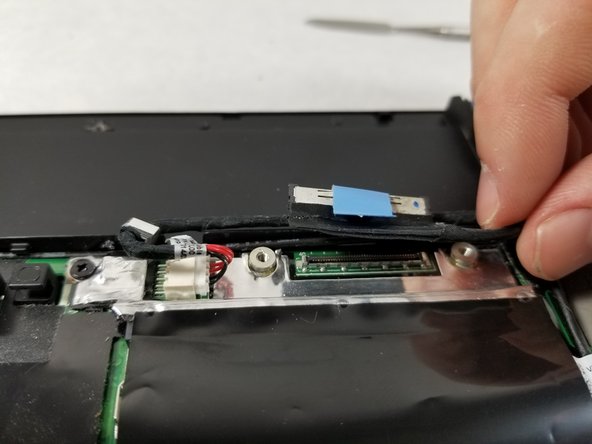
    • Use the Phillips #1 screwdriver to remove the five screws securing the display mounts.

  6. Lenovo Thinkpad T440s Display Replacement: 手順 6、 3の画像 1 Lenovo Thinkpad T440s Display Replacement: 手順 6、 3の画像 2 Lenovo Thinkpad T440s Display Replacement: 手順 6、 3の画像 3
    • Use the metal spudger to pry up the lever securing the ribbon cable in it's connection housing.

  7. Lenovo Thinkpad T440s Display Replacement: 手順 7、 3の画像 1 Lenovo Thinkpad T440s Display Replacement: 手順 7、 3の画像 2 Lenovo Thinkpad T440s Display Replacement: 手順 7、 3の画像 3
    • Grab hold of the ribbon cable and pull it out of it's connection housing.

  8. Lenovo Thinkpad T440s Display Replacement: 手順 8、 2の画像 1 Lenovo Thinkpad T440s Display Replacement: 手順 8、 2の画像 2
    • Disconnect the white and blue wires connected to the mounted circuit by grabbing them close to the connection and pulling upward.

  9. Lenovo Thinkpad T440s Display Replacement: 手順 9、 2の画像 1 Lenovo Thinkpad T440s Display Replacement: 手順 9、 2の画像 2
    • Use the Phillips #1 screwdriver to remove the two screws securing the metal plate to expose the wire connection.

  10. Lenovo Thinkpad T440s Display Replacement: 手順 10、 2の画像 1 Lenovo Thinkpad T440s Display Replacement: 手順 10、 2の画像 2
    • Disconnect the wire by pulling it upward from the motherboard.

  11. Lenovo Thinkpad T440s Display Replacement: 手順 11、 3の画像 1 Lenovo Thinkpad T440s Display Replacement: 手順 11、 3の画像 2 Lenovo Thinkpad T440s Display Replacement: 手順 11、 3の画像 3
    • Unclip the 5 wires connected to the display assembly from the motherboard and move them out of the way.

  12. Lenovo Thinkpad T440s Display Replacement: 手順 12、 3の画像 1 Lenovo Thinkpad T440s Display Replacement: 手順 12、 3の画像 2 Lenovo Thinkpad T440s Display Replacement: 手順 12、 3の画像 3
    • Now that the display assembly is disconnected from the main body, lift both of the mounting brackets and remove the display assembly from the main body.

終わりに

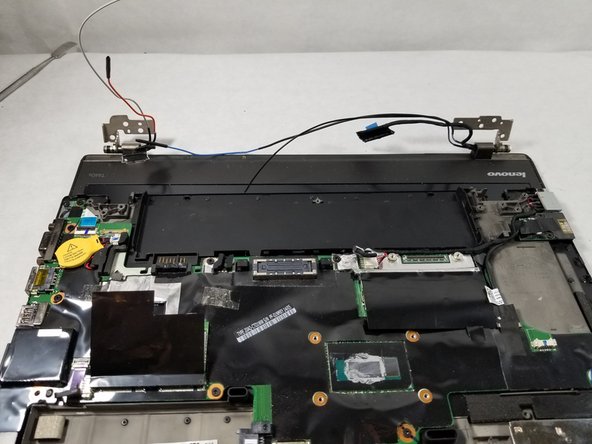
To reassemble your device, follow these instructions in reverse order.

3 の人々がこのガイドを完成させました。

作成者

1人の作成者と共同作成されました。

Terelle Montalvo

メンバー登録日: 10/22/18

1,438 ポイント

8のガイドは作成済み

チーム

UMass Dartmouth, Team S1-G5, Simcock Fall 2018 UMass Dartmouth, Team S1-G5, Simcock Fall 2018人のメンバー

UMASSD-SIMCOCK-F18S1G5

3 メンバー

8のガイドは作成済み

0 件のコメント

コメントを追加

統計データ:

過去 24時間: 0

過去 7 日: 8

過去 30 日: 22

今までの合計 3,204