メインコンテンツにスキップ

このバージョンは誤った内容を含んでいる可能性があります。最新の承認済みスナップショットに切り替えてください。

必要な工具と部品

  1. この手順は未翻訳です。 翻訳を手伝う。

    : 手順 1、 2の画像 1 : 手順 1、 2の画像 2
    • This cover is glued to the laptop. Please use caution as you use a spudger to disconnect the glue from the edge of the computer screen. Make sure the glue stays in tact on the cover.

    • Use the spudger all the way around to pry the cover loose.

  2. この手順は未翻訳です。 翻訳を手伝う。

    : 手順 2、 3の画像 1 : 手順 2、 3の画像 2 : 手順 2、 3の画像 3
    • Once the cover is off, you will see the screen is held in with 4 Phillips head screws.

    • Remove all 4 screws as shown.

  3. この手順は未翻訳です。 翻訳を手伝う。

    : 手順 3、 2の画像 1 : 手順 3、 2の画像 2
    • Once you have removed the screws, the monitor will be free.

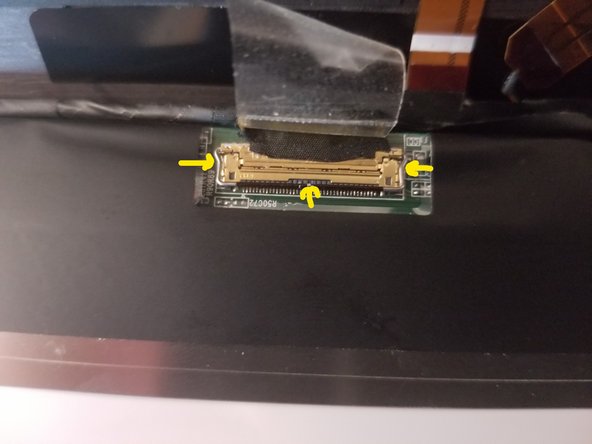
    • The best way to take the monitor out is to gently pull the top of it away from the case. As you can see it is connected at the bottom by the video connection.

    • To remove the screen completely you must disconnect this video connection. There is a very thin metal tab (see picture) that will pry up and allow the connection to disconnect.

  4. この手順は未翻訳です。 翻訳を手伝う。

    : 手順 4、 1の画像 1
    • The screen is now disconnected.

    • Once you have a replacement screen you can connect it in reverse order.

ゴール

4 の人々がこのガイドを完成させました。

作成者

2人の作成者と共同で作成されました。

Bill

メンバー登録日: 09/17/14

818 ポイント

5のガイドは作成済み

6 件のコメント

Thanks for posting - this is much easier than I expected and your posting made it truly a simple task!!

Rob Campbell - 返信

Will a screen of a T460s or aT470s fit a T480s ?

c.evagelidakis - 返信

I haven’t had a chance to check the T480 screen to see if it is the same connection.

Bill -

Do you need to apply some type of adhesive to put the front panel back on after replacing the screen?

Matt - 返信

No, you just need to put the screws back

ROHIT BHUSAM -

コメントを追加

統計データ:

過去 24時間: 8

過去 7 日: 73

過去 30 日: 280

今までの合計 13,639