はじめに
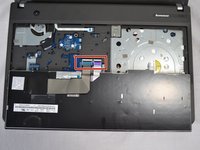
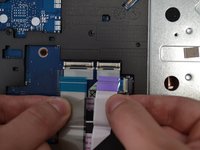
A guide on how to replace the individual keys on a Lenovo ThinkPad E540 laptop.
必要な工具と部品


To reassemble your device, follow these instructions in reverse order.
To reassemble your device, follow these instructions in reverse order.
2 の人々がこのガイドを完成させました。
チーム

USF Tampa, Team S2-G5, Nance Spring 2018 USF Tampa, Team S2-G5, Nance Spring 2018人のメンバー
USFT-NANCE-S18S2G5
4 メンバー
8のガイドは作成済み
4 件のコメント
Thank you for posting this guide. I was able to comfortably replace my keyboard on a Lenovo E540 Thinkpad after I spilled a full glass of water on it. I was able to get a replacement keyboard via AliExpress for $25.84USD -- I initially considered buying a replacement from eBay but the keyboard prices were half of the laptop's current value, which is a bit silly.
Thank you Timothy Sumner, you’re a legend! :)
These instructions are miserably wrong for the model E540 20C6-008SUS. The keyboard is completely covered by a plastic grid that fills the large gaps between the keys. The keyboard hold-down screws are hidden by this grid. YOUR OWN PHOTO CLEARLY SHOWS THIS ! Furthermore, the keyboard can not be pushed “forward towards the display to create a gap above the trackpad “ simply because the 4 screws are holding it solidly in place. This plastic grid must be carefully pried up and out to expose the keyboard screws enough to be able to get a screwdriver in position over the screw heads.
With my edge 540 (submodel unknown) I was able to reach the screws by pushing the screw driver under the plastic grid. It did however slightly scuff up my F key
You forgot the latch underneath the main battery.