メインコンテンツにスキップ

Lenovo ThinkPad X1 Extreme Charging Port Replacement

必要な工具と部品

  1. Lenovo ThinkPad X1 Extreme Charging Port Replacement, Back Cover: 手順 1、 3の画像 1 Lenovo ThinkPad X1 Extreme Charging Port Replacement, Back Cover: 手順 1、 3の画像 2 Lenovo ThinkPad X1 Extreme Charging Port Replacement, Back Cover: 手順 1、 3の画像 3
    • Power off and unplug your device before you begin.

    • Orient the laptop so that it is bottom up, and the trackpad is closest to you.

    • Unscrew the seven captive screws with a Phillips #00 screwdriver.

    • These screws will loosen, but stay attached to the cover. Do not attempt to completely remove them.

    • Slide a blue opening pick in the gap between the bottom panel and chassis, and pry off the one clip on each side.

    • Remove the back cover from the device.

  2. Lenovo ThinkPad X1 Extreme Charging Port Replacement, Fan: 手順 2、 3の画像 1 Lenovo ThinkPad X1 Extreme Charging Port Replacement, Fan: 手順 2、 3の画像 2 Lenovo ThinkPad X1 Extreme Charging Port Replacement, Fan: 手順 2、 3の画像 3
    • Unscrew the 3mm screw holding down the wireless adapter using a Phillips #00 screwdriver.

    • Slide the adapter out of its connector.

    • Detach the black and gray cables and separate them from the frame of the fan by gently pulling upwards.

  3. Lenovo ThinkPad X1 Extreme Charging Port Replacement: 手順 3、 2の画像 1 Lenovo ThinkPad X1 Extreme Charging Port Replacement: 手順 3、 2の画像 2
    • Unlatch and remove the cable connecting to the frame of the fan by flipping the thin black tab up.

    • Separate the cable from the frame of the fan.

  4. Lenovo ThinkPad X1 Extreme Charging Port Replacement: 手順 4、 2の画像 1 Lenovo ThinkPad X1 Extreme Charging Port Replacement: 手順 4、 2の画像 2
    • Loosen the five screws connecting the fan to the motherboard using a Philips #00 head screwdriver.

    • These screws will not come out and will stay connected to the fan.

  5. Lenovo ThinkPad X1 Extreme Charging Port Replacement: 手順 5、 3の画像 1 Lenovo ThinkPad X1 Extreme Charging Port Replacement: 手順 5、 3の画像 2 Lenovo ThinkPad X1 Extreme Charging Port Replacement: 手順 5、 3の画像 3
    • Gently disconnect the two cables located on right and left side of the fan.

    • To identify these, they are labeled "FANR1" and FANL2" on the motherboard.

    • Lift the fan up and out and remove it from the device.

  6. Lenovo ThinkPad X1 Extreme Charging Port Replacement, Charging Port: 手順 6、 1の画像 1
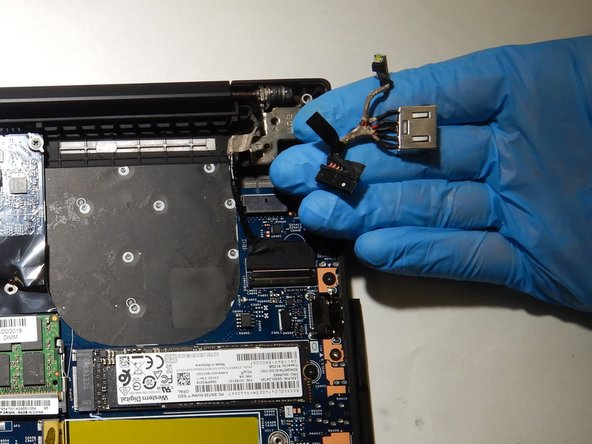
    • Using the Phillips #00 screwdriver, remove the two screws on the cover of the charging port.

  7. Lenovo ThinkPad X1 Extreme Charging Port Replacement: 手順 7、 2の画像 1 Lenovo ThinkPad X1 Extreme Charging Port Replacement: 手順 7、 2の画像 2
    • Disconnect the charging port cable from the motherboard.

終わりに

To reassemble your device, follow these instructions in reverse order.

作成者

3人の作成者と共同で作成されました。

Addy Botao Liu

メンバー登録日: 02/21/21

259 ポイント

3のガイドは作成済み

0 件のコメント

コメントを追加

統計データ:

過去 24時間: 8

過去 7 日: 22

過去 30 日: 58

今までの合計 1,896