メインコンテンツにスキップ

Lenovo ThinkPad X1 Carbon 7th Gen Keyboard Replacement

必要な工具と部品

  1. Lenovo ThinkPad X1 Carbon 7th Gen Keyboard Replacement, Back cover removal: 手順 1、 2の画像 1 Lenovo ThinkPad X1 Carbon 7th Gen Keyboard Replacement, Back cover removal: 手順 1、 2の画像 2
    • Use a Phillips #1 screwdriver to loosen the five captive screws securing the back cover.

  2. Lenovo ThinkPad X1 Carbon 7th Gen Keyboard Replacement, Insert an opening pick: 手順 2、 3の画像 1 Lenovo ThinkPad X1 Carbon 7th Gen Keyboard Replacement, Insert an opening pick: 手順 2、 3の画像 2 Lenovo ThinkPad X1 Carbon 7th Gen Keyboard Replacement, Insert an opening pick: 手順 2、 3の画像 3
    • Insert an opening pick at a 45˚ angle between the back cover and frame near the rear middle screw.

    • Pry up on the pick to release the clips securing the back cover to the frame.

    • You will hear several clicks while prying up.

  3. Lenovo ThinkPad X1 Carbon 7th Gen Keyboard Replacement, Remove the back cover: 手順 3、 3の画像 1 Lenovo ThinkPad X1 Carbon 7th Gen Keyboard Replacement, Remove the back cover: 手順 3、 3の画像 2 Lenovo ThinkPad X1 Carbon 7th Gen Keyboard Replacement, Remove the back cover: 手順 3、 3の画像 3
    • Lift the back cover up and remove it from the chassis.

    • You will hear several clicks while lifting up.

    • During reassembly, this is a good point to power on your laptop and test all functions before sealing it up. Be sure to power your laptop back down before you continue working.

  4. Lenovo ThinkPad X1 Carbon 7th Gen Keyboard Replacement, Unfasten the battery: 手順 4、 2の画像 1 Lenovo ThinkPad X1 Carbon 7th Gen Keyboard Replacement, Unfasten the battery: 手順 4、 2の画像 2
    • Use a Phillips #0 screwdriver to remove the six 4.9 mm-long screws securing the battery.

  5. Lenovo ThinkPad X1 Carbon 7th Gen Keyboard Replacement, Remove the battery: 手順 5、 3の画像 1 Lenovo ThinkPad X1 Carbon 7th Gen Keyboard Replacement, Remove the battery: 手順 5、 3の画像 2 Lenovo ThinkPad X1 Carbon 7th Gen Keyboard Replacement, Remove the battery: 手順 5、 3の画像 3
    • Lift the battery straight out of its recess and remove it.

  6. Lenovo ThinkPad X1 Carbon 7th Gen Keyboard Replacement, Motherboard: 手順 6、 2の画像 1 Lenovo ThinkPad X1 Carbon 7th Gen Keyboard Replacement, Motherboard: 手順 6、 2の画像 2
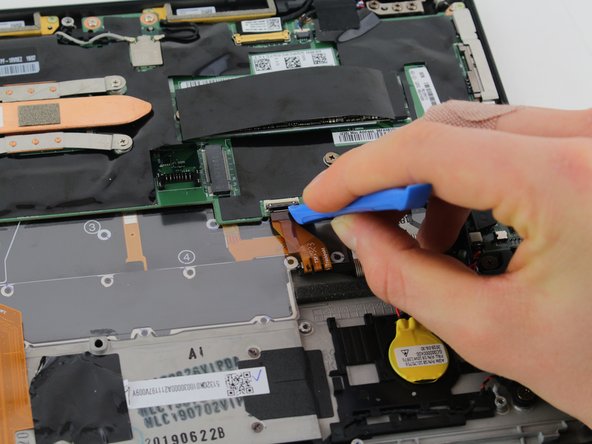
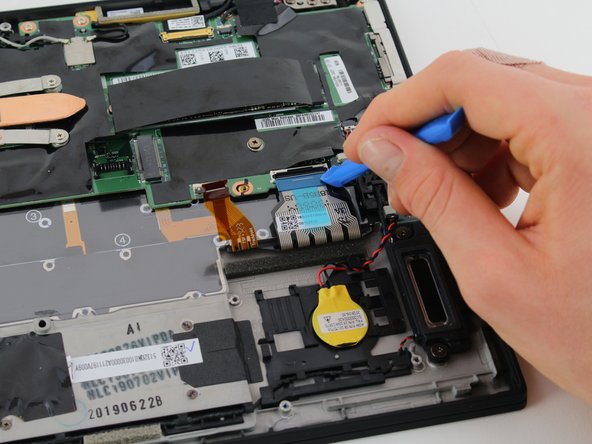
    • Remove the connectors with bar latches by lifting up on the small bar behind the port and pulling the circuit ribbon away from the port.

  7. Lenovo ThinkPad X1 Carbon 7th Gen Keyboard Replacement: 手順 7、 3の画像 1 Lenovo ThinkPad X1 Carbon 7th Gen Keyboard Replacement: 手順 7、 3の画像 2 Lenovo ThinkPad X1 Carbon 7th Gen Keyboard Replacement: 手順 7、 3の画像 3
    • Remove the snap connectors by lifting straight up until the connection pops out.

    • Use an opening tool to pry them off if a finger cannot get underneath the connection.

  8. Lenovo ThinkPad X1 Carbon 7th Gen Keyboard Replacement: 手順 8、 3の画像 1 Lenovo ThinkPad X1 Carbon 7th Gen Keyboard Replacement: 手順 8、 3の画像 2 Lenovo ThinkPad X1 Carbon 7th Gen Keyboard Replacement: 手順 8、 3の画像 3
    • Remove the latch connections by lifting the latch up, releasing the circuit ribbon.

    • Use an opening tool to get underneath the latch if a finger cannot.

  9. Lenovo ThinkPad X1 Carbon 7th Gen Keyboard Replacement: 手順 9、 1の画像 1
    • Remove the insert connections by pulling the connector away from the port.

  10. Lenovo ThinkPad X1 Carbon 7th Gen Keyboard Replacement: 手順 10、 1の画像 1
    • Remove the seven 4 mm Phillips #0 screws that hold the motherboard in place

    • Remove the 3 mm Phillips #0 screw located near the fan.

  11. Lenovo ThinkPad X1 Carbon 7th Gen Keyboard Replacement: 手順 11、 1の画像 1
    • Lift the motherboard with the fan still connected straight up and out of the device.

  12. Lenovo ThinkPad X1 Carbon 7th Gen Keyboard Replacement, Keyboard: 手順 12、 1の画像 1
    • Using a Phillips #00 screwdriver, remove sixty-six 0.5 mm screws from the keyboard.

  13. Lenovo ThinkPad X1 Carbon 7th Gen Keyboard Replacement: 手順 13、 1の画像 1
    • Lift the keyboard straight up and out of the computer.

終わりに

To reassemble your device, follow these instructions in reverse order.

6 の人々がこのガイドを完成させました。

作成者

3人の作成者と共同で作成されました。

Everett James Barkley

メンバー登録日: 09/16/20

422 ポイント

3のガイドは作成済み

2 件のコメント

I did this and the new keyboard only works for 1 minutes be for stopping

parker kerby - 返信

Where did you purchase the replacement keyboard from. I got mine from myfixguide and replaced using this tutorial. Worked flawlessly for me.

Rakesh S - 返信

コメントを追加

統計データ:

過去 24時間: 23

過去 7 日: 155

過去 30 日: 627

今までの合計 12,082