メインコンテンツにスキップ

Lenovo ThinkPad T580 CMOS Battery Replacement

必要な工具と部品

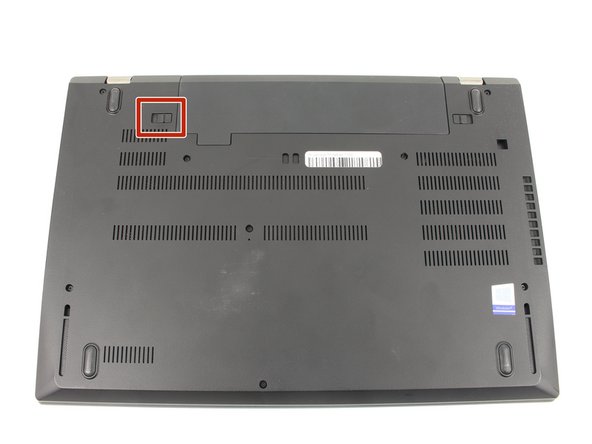
  1. Lenovo ThinkPad T580 CMOS Battery Replacement, External Battery: 手順 1、 3の画像 1 Lenovo ThinkPad T580 CMOS Battery Replacement, External Battery: 手順 1、 3の画像 2 Lenovo ThinkPad T580 CMOS Battery Replacement, External Battery: 手順 1、 3の画像 3
    • Slide the switch on the left side of the battery to the left.

  2. Lenovo ThinkPad T580 CMOS Battery Replacement: 手順 2、 3の画像 1 Lenovo ThinkPad T580 CMOS Battery Replacement: 手順 2、 3の画像 2 Lenovo ThinkPad T580 CMOS Battery Replacement: 手順 2、 3の画像 3
    • Slide the switch on the right side of the battery to the right while applying upward pressure on the battery.

  3. Lenovo ThinkPad T580 CMOS Battery Replacement: 手順 3、 3の画像 1 Lenovo ThinkPad T580 CMOS Battery Replacement: 手順 3、 3の画像 2 Lenovo ThinkPad T580 CMOS Battery Replacement: 手順 3、 3の画像 3
    • Pull the battery directly out of the socket

  4. Lenovo ThinkPad T580 CMOS Battery Replacement, Bottom Case: 手順 4、 2の画像 1 Lenovo ThinkPad T580 CMOS Battery Replacement, Bottom Case: 手順 4、 2の画像 2
    • Using a Phillips #00 screwdriver, unscrew the eight 3.3 mm captive screws on the bottom of the laptop.

    • The "captive" screws will not come out of the case.

  5. Lenovo ThinkPad T580 CMOS Battery Replacement: 手順 5、 3の画像 1 Lenovo ThinkPad T580 CMOS Battery Replacement: 手順 5、 3の画像 2 Lenovo ThinkPad T580 CMOS Battery Replacement: 手順 5、 3の画像 3
    • Run a Jimmy along the crease of the computer all the way around, twisting it periodically to disengage the clips.

  6. Lenovo ThinkPad T580 CMOS Battery Replacement: 手順 6、 3の画像 1 Lenovo ThinkPad T580 CMOS Battery Replacement: 手順 6、 3の画像 2 Lenovo ThinkPad T580 CMOS Battery Replacement: 手順 6、 3の画像 3
    • Once all the clips are released, remove the bottom cover.

    • You may need to jiggle the case slightly to release the clips around the external battery bay.

  7. Lenovo ThinkPad T580 CMOS Battery Replacement, Internal Battery: 手順 7、 1の画像 1
    • Using a Phillips #00 screwdriver, remove five 3.7 mm screws holding down the battery.

  8. Lenovo ThinkPad T580 CMOS Battery Replacement: 手順 8、 3の画像 1 Lenovo ThinkPad T580 CMOS Battery Replacement: 手順 8、 3の画像 2 Lenovo ThinkPad T580 CMOS Battery Replacement: 手順 8、 3の画像 3
    • Unplug and remove the battery connector from the motherboard.

    • Remove the internal battery.

  9. Lenovo ThinkPad T580 CMOS Battery Replacement, CMOS Battery: 手順 9、 3の画像 1 Lenovo ThinkPad T580 CMOS Battery Replacement, CMOS Battery: 手順 9、 3の画像 2 Lenovo ThinkPad T580 CMOS Battery Replacement, CMOS Battery: 手順 9、 3の画像 3
    • Pull out the CMOS battery cable connector with a pair of blunt nose tweezers.

  10. Lenovo ThinkPad T580 CMOS Battery Replacement: 手順 10、 3の画像 1 Lenovo ThinkPad T580 CMOS Battery Replacement: 手順 10、 3の画像 2 Lenovo ThinkPad T580 CMOS Battery Replacement: 手順 10、 3の画像 3
    • Using a spudger, pry the CMOS battery off of the motherboard.

    • A light adhesive holds the CMOS battery down to the motherboard. Be careful not to puncture the battery while prying it off.

    • Remove the CMOS battery.

終わりに

To reassemble your device, follow these instructions in reverse order.
作成者

1人の作成者と共同作成されました。

Austin Blakely

メンバー登録日: 03/11/19

19,479 ポイント

53のガイドは作成済み

チーム

iFixit iFixit人のメンバー

Staff

135 メンバー

16,734のガイドは作成済み

0 件のコメント

コメントを追加

統計データ:

過去 24時間: 0

過去 7 日: 9

過去 30 日: 34

今までの合計 537