メインコンテンツにスキップ

Lenovo ThinkPad T480s Camera/LED Cable Replacement

必要な工具と部品

  1. Lenovo ThinkPad T480s Camera/LED Cable Replacement, Bottom Cover: 手順 1、 2の画像 1 Lenovo ThinkPad T480s Camera/LED Cable Replacement, Bottom Cover: 手順 1、 2の画像 2
    • Disable the battery, power down the device, and unplug the power adapter from your device before proceeding/beginning the guide.

    • Loosen the six captive screws with a Phillips #1 screwdriver.

  2. Lenovo ThinkPad T480s Camera/LED Cable Replacement: 手順 2、 3の画像 1 Lenovo ThinkPad T480s Camera/LED Cable Replacement: 手順 2、 3の画像 2 Lenovo ThinkPad T480s Camera/LED Cable Replacement: 手順 2、 3の画像 3
    • Remove the bottom cover with an opening tool.

    • Start from the top edge near the hinge and work your way along the edge until all of the clips are unsnapped.

  3. Lenovo ThinkPad T480s Camera/LED Cable Replacement: 手順 3、 2の画像 1 Lenovo ThinkPad T480s Camera/LED Cable Replacement: 手順 3、 2の画像 2
    • Lift the bottom cover off.

  4. Lenovo ThinkPad T480s Camera/LED Cable Replacement, LCD Assembly: 手順 4、 3の画像 1 Lenovo ThinkPad T480s Camera/LED Cable Replacement, LCD Assembly: 手順 4、 3の画像 2 Lenovo ThinkPad T480s Camera/LED Cable Replacement, LCD Assembly: 手順 4、 3の画像 3
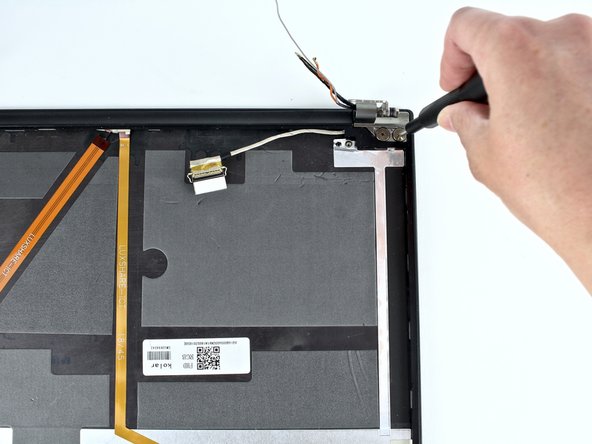
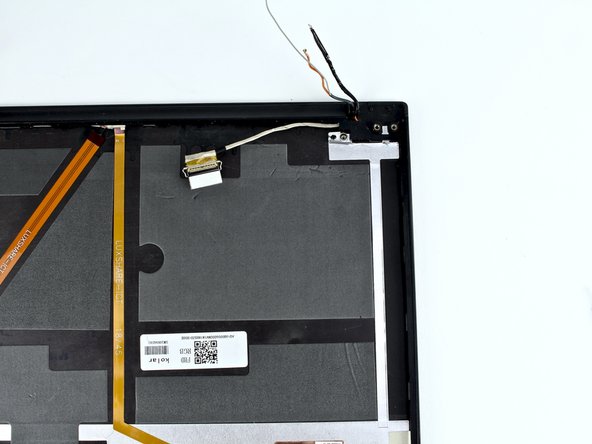
    • Use the spudger to disconnect the coaxial cables from the Wi-Fi card and WWAN card.

    • When reassembling the Wi-Fi card, reattach the black wire closest to the screw and the gray wire on the other side of the black wire. With the WWAN card, reattach the blue wire on the left and the orange wire on the right.

    • There are also small color coded arrows on each card that match the corresponding wires, to make sure you connect to the correct spot.

  5. Lenovo ThinkPad T480s Camera/LED Cable Replacement: 手順 5、 3の画像 1 Lenovo ThinkPad T480s Camera/LED Cable Replacement: 手順 5、 3の画像 2 Lenovo ThinkPad T480s Camera/LED Cable Replacement: 手順 5、 3の画像 3
    • Use the spudger to disconnect the LCD cable from the motherboard.

  6. Lenovo ThinkPad T480s Camera/LED Cable Replacement: 手順 6、 3の画像 1 Lenovo ThinkPad T480s Camera/LED Cable Replacement: 手順 6、 3の画像 2 Lenovo ThinkPad T480s Camera/LED Cable Replacement: 手順 6、 3の画像 3
    • Disconnect the camera cable from the motherboard using a spudger.

  7. Lenovo ThinkPad T480s Camera/LED Cable Replacement: 手順 7、 2の画像 1 Lenovo ThinkPad T480s Camera/LED Cable Replacement: 手順 7、 2の画像 2
    • Remove all antenna cables from their routing.

  8. Lenovo ThinkPad T480s Camera/LED Cable Replacement: 手順 8、 3の画像 1 Lenovo ThinkPad T480s Camera/LED Cable Replacement: 手順 8、 3の画像 2 Lenovo ThinkPad T480s Camera/LED Cable Replacement: 手順 8、 3の画像 3
    • Using the Phillips #1 screwdriver, remove three 5 mm screws from the left hinge and three 5 mm screws from the right hinge.

  9. Lenovo ThinkPad T480s Camera/LED Cable Replacement: 手順 9、 3の画像 1 Lenovo ThinkPad T480s Camera/LED Cable Replacement: 手順 9、 3の画像 2 Lenovo ThinkPad T480s Camera/LED Cable Replacement: 手順 9、 3の画像 3
    • Carefully rotate the hinges upward and remove the bottom of the machine from the LCD unit.

  10. Lenovo ThinkPad T480s Camera/LED Cable Replacement, LCD Bezel: 手順 10、 3の画像 1 Lenovo ThinkPad T480s Camera/LED Cable Replacement, LCD Bezel: 手順 10、 3の画像 2 Lenovo ThinkPad T480s Camera/LED Cable Replacement, LCD Bezel: 手順 10、 3の画像 3
    • Using the spudger, pry the LCD bezel up from the edges starting near the hinges.

    • It is attached by adhesive so be careful not to break it. You may hear loud snaps when detaching the clips; this is normal.

  11. Lenovo ThinkPad T480s Camera/LED Cable Replacement: 手順 11、 3の画像 1 Lenovo ThinkPad T480s Camera/LED Cable Replacement: 手順 11、 3の画像 2 Lenovo ThinkPad T480s Camera/LED Cable Replacement: 手順 11、 3の画像 3
    • Use the spudger to remove the internal bezel.

    • Start at the corner by the hinge and lift the edge of the internal bezel up with the pointed end of the spudger.

    • Hold the internal bezel with your fingers and work your way around the perimeter of the screen carefully pulling the bezel up.

    • You will feel resistance and hear snapping as you remove the bezel because it is connected with clips. Be careful that you don't crack the bezel. The plastic is delicate in places.

  12. Lenovo ThinkPad T480s Camera/LED Cable Replacement, LCD Panel: 手順 12、 2の画像 1 Lenovo ThinkPad T480s Camera/LED Cable Replacement, LCD Panel: 手順 12、 2の画像 2
    • Remove four 2.9 mm screws from the LCD panel using the Phillips #1 screwdriver.

  13. Lenovo ThinkPad T480s Camera/LED Cable Replacement: 手順 13、 3の画像 1 Lenovo ThinkPad T480s Camera/LED Cable Replacement: 手順 13、 3の画像 2 Lenovo ThinkPad T480s Camera/LED Cable Replacement: 手順 13、 3の画像 3
    • Gently lift the panel and flip it over.

    • The panel is still connected to the unit by the LCD cable so be careful not to rip the connector when flipping it over.

  14. Lenovo ThinkPad T480s Camera/LED Cable Replacement: 手順 14、 2の画像 1 Lenovo ThinkPad T480s Camera/LED Cable Replacement: 手順 14、 2の画像 2
    • Peel back the tape covering the LCD cable connector.

    • Use the spudger to unlock the LCD cable.

  15. Lenovo ThinkPad T480s Camera/LED Cable Replacement: 手順 15、 2の画像 1 Lenovo ThinkPad T480s Camera/LED Cable Replacement: 手順 15、 2の画像 2
    • Remove the LCD cable from the socket.

  16. Lenovo ThinkPad T480s Camera/LED Cable Replacement: 手順 16、 2の画像 1 Lenovo ThinkPad T480s Camera/LED Cable Replacement: 手順 16、 2の画像 2
    • Remove the LCD panel from the system.

  17. Lenovo ThinkPad T480s Camera/LED Cable Replacement, Hinges: 手順 17、 2の画像 1 Lenovo ThinkPad T480s Camera/LED Cable Replacement, Hinges: 手順 17、 2の画像 2
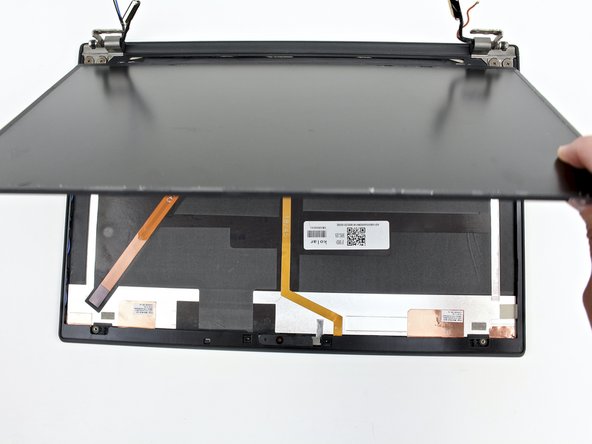
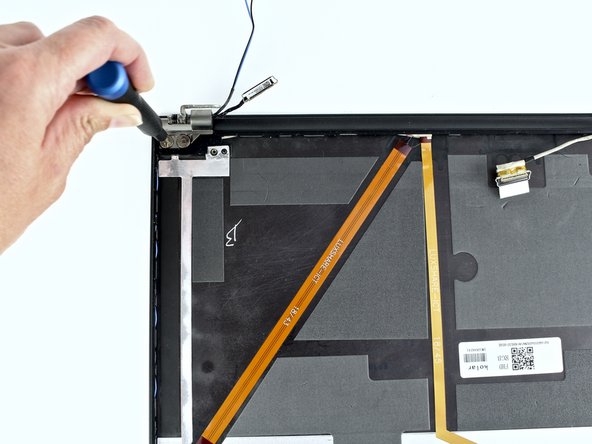
    • Use the Phillips #1 screwdriver to remove two 2.8 mm screws from the hinge in the upper right corner.

  18. Lenovo ThinkPad T480s Camera/LED Cable Replacement: 手順 18、 2の画像 1 Lenovo ThinkPad T480s Camera/LED Cable Replacement: 手順 18、 2の画像 2
    • Remove the hinge in the upper right corner.

  19. Lenovo ThinkPad T480s Camera/LED Cable Replacement: 手順 19、 2の画像 1 Lenovo ThinkPad T480s Camera/LED Cable Replacement: 手順 19、 2の画像 2
    • Use a Phillips #1 screwdriver to remove two 2.8 mm screws from the hinge in the upper left corner.

  20. Lenovo ThinkPad T480s Camera/LED Cable Replacement: 手順 20、 2の画像 1 Lenovo ThinkPad T480s Camera/LED Cable Replacement: 手順 20、 2の画像 2
    • Remove the hinge in the upper left corner.

  21. Lenovo ThinkPad T480s Camera/LED Cable Replacement, Camera/LED Cable: 手順 21、 3の画像 1 Lenovo ThinkPad T480s Camera/LED Cable Replacement, Camera/LED Cable: 手順 21、 3の画像 2 Lenovo ThinkPad T480s Camera/LED Cable Replacement, Camera/LED Cable: 手順 21、 3の画像 3
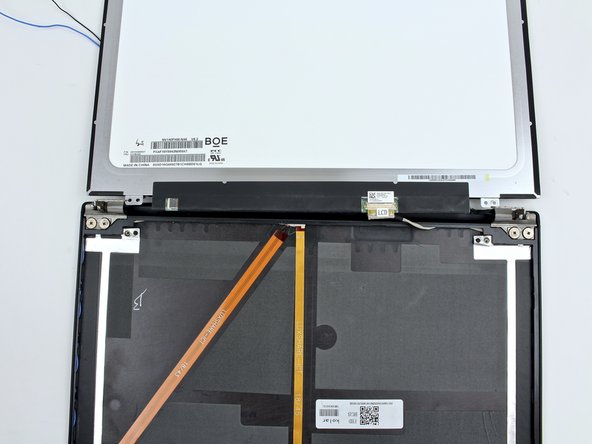
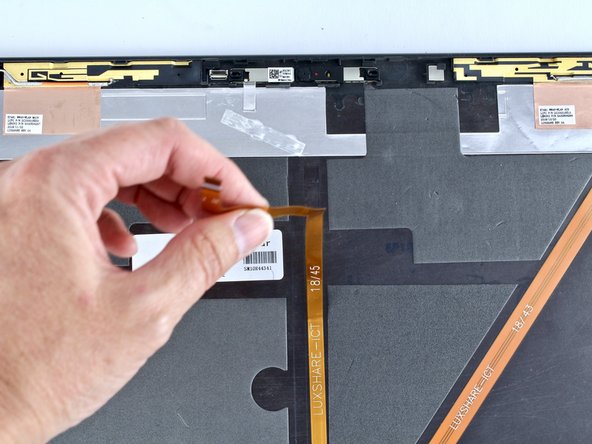
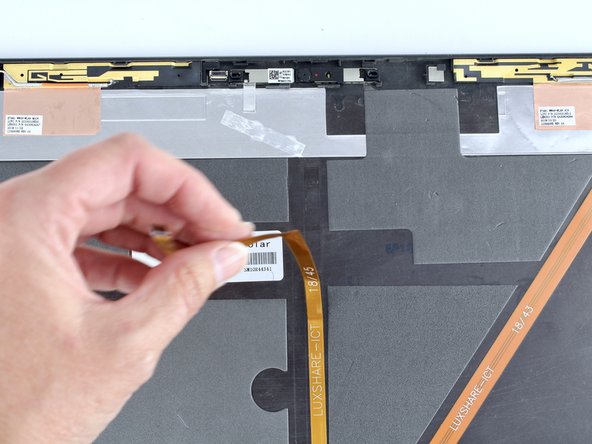
    • Use the spudger to disconnect the cable from the camera card, then peel the cable up from the LCD unit.

  22. Lenovo ThinkPad T480s Camera/LED Cable Replacement: 手順 22、 2の画像 1 Lenovo ThinkPad T480s Camera/LED Cable Replacement: 手順 22、 2の画像 2
    • Peel the ThinkPad logo LED cable from the LCD unit and remove the cables from the system.

終わりに

To reassemble your device, follow these instructions in reverse order.

Take your e-waste to an R2 or e-Stewards certified recycler.

Repair didn’t go as planned? Try some basic troubleshooting, or ask our Answers community for help.

作成者

1人の作成者と共同作成されました。

Sarah Westberg

メンバー登録日: 03/11/19

23,116 ポイント

70のガイドは作成済み

チーム

iFixit iFixit人のメンバー

Staff

135 メンバー

16,767のガイドは作成済み

0 件のコメント

コメントを追加

統計データ:

過去 24時間: 0

過去 7 日: 1

過去 30 日: 19

今までの合計 585