メインコンテンツにスキップ

Lenovo ThinkPad T460 Fan and Heat Sink Replacement

必要な工具と部品

  1. Lenovo ThinkPad T460 Fan and Heat Sink Replacement, External Battery: 手順 1、 3の画像 1 Lenovo ThinkPad T460 Fan and Heat Sink Replacement, External Battery: 手順 1、 3の画像 2 Lenovo ThinkPad T460 Fan and Heat Sink Replacement, External Battery: 手順 1、 3の画像 3
    • Before you begin this guide, make sure to disable the internal battery, power down your device, and disconnect from any external power sources.

    • Place the laptop so that the bottom is facing upwards.

    • Slide the latch on the left side of the battery to the left until it clicks in place.

  2. Lenovo ThinkPad T460 Fan and Heat Sink Replacement: 手順 2、 3の画像 1 Lenovo ThinkPad T460 Fan and Heat Sink Replacement: 手順 2、 3の画像 2 Lenovo ThinkPad T460 Fan and Heat Sink Replacement: 手順 2、 3の画像 3
    • Slide the latch on the right side of the battery to the right and hold it in place with your thumb.

    • Use your other hand to slide the battery towards the back of the laptop.

    • Lift the battery up and away from the laptop.

  3. Lenovo ThinkPad T460 Fan and Heat Sink Replacement, Bottom Cover: 手順 3、 2の画像 1 Lenovo ThinkPad T460 Fan and Heat Sink Replacement, Bottom Cover: 手順 3、 2の画像 2
    • Loosen the eight captive screws in the bottom cover using a Phillips #1 screwdriver.

  4. Lenovo ThinkPad T460 Fan and Heat Sink Replacement: 手順 4、 3の画像 1 Lenovo ThinkPad T460 Fan and Heat Sink Replacement: 手順 4、 3の画像 2 Lenovo ThinkPad T460 Fan and Heat Sink Replacement: 手順 4、 3の画像 3
    • Insert the flat end of a spudger in between the bottom cover and the rest of the laptop, starting in the lower left corner.

    • Pry the lower left corner of the bottom cover up by a few millimeters.

    • Slide the spudger along the bottom of the laptop to release the clips until you reach the lower right corner.

    • You may hear some snapping noises as the clips are released.

  5. Lenovo ThinkPad T460 Fan and Heat Sink Replacement: 手順 5、 2の画像 1 Lenovo ThinkPad T460 Fan and Heat Sink Replacement: 手順 5、 2の画像 2
    • Slide the spudger along the right and top sides of the bottom cover to release the clips.

    • You may hear some snapping noises as the clips are released.

    • Potential for device damage: If the clips do not release easily, check to ensure that the captive screws are fully loosened. Forcing the clips to detach can crack the bottom cover.

  6. Lenovo ThinkPad T460 Fan and Heat Sink Replacement: 手順 6、 2の画像 1 Lenovo ThinkPad T460 Fan and Heat Sink Replacement: 手順 6、 2の画像 2
    • Use the spudger to pry the upper left corner up by a few millimeters.

    • Pry up the sections of the bottom cover with printed logos of the ports.

    • Potential for device damage: Prying inside the ports themselves can damage your laptop. Be sure to only pry up on the sections of the cover that extend past the ports.

  7. Lenovo ThinkPad T460 Fan and Heat Sink Replacement: 手順 7、 2の画像 1 Lenovo ThinkPad T460 Fan and Heat Sink Replacement: 手順 7、 2の画像 2
    • Use the spudger to pry up the bottom cover in the lower portion of the external battery compartment by a few millimeters.

  8. Lenovo ThinkPad T460 Fan and Heat Sink Replacement: 手順 8、 3の画像 1 Lenovo ThinkPad T460 Fan and Heat Sink Replacement: 手順 8、 3の画像 2 Lenovo ThinkPad T460 Fan and Heat Sink Replacement: 手順 8、 3の画像 3
    • Use both hands to lift the bottom cover up and away from the laptop.

  9. Lenovo ThinkPad T460 Fan and Heat Sink Replacement, Fan and Heat Sink: 手順 9、 2の画像 1 Lenovo ThinkPad T460 Fan and Heat Sink Replacement, Fan and Heat Sink: 手順 9、 2の画像 2
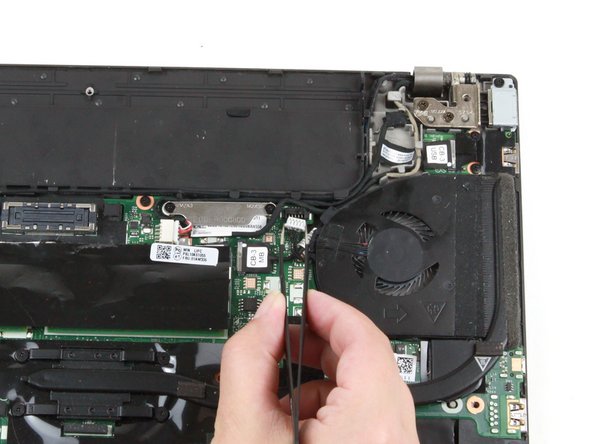
    • Use a pair of blunt nose tweezers to pull the white fan connector out of its socket on the motherboard.

    • This connector may be difficult to remove. You can use a pair of tweezers to gently rock the connector back and forth until it is free from the socket.

  10. Lenovo ThinkPad T460 Fan and Heat Sink Replacement: 手順 10、 1の画像 1
    • Use a Phillips #1 screwdriver to loosen the first pair of captive screws on the fan assembly in a crosswise pattern.

    • Use a Phillips #1 screwdriver to loosen the second pair of captive screws on the fan assembly in a crosswise pattern.

    • Secure the screws using the same cross-pattern when reassembling the fan.

  11. Lenovo ThinkPad T460 Fan and Heat Sink Replacement: 手順 11、 2の画像 1 Lenovo ThinkPad T460 Fan and Heat Sink Replacement: 手順 11、 2の画像 2
    • Use your hands to pull the fan assembly up and away from the laptop.

終わりに

To reassemble your device, follow these instructions in reverse order.

Take your e-waste to an R2 or e-Stewards certified recycler.

Repair didn’t go as planned? Try some basic troubleshooting, or ask our Answers community for help.

作成者

1人の作成者と共同作成されました。

Kristen Gismondi

メンバー登録日: 11/12/14

81,644 ポイント

200のガイドは作成済み

チーム

iFixit iFixit人のメンバー

Staff

135 メンバー

16,731のガイドは作成済み

0 件のコメント

コメントを追加

統計データ:

過去 24時間: 3

過去 7 日: 14

過去 30 日: 46

今までの合計 1,745