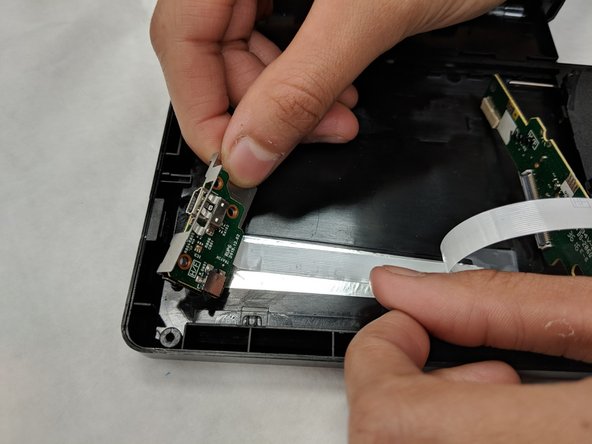
メインコンテンツにスキップ

Lenovo Slim DVD Burner DB65 USB 2.0 Power Assembly Replacement

必要な工具と部品

  1. Lenovo Slim DVD Burner DB65 USB 2.0 Power Assembly Replacement, USB 2.0 Power Assembly: 手順 1、 2の画像 1 Lenovo Slim DVD Burner DB65 USB 2.0 Power Assembly Replacement, USB 2.0 Power Assembly: 手順 1、 2の画像 2
    • Flip the unit over so the bottom is facing you.

    • Remove the two black 7.6mm Phillips #0 screws from the bottom cover.

  2. Lenovo Slim DVD Burner DB65 USB 2.0 Power Assembly Replacement: 手順 2、 2の画像 1 Lenovo Slim DVD Burner DB65 USB 2.0 Power Assembly Replacement: 手順 2、 2の画像 2
    • Use the iFixit Opening Tool to gently pry the unit apart to gain access to the interior.

    • If the top seems stuck, run the iFixit Opening Tool along the edge while simultaneously pulling up on the top with your fingers. Continue to apply pressure until it opens completely.

  3. Lenovo Slim DVD Burner DB65 USB 2.0 Power Assembly Replacement: 手順 3、 2の画像 1 Lenovo Slim DVD Burner DB65 USB 2.0 Power Assembly Replacement: 手順 3、 2の画像 2
    • Open the device tray by inserting a paper clip into the eject hole.

  4. Lenovo Slim DVD Burner DB65 USB 2.0 Power Assembly Replacement: 手順 4、 2の画像 1 Lenovo Slim DVD Burner DB65 USB 2.0 Power Assembly Replacement: 手順 4、 2の画像 2
    • Remove the two silver 3mm Phillips #0 screws from the mini USB circuit board.

  5. Lenovo Slim DVD Burner DB65 USB 2.0 Power Assembly Replacement: 手順 5、 2の画像 1 Lenovo Slim DVD Burner DB65 USB 2.0 Power Assembly Replacement: 手順 5、 2の画像 2
    • Turn the unit over and remove the two silver 3mm Phillips #0 screws from the aluminum cover.

  6. Lenovo Slim DVD Burner DB65 USB 2.0 Power Assembly Replacement: 手順 6、 1の画像 1
    • Lift up and remove the silver cover to expose the internal components.

    • If the cover seems stuck gently pull up on one edge. The cover should remove completely after one side is free.

  7. Lenovo Slim DVD Burner DB65 USB 2.0 Power Assembly Replacement: 手順 7、 2の画像 1 Lenovo Slim DVD Burner DB65 USB 2.0 Power Assembly Replacement: 手順 7、 2の画像 2
    • Remove the two ribbon cables using any pair of ESD(electrostatic discharge) safe tweezers.

    • The ribbons wires are fragile but still require a firm force to remove.

  8. Lenovo Slim DVD Burner DB65 USB 2.0 Power Assembly Replacement: 手順 8、 2の画像 1 Lenovo Slim DVD Burner DB65 USB 2.0 Power Assembly Replacement: 手順 8、 2の画像 2
    • Use the iFixit Opening Tool to flip up the grey locking flap on the ZIF (zero insertion force) connector to allow removal of the ribbon cable.

    • Remove the large ribbon wire using any pair of ESD safe tweezers.

  9. Lenovo Slim DVD Burner DB65 USB 2.0 Power Assembly Replacement: 手順 9、 2の画像 1 Lenovo Slim DVD Burner DB65 USB 2.0 Power Assembly Replacement: 手順 9、 2の画像 2
    • Remove the single 3mm Phillips #0 screw to loosen the large circuit board.

  10. Lenovo Slim DVD Burner DB65 USB 2.0 Power Assembly Replacement: 手順 10、 1の画像 1
    • Pull up on the large circuit board and slide it through the opening with the ribbon cable attached to it.

    • The large circuit board should end up on the other side of the device next to the Mini USB circuit board.

  11. Lenovo Slim DVD Burner DB65 USB 2.0 Power Assembly Replacement: 手順 11、 2の画像 1 Lenovo Slim DVD Burner DB65 USB 2.0 Power Assembly Replacement: 手順 11、 2の画像 2
    • Remove the power assembly by peeling it away from the unit.

    • The two circuit boards, which make up the power assembly, are connected together with a white ribbon cable.

    • Take your time when removing the power assembly, as it requires a firm amount of force to peel away and remove.

終わりに

To reassemble your device, follow these instructions in reverse order.

作成者

3人の作成者と共同で作成されました。

Matthew Green

メンバー登録日: 07/05/18

337 ポイント

2のガイドは作成済み

チーム

IUPUI, Team S2-G1, Harley Summer 2018 IUPUI, Team S2-G1, Harley Summer 2018人のメンバー

IUPUI-HARLEY-SU18S2G1

3 メンバー

2のガイドは作成済み

0 件のコメント

コメントを追加

統計データ:

過去 24時間: 0

過去 7 日: 2

過去 30 日: 11

今までの合計 1,086