メインコンテンツにスキップ

Lenovo N500 Fan Replacement

必要な工具と部品

  1. Lenovo N500 Fan Replacement, Remove the heatsink cover: 手順 1、 1の画像 1
    • Remove the battery to prevent the risk of shocking yourself or damaging the system.

    • Locate the large black panel with the round vent. It will have two Phillips head screws. Loosen them with a screwdriver until they start making a clicking noise. The screws stay captive in the cover.

    • You may damage the screw or chassis if you continue to turn the screws when they are loose. Stop turning the screws once they are removed.

    • To remove the panel, pull up from this tab. Lift the panel with the tab located between the screws using a flathead screwdriver or your fingernail. You will encounter resistance from the plastic snap tabs that are on the cover. Gently pry around the corners on either side of the front until the panel pops up. Lift off the panel carefully.

  2. Lenovo N500 Fan Replacement, Remove the fan: 手順 2、 2の画像 1 Lenovo N500 Fan Replacement, Remove the fan: 手順 2、 2の画像 2
    • To remove the fan, remove the three screws that hold it into the system. Disconnect the fan before removing it.

  3. Lenovo N500 Fan Replacement, Clean the dust out of the heatsink: 手順 3、 2の画像 1 Lenovo N500 Fan Replacement, Clean the dust out of the heatsink: 手順 3、 2の画像 2
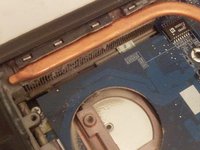
    • Clean out the fins in the heatsink. To do this, use a can of compressed air.

    • Be gentle with the heat sink assembly. If you apply too much pressure, you may damage the heatpipe.

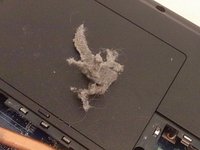
    • The second image shows the dust from the heat sink.

  4. Lenovo N500 Fan Replacement, Reassemble the laptop: 手順 4、 1の画像 1
    • Reassemble the laptop by following this guide in reverse.

終わりに

To reassemble your device, follow these instructions in reverse order.

2 の人々がこのガイドを完成させました。

作成者

7人の作成者と共同で作成されました。

alex chargeer

メンバー登録日: 09/08/12

156 ポイント

1ガイドが承認済み

0 件のコメント

コメントを追加

統計データ:

過去 24時間: 1

過去 7 日: 4

過去 30 日: 21

今までの合計 5,039