メインコンテンツにスキップ

Lenovo N21 Chromebook Battery Replacement

必要な工具と部品

  1. Lenovo N21 Chromebook Battery Replacement, Keyboard and Trackpad Panel: 手順 1、 2の画像 1 Lenovo N21 Chromebook Battery Replacement, Keyboard and Trackpad Panel: 手順 1、 2の画像 2
    • Power down the Chromebook before starting any repair.

    • Opening up your Chromebook voids the manufacturer warranty.

    • Use a screwdriver to remove the six 5.0mm Phillips screws from the bottom housing of the Chromebook.

  2. Lenovo N21 Chromebook Battery Replacement: 手順 2、 2の画像 1 Lenovo N21 Chromebook Battery Replacement: 手順 2、 2の画像 2
    • Use a plastic opening tool to pry off the four rubber pegs from the bottom housing.

  3. Lenovo N21 Chromebook Battery Replacement: 手順 3、 2の画像 1 Lenovo N21 Chromebook Battery Replacement: 手順 3、 2の画像 2
    • Use a screwdriver to remove the four 5.0mm Phillips screws located under the rubber soles.

  4. Lenovo N21 Chromebook Battery Replacement: 手順 4、 3の画像 1 Lenovo N21 Chromebook Battery Replacement: 手順 4、 3の画像 2 Lenovo N21 Chromebook Battery Replacement: 手順 4、 3の画像 3
    • Flip the laptop over and open the screen.

    • Gently pry the keyboard and trackpad panel away from the bottom housing using a plastic opening tool.

    • Once completely separated, do not immediately pull the panel completely away from the bottom housing. There are wires that are still connecting the panel to the rest of the internals of the Chromebook.

  5. Lenovo N21 Chromebook Battery Replacement: 手順 5、 2の画像 1 Lenovo N21 Chromebook Battery Replacement: 手順 5、 2の画像 2
    • Disconnect the keyboard ribbon cable by lifting the ZIF connector lock with a plastic opening tool or fingernail and gently pulling the ribbon cable straight out of its socket.

  6. Lenovo N21 Chromebook Battery Replacement: 手順 6、 3の画像 1 Lenovo N21 Chromebook Battery Replacement: 手順 6、 3の画像 2 Lenovo N21 Chromebook Battery Replacement: 手順 6、 3の画像 3
    • Disconnect the trackpad ribbon cable by lifting the ZIF connector lock with a small prying tool or fingernail and gently pulling the ribbon cable straight out of its socket.

  7. Lenovo N21 Chromebook Battery Replacement: 手順 7、 1の画像 1
    • Remove the keyboard and trackpad panel away from the device.

  8. Lenovo N21 Chromebook Battery Replacement, Battery: 手順 8、 3の画像 1 Lenovo N21 Chromebook Battery Replacement, Battery: 手順 8、 3の画像 2 Lenovo N21 Chromebook Battery Replacement, Battery: 手順 8、 3の画像 3
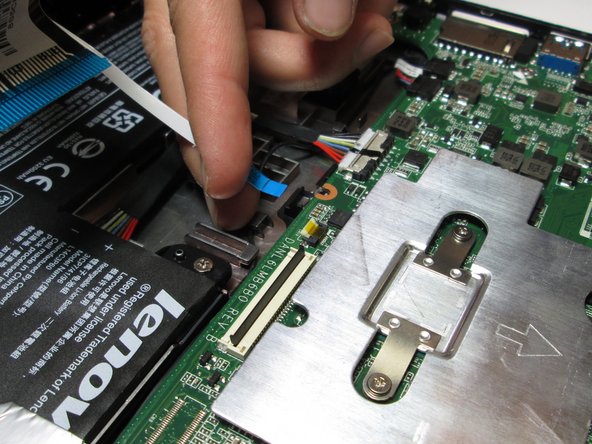
    • Disconnect the white charging cable connectors by pulling straight down on the connector.

  9. Lenovo N21 Chromebook Battery Replacement: 手順 9、 2の画像 1 Lenovo N21 Chromebook Battery Replacement: 手順 9、 2の画像 2
    • Use a Phillips screwdriver to remove the three 3mm screws located along the edge of the battery.

  10. Lenovo N21 Chromebook Battery Replacement: 手順 10、 1の画像 1
    • Peel up on the silver cable enough to remove the adhesive to the battery.

    • When moving the adhesive cable, be careful not to disconnect or damage the cable and motherboard.

  11. Lenovo N21 Chromebook Battery Replacement: 手順 11、 1の画像 1
    • Remove the battery by pulling back and up.

終わりに

To reassemble your device, follow these instructions in reverse order.

7 の人々がこのガイドを完成させました。

作成者

4人の作成者と共同で作成されました。

Jacob Taylor

メンバー登録日: 04/26/17

260 ポイント

1ガイドが承認済み

チーム

Cal Poly, Team S21-G2, Livingston Spring 2017 Cal Poly, Team S21-G2, Livingston Spring 2017人のメンバー

CPSU-LIVINGSTON-S17S21G2

4 メンバー

12のガイドは作成済み

コメント 1 件

Great step by step instructions!

M Mikusa - 返信

コメントを追加

統計データ:

過去 24時間: 1

過去 7 日: 2

過去 30 日: 40

今までの合計 8,922