メインコンテンツにスキップ

Lenovo IdeaTab A2109 Battery Replacement

必要な工具と部品

  1. Lenovo IdeaTab A2109 Battery Replacement, Battery: 手順 1、 1の画像 1
    • Look at the back of the tablet and locate the speakers on top of the rear cover.

    • There is a smaller indentation in the plastic cover that runs across the top of the device.

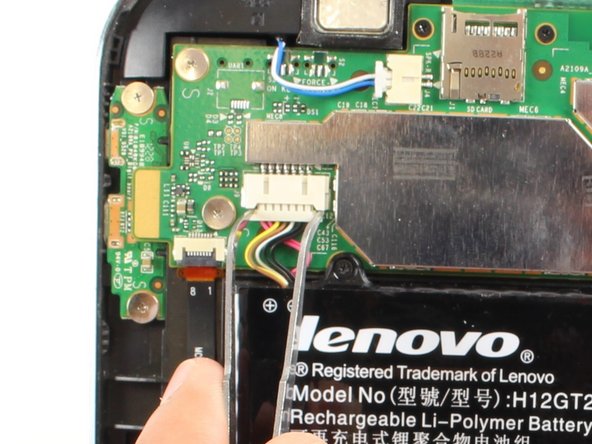
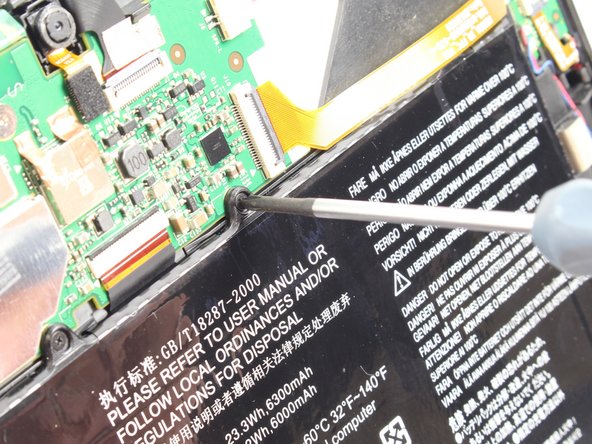
    • Wedge the plastic opening tool, under the middle of the cover as shown, then push up and the cover will pop off.

  2. Lenovo IdeaTab A2109 Battery Replacement: 手順 2、 2の画像 1 Lenovo IdeaTab A2109 Battery Replacement: 手順 2、 2の画像 2
    • Remove SD card if present.

    • Remove two black 3mm Phillips #00 screws.

  3. Lenovo IdeaTab A2109 Battery Replacement: 手順 3、 2の画像 1 Lenovo IdeaTab A2109 Battery Replacement: 手順 3、 2の画像 2
    • Disconnect battery power connector by pinching the connector with tweezers, and sliding it out of the housing.

  4. Lenovo IdeaTab A2109 Battery Replacement: 手順 4、 2の画像 1 Lenovo IdeaTab A2109 Battery Replacement: 手順 4、 2の画像 2
    • Remove seven black 3mm Phillips #00 screws.

    • The top right corner screw is underneath a yellow ribbon. Lift the ribbon up without disconnecting it and unscrew the screw.

  5. Lenovo IdeaTab A2109 Battery Replacement: 手順 5、 2の画像 1 Lenovo IdeaTab A2109 Battery Replacement: 手順 5、 2の画像 2
    • Now you can take the battery out in order to either replace it or continue disassembling the device.

終わりに

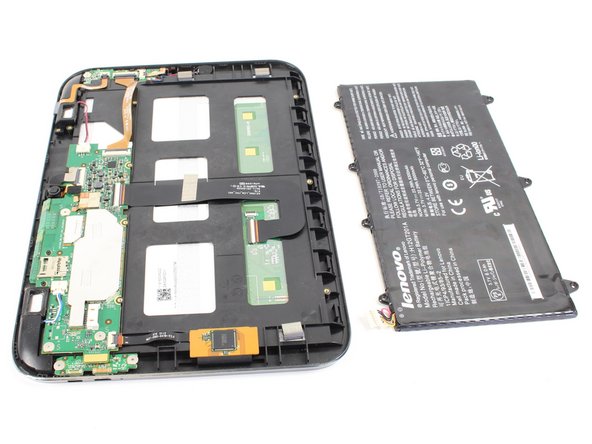
To reassemble your device, follow these instructions in reverse order.

9 の人々がこのガイドを完成させました。

作成者

8人の作成者と共同で作成されました。

Kyle

メンバー登録日: 04/22/14

581 ポイント

2のガイドは作成済み

チーム

Cal Poly, Team 7-19, Regan Spring 2014 Cal Poly, Team 7-19, Regan Spring 2014人のメンバー

CPSU-REGAN-S14S7G19

4 メンバー

15のガイドは作成済み

コメント 1 件

If there is an SD Micro memory card installed, REMOVE IT!, before the back cover. Otherwise, the card reader/writer will be damaged.

FilAm Harley - 返信

コメントを追加

統計データ:

過去 24時間: 0

過去 7 日: 2

過去 30 日: 8

今までの合計 8,265