メインコンテンツにスキップ

Lenovo IdeaPad Y400 CPU Replacement

必要な工具と部品

  1. Lenovo IdeaPad Y400 CPU Replacement, Battery: 手順 1、 3の画像 1 Lenovo IdeaPad Y400 CPU Replacement, Battery: 手順 1、 3の画像 2 Lenovo IdeaPad Y400 CPU Replacement, Battery: 手順 1、 3の画像 3
    • Make sure the laptop is upside down, then turn the laptop so that the battery is facing you. Now that the battery is facing you, there will be two locks, one on the left and one on the right.

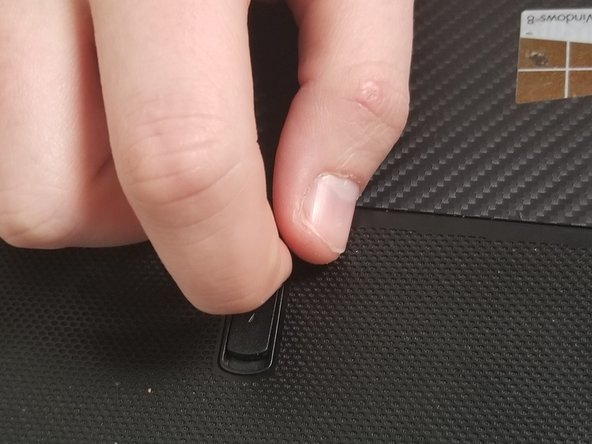
    • Slide the lock to the right until you can hear a "click". Once you hear this click, you should be able to see the color red.

  2. Lenovo IdeaPad Y400 CPU Replacement: 手順 2、 2の画像 1 Lenovo IdeaPad Y400 CPU Replacement: 手順 2、 2の画像 2
    • Unlike the first lock, the left lock does not stay in place. You will need to hold it in place as you take the battery out.

    • Slide the second (left) lock to the left and hold it there.

  3. Lenovo IdeaPad Y400 CPU Replacement: 手順 3、 1の画像 1
    • Gently pull the battery out.

  4. Lenovo IdeaPad Y400 CPU Replacement, Back Panel: 手順 4、 1の画像 1
    • Remove the eight 9mm screws with a Phillips #0 screwdriver.

  5. Lenovo IdeaPad Y400 CPU Replacement: 手順 5、 3の画像 1 Lenovo IdeaPad Y400 CPU Replacement: 手順 5、 3の画像 2 Lenovo IdeaPad Y400 CPU Replacement: 手順 5、 3の画像 3
    • Use the plastic opening tool to remove the back panel from the device.

    • Do not force the back off, as you may break the clips keeping it down.

  6. Lenovo IdeaPad Y400 CPU Replacement, Optical Drive: 手順 6、 2の画像 1 Lenovo IdeaPad Y400 CPU Replacement, Optical Drive: 手順 6、 2の画像 2
    • Move the lock down until you see red and hear a slight click.

  7. Lenovo IdeaPad Y400 CPU Replacement: 手順 7、 3の画像 1 Lenovo IdeaPad Y400 CPU Replacement: 手順 7、 3の画像 2 Lenovo IdeaPad Y400 CPU Replacement: 手順 7、 3の画像 3
    • Hold this lock down while removing the optical drive.

  8. Lenovo IdeaPad Y400 CPU Replacement, Motherboard: 手順 8、 1の画像 1
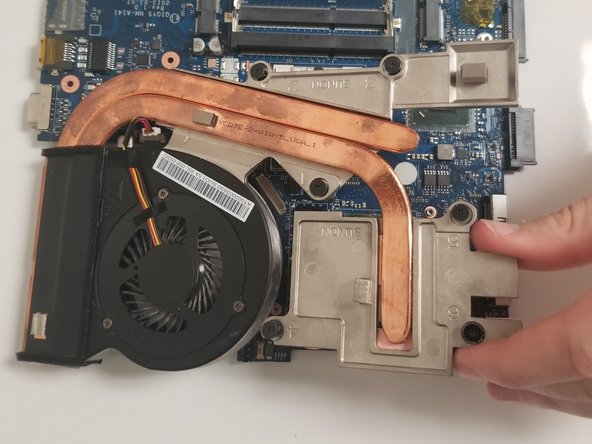
    • Unscrew the screws using a Phillips #0 screwdriver.

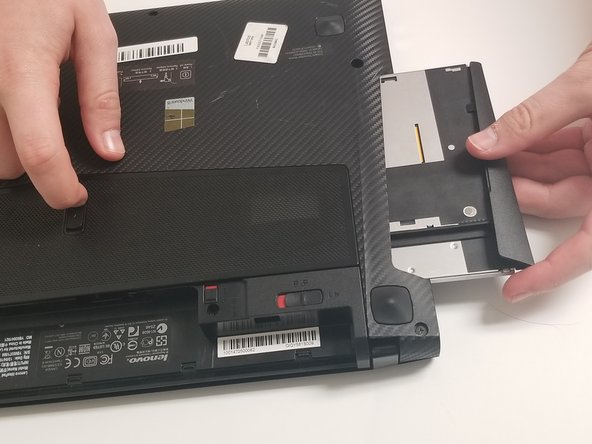
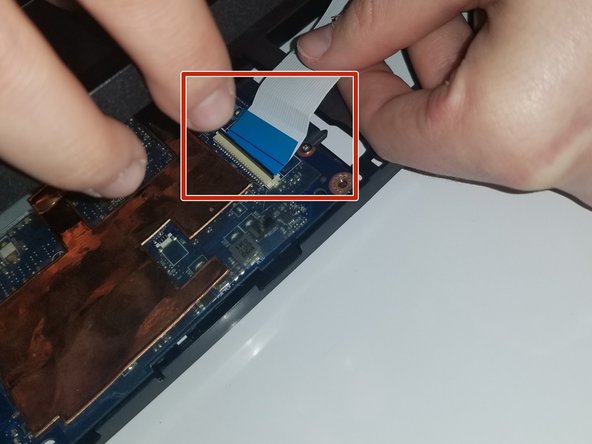
    • Unplug the wireless adapter to fully remove the motherboard.

    • If you don't want to break any of the parts you might want to take out the RAM, SSD, and the Hard Drive.

    • Screw sizes will be 4mm and 9mm

  9. Lenovo IdeaPad Y400 CPU Replacement: 手順 9、 3の画像 1 Lenovo IdeaPad Y400 CPU Replacement: 手順 9、 3の画像 2 Lenovo IdeaPad Y400 CPU Replacement: 手順 9、 3の画像 3
    • Use the plastic opening tool to take off the front panel.

    • Unplug the blue wire to remove the front panel.

  10. Lenovo IdeaPad Y400 CPU Replacement: 手順 10、 1の画像 1
    • Fully remove the front panel.

    • Unscrew the 9mm and 4mm screws (there is one of each screw).

  11. Lenovo IdeaPad Y400 CPU Replacement: 手順 11、 2の画像 1 Lenovo IdeaPad Y400 CPU Replacement: 手順 11、 2の画像 2
    • After unscrewing the screws, remove the motherboard.

  12. Lenovo IdeaPad Y400 CPU Replacement, CPU: 手順 12、 2の画像 1 Lenovo IdeaPad Y400 CPU Replacement, CPU: 手順 12、 2の画像 2
    • Unscrew the six screws using a Phillips #0 screwdriver.

    • These do not come out, do not try and force them out.

    • After you are done unscrewing them, remove the heatsink.

  13. Lenovo IdeaPad Y400 CPU Replacement: 手順 13、 1の画像 1
    • To take the CPU off you will need to unlock it, use the plastic opening tool to unlock the CPU. Turn it to the left until it is unlocked.

    • The lock will look like a small circle with a gap in the middle.

    • If you get thermal paste (the grey goopy looking stuff) on your hands, make sure to wash it off with warm water.

  14. Lenovo IdeaPad Y400 CPU Replacement: 手順 14、 1の画像 1
    • Gently take the CPU out.

    • Make sure not to bend the golden pins.

終わりに

To reassemble your device, follow these instructions in reverse order.

作成者

5人の作成者と共同で作成されました。

Rachel Simmons

メンバー登録日: 09/26/18

603 ポイント

6のガイドは作成済み

チーム

University of North Texas, Team S7-G5, Thompson Fall 2018 University of North Texas, Team S7-G5, Thompson Fall 2018人のメンバー

UNT-THOMPSON-F18S7G5

2 メンバー

6のガイドは作成済み

0 件のコメント

コメントを追加

統計データ:

過去 24時間: 0

過去 7 日: 2

過去 30 日: 5

今までの合計 618