メインコンテンツにスキップ

Lenovo IdeaPad U310 Fan Replacement

必要な工具と部品

  1. Lenovo IdeaPad U310 Fan Replacement, Battery: 手順 1、 1の画像 1
    • Flip the device over so the bottom panel is facing up.

    • Remove the rubber feet by pinching and pulling in an upward motion.

    • The rubber feet are missing from this photo, but will be located within the red markups.

  2. Lenovo IdeaPad U310 Fan Replacement: 手順 2、 1の画像 1
    • Remove the 4 screws securing the bottom panel to the device.

    • The screws are missing from this device and are not pictured. They will be located under the rubber feet within the red markups.

  3. Lenovo IdeaPad U310 Fan Replacement: 手順 3、 2の画像 1 Lenovo IdeaPad U310 Fan Replacement: 手順 3、 2の画像 2
    • Place the plastic opening tool between the bottom panel and device.

    • Pry around the device's outer edge until the bottom panel is no longer attached.

    • Lift the bottom panel up and away from device.

  4. Lenovo IdeaPad U310 Fan Replacement: 手順 4、 2の画像 1 Lenovo IdeaPad U310 Fan Replacement: 手順 4、 2の画像 2
    • Unplug the Battery from the circuit board by carefully prying the connector from its housing.

  5. Lenovo IdeaPad U310 Fan Replacement: 手順 5、 2の画像 1 Lenovo IdeaPad U310 Fan Replacement: 手順 5、 2の画像 2
    • Remove the 5.6 mm Screw with the PH1 screwdriver.

    • Remove the 4.6 mm screws with the PH1 screwdriver.

  6. Lenovo IdeaPad U310 Fan Replacement: 手順 6、 2の画像 1 Lenovo IdeaPad U310 Fan Replacement: 手順 6、 2の画像 2
    • Lift the strip tape away from the battery, being careful not to completely remove it.

  7. Lenovo IdeaPad U310 Fan Replacement: 手順 7、 1の画像 1
    • Remove the battery by lifting up and away from device.

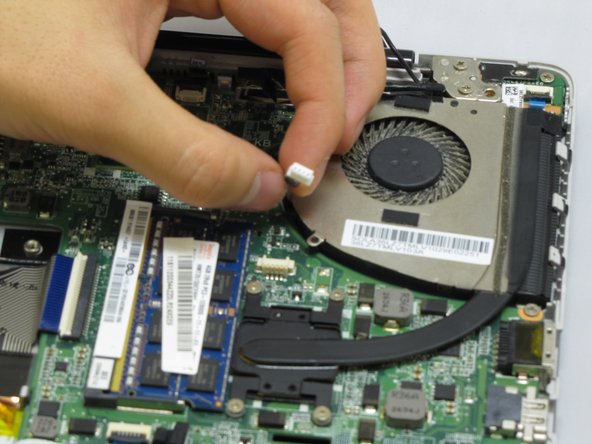
  8. Lenovo IdeaPad U310 Fan Replacement, Fan: 手順 8、 2の画像 1 Lenovo IdeaPad U310 Fan Replacement, Fan: 手順 8、 2の画像 2
    • Unplug fan by pinching the connector and pulling it away from its housing.

  9. Lenovo IdeaPad U310 Fan Replacement: 手順 9、 2の画像 1 Lenovo IdeaPad U310 Fan Replacement: 手順 9、 2の画像 2
    • Unscrew 5.1 mm screw using PH1.

    • Unscrew the four 3.6 mm screws using PH1.

    • Theses five screws are attached to the black plate with rubber stoppers. You will be able to loosen them from the circuit board, but they will stay attached.

  10. Lenovo IdeaPad U310 Fan Replacement: 手順 10、 1の画像 1
    • Remove fan by lifting up and away from device.

終わりに

To reassemble your device, follow these instructions in reverse order.

2 の人々がこのガイドを完成させました。

作成者

4人の作成者と共同で作成されました。

Tommie Tucker

メンバー登録日: 09/28/16

270 ポイント

1ガイドが承認済み

チーム

Eastern Washington University, Team 2-1, Mathisen Fall 2016 Eastern Washington University, Team 2-1, Mathisen Fall 2016人のメンバー

EWU-MATHISEN-F16S2G1

5 メンバー

5のガイドは作成済み

0 件のコメント

コメントを追加

統計データ:

過去 24時間: 0

過去 7 日: 0

過去 30 日: 1

今までの合計 1,562