メインコンテンツにスキップ

Lenovo IdeaPad N586 Fan Replacement

必要な工具と部品

  1. Lenovo IdeaPad N586 Fan Replacement, Battery: 手順 1、 2の画像 1 Lenovo IdeaPad N586 Fan Replacement, Battery: 手順 1、 2の画像 2
    • To unlock the battery, flip the laptop over so that the bottom is facing upward. Then unlock the left clip by pushing the clip to the left.

  2. Lenovo IdeaPad N586 Fan Replacement: 手順 2、 2の画像 1 Lenovo IdeaPad N586 Fan Replacement: 手順 2、 2の画像 2
    • Now push the right clip to the right and hold it while using your other hand to pull the battery out.

  3. Lenovo IdeaPad N586 Fan Replacement, Hard Drive: 手順 3、 1の画像 1
    • Now remove the last two screws highlighted

  4. Lenovo IdeaPad N586 Fan Replacement: 手順 4、 2の画像 1 Lenovo IdeaPad N586 Fan Replacement: 手順 4、 2の画像 2
    • Push hard drive away from the center of the chassis.

    • Lift the hard drive out of the chassis using the tab located on the drive.

  5. Lenovo IdeaPad N586 Fan Replacement, Memory: 手順 5、 2の画像 1 Lenovo IdeaPad N586 Fan Replacement, Memory: 手順 5、 2の画像 2
    • Now push the little clips out away from the memory to unlock the memory.

  6. Lenovo IdeaPad N586 Fan Replacement: 手順 6、 1の画像 1
    • After unlocking the memory from it's position, pull the memory out.

  7. Lenovo IdeaPad N586 Fan Replacement, Keyboard: 手順 7、 1の画像 1
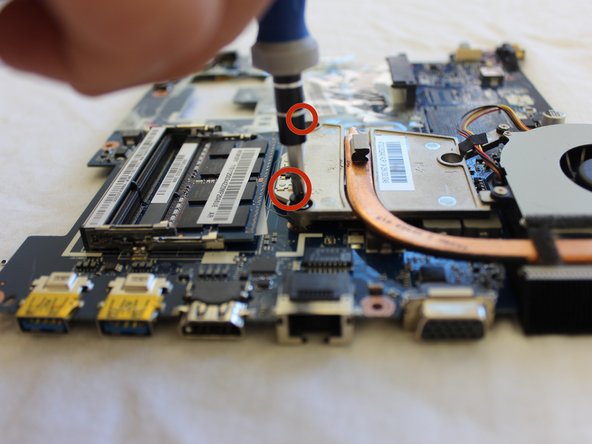
    • Remove three screws on bottom of case. They have a little keyboard image next to them. If you don't do this first, the keyboard will not come off. Place the plastic spudger right under the edge of the keyboard and lift up the keyboard.

  8. Lenovo IdeaPad N586 Fan Replacement: 手順 8、 1の画像 1
    • Slowly and gently lift the keyboard up to separate from the chassis.

  9. Lenovo IdeaPad N586 Fan Replacement: 手順 9、 1の画像 1
    • Gently lift the keyboard off the chassis.

    • Carefully disconnect the keyboard from the laptop by unhooking the keyboard ribbon.

  10. Lenovo IdeaPad N586 Fan Replacement: 手順 10、 1の画像 1
    • Now remove the keyboard from the computer.

  11. Lenovo IdeaPad N586 Fan Replacement, Fan: 手順 11、 2の画像 1 Lenovo IdeaPad N586 Fan Replacement, Fan: 手順 11、 2の画像 2
    • Pull the plug shown.

  12. Lenovo IdeaPad N586 Fan Replacement: 手順 12、 2の画像 1 Lenovo IdeaPad N586 Fan Replacement: 手順 12、 2の画像 2
    • Lift up fan.

    • Remove two highlighted screws.

  13. Lenovo IdeaPad N586 Fan Replacement: 手順 13、 1の画像 1
    • This is the fan separated from the motherboard.

終わりに

To reassemble your device, follow these instructions in reverse order.

ある他の人がこのガイドを完成しました。

作成者

1人の作成者と共同作成されました。

Patrick

メンバー登録日: 04/08/14

453 ポイント

3のガイドは作成済み

チーム

Cal Poly, Team 8-7, Regan Spring 2014 Cal Poly, Team 8-7, Regan Spring 2014人のメンバー

CPSU-REGAN-S14S8G7

5 メンバー

10のガイドは作成済み

コメント 1 件

These instructions are incomplete. There are no steps to getting from removing the keyboard to getting to the fan. There may be more missing.

Clint Hatchett - 返信

コメントを追加

統計データ:

過去 24時間: 0

過去 7 日: 0

過去 30 日: 0

今までの合計 1,017