はじめに
If you want to upgrade the Wi-Fi card in your Lenovo IdeaPad Flex 5 14ARE05, this guide is exactly what you need. The Wi-Fi card allows your laptop to join a Wi-Fi network and access the Internet. An outdated Wi-Fi card could cause slow Wi-Fi speeds and an unstable internet connection, preventing you from using your laptop to its fullest potential. Before starting this guide test your Wi-Fi speeds and ensure you have powered down the laptop and disconnected it from any power sources.
必要な工具と部品
-
-
Remove the five 8 mm screws using a T5 Torx Screwdriver.
-
Remove the four 5 mm screws using a T5 Torx Screwdriver.
-
-
-
-
Remove the 2 mm screw using a Phillips #2 screwdriver.
-
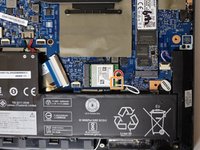
Disconnect the white and black wires.
-
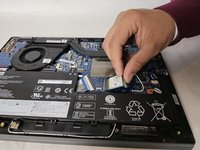
Carefully lift upward where the screw was on the Wi-Fi card.
-


To reassemble your device, follow these instructions in reverse order.
To reassemble your device, follow these instructions in reverse order.
2 の人々がこのガイドを完成させました。

チーム

UMass Dartmouth, Team 1-6, Konn Fall 2024 UMass Dartmouth, Team 1-6, Konn Fall 2024人のメンバー
UMASSD-KONN-F24S1G6
4 メンバー
5のガイドは作成済み