メインコンテンツにスキップ

Lenovo IdeaPad 130S-11IGM Trackpad Replacement

必要な工具と部品

  1. Lenovo IdeaPad 130S-11IGM Trackpad Replacement, Trackpad: 手順 1、 2の画像 1 Lenovo IdeaPad 130S-11IGM Trackpad Replacement, Trackpad: 手順 1、 2の画像 2
    • Power down the device and disconnect the power cable.

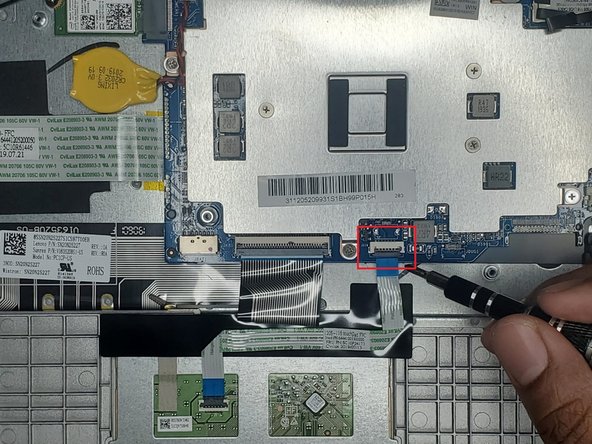
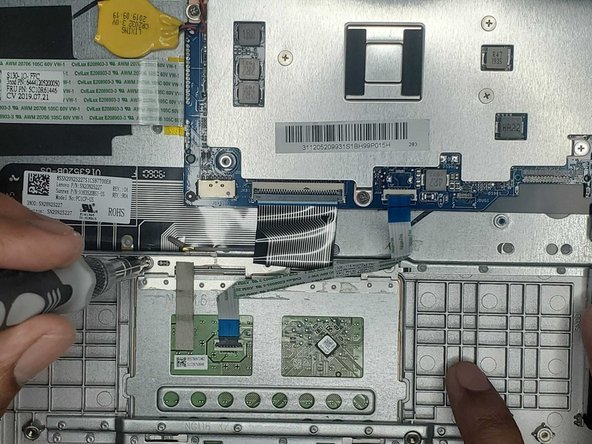
    • Remove the ten screws from the back panel using a T5 Torx screwdriver.

  2. Lenovo IdeaPad 130S-11IGM Trackpad Replacement: 手順 2、 2の画像 1 Lenovo IdeaPad 130S-11IGM Trackpad Replacement: 手順 2、 2の画像 2
    • Use an iFixit opening tool to detach the clips on the top side of the back panel.

    • After unclipping the top part of the panel, use your hands to gently unclip the rest of the panel.

    • Remove the back panel from the laptop.

  3. Lenovo IdeaPad 130S-11IGM Trackpad Replacement: 手順 3、 3の画像 1 Lenovo IdeaPad 130S-11IGM Trackpad Replacement: 手順 3、 3の画像 2 Lenovo IdeaPad 130S-11IGM Trackpad Replacement: 手順 3、 3の画像 3
    • Unplug the battery connection from the motherboard.

    • This can be a little bit tricky; hold the wire of the plug and gently pull it. Alternatively, there is a small ridge at the edge of the battery connector, next to the wires which allows you to pry the connector out with a spudger.

  4. Lenovo IdeaPad 130S-11IGM Trackpad Replacement: 手順 4、 3の画像 1 Lenovo IdeaPad 130S-11IGM Trackpad Replacement: 手順 4、 3の画像 2 Lenovo IdeaPad 130S-11IGM Trackpad Replacement: 手順 4、 3の画像 3
    • Remove the five screws from the battery using a Phillips #00 screwdriver.

    • Use your hands to remove the battery from the laptop.

  5. Lenovo IdeaPad 130S-11IGM Trackpad Replacement: 手順 5、 2の画像 1 Lenovo IdeaPad 130S-11IGM Trackpad Replacement: 手順 5、 2の画像 2
    この手順で使用する道具:
    Tweezers
    $4.99
    購入する
    • Use a pair of tweezers to lift the clip securing the touchpad cable.

    • Disconnect the touchpad cable from the motherboard.

  6. Lenovo IdeaPad 130S-11IGM Trackpad Replacement: 手順 6、 2の画像 1 Lenovo IdeaPad 130S-11IGM Trackpad Replacement: 手順 6、 2の画像 2
    • Remove the black tape hiding the screws on the trackpad.

    • Be careful when taking the tape off; try not to damage the other wires.

    • You will need the tape when reassembling the laptop.

  7. Lenovo IdeaPad 130S-11IGM Trackpad Replacement: 手順 7、 2の画像 1 Lenovo IdeaPad 130S-11IGM Trackpad Replacement: 手順 7、 2の画像 2
    • Remove the three screws holding the trackpad in place using a Phillips #00 screwdriver.

  8. Lenovo IdeaPad 130S-11IGM Trackpad Replacement: 手順 8、 3の画像 1 Lenovo IdeaPad 130S-11IGM Trackpad Replacement: 手順 8、 3の画像 2 Lenovo IdeaPad 130S-11IGM Trackpad Replacement: 手順 8、 3の画像 3
    • Lift the trackpad from the top side and remove it from the laptop.

終わりに

To reassemble your device, follow these instructions in reverse order.

作成者

3人の作成者と共同で作成されました。

MD Yeasin Rahman Khan

メンバー登録日: 01/12/22

208 ポイント

1ガイドが承認済み

チーム

York University, Team S-13, Woodhouse Winter 2022 York University, Team S-13, Woodhouse Winter 2022人のメンバー

YORK-WOODHOUSE-W22SSG13

1 メンバー

1のガイドは作成済み

0 件のコメント

コメントを追加

統計データ:

過去 24時間: 4

過去 7 日: 7

過去 30 日: 17

今までの合計 472