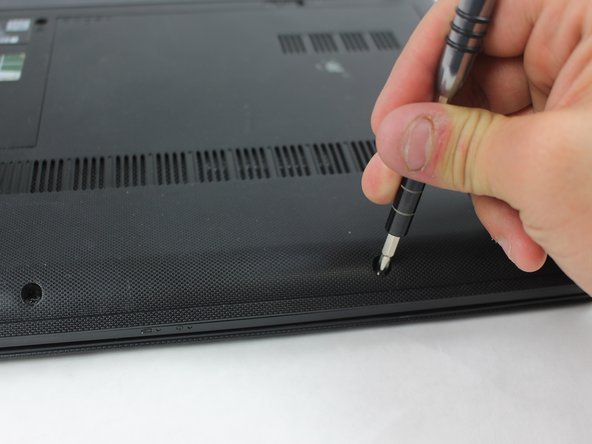
メインコンテンツにスキップ

Lenovo G40-30 Keyboard Replacement

必要な工具と部品

  1. Lenovo G40-30 Keyboard Replacement, Battery: 手順 1、 3の画像 1 Lenovo G40-30 Keyboard Replacement, Battery: 手順 1、 3の画像 2 Lenovo G40-30 Keyboard Replacement, Battery: 手順 1、 3の画像 3
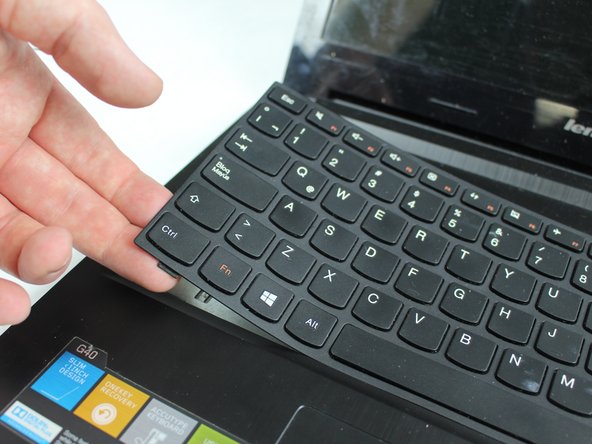
    • At the top of the laptop you will see two switches, like in image one and two.

    • Pull the switches outwards with your thumb, towards the unlocked lock.

  2. Lenovo G40-30 Keyboard Replacement: 手順 2、 3の画像 1 Lenovo G40-30 Keyboard Replacement: 手順 2、 3の画像 2 Lenovo G40-30 Keyboard Replacement: 手順 2、 3の画像 3
    • Once both switches are pulled, the battery should pop out.

  3. Lenovo G40-30 Keyboard Replacement: 手順 3、 1の画像 1
    • Now you are ready to insert your new battery.

  4. Lenovo G40-30 Keyboard Replacement, Keyboard: 手順 4、 2の画像 1 Lenovo G40-30 Keyboard Replacement, Keyboard: 手順 4、 2の画像 2
    • Use a JIS #1 screwdriver to remove the two 7 mm screws.

  5. Lenovo G40-30 Keyboard Replacement: 手順 5、 2の画像 1 Lenovo G40-30 Keyboard Replacement: 手順 5、 2の画像 2
    • Remove the back panel by sliding it away from the battery.

  6. Lenovo G40-30 Keyboard Replacement: 手順 6、 1の画像 1
    • Use a JIS #1 screwdriver to remove the three 7 mm screws.

  7. Lenovo G40-30 Keyboard Replacement: 手順 7、 2の画像 1 Lenovo G40-30 Keyboard Replacement: 手順 7、 2の画像 2
    • Wedge the plastic opening tool in-between the keyboard and the base of the laptop.

    • Continue using the plastic opening tool to pry around the edge until the keyboard is completely freed form the frame.

    • The keyboard should only be connected by a ribbon on the underside of the keyboard.

    • It is recommended that you slowly pull the keyboard out as your move around the edge. As in picture 2.

    • Be careful not to pull the keyboard too far away from the face as it will damage the data ribbon.

  8. Lenovo G40-30 Keyboard Replacement: 手順 8、 3の画像 1 Lenovo G40-30 Keyboard Replacement: 手順 8、 3の画像 2 Lenovo G40-30 Keyboard Replacement: 手順 8、 3の画像 3
    • Use the tweezers to lift the black hinge on the ribbon connector.

    • Then pull the ribbon from the connector and remove the keyboard from the laptop.

  9. Lenovo G40-30 Keyboard Replacement: 手順 9、 1の画像 1
    • Now your keyboard is free to be replaced!

終わりに

To reassemble your device, follow these instructions in reverse order.

2 の人々がこのガイドを完成させました。

作成者

1人の作成者と共同作成されました。

Luke

メンバー登録日: 02/08/18

314 ポイント

1ガイドが承認済み

チーム

Sam Houston State, Team S16-G4, Nardone Spring 2018 Sam Houston State, Team S16-G4, Nardone Spring 2018人のメンバー

SHSU-NARDONE-S18S16G4

5 メンバー

5のガイドは作成済み

コメント 1 件

thanks ….terimakasih sangat membantu…..

herman - 返信

コメントを追加

統計データ:

過去 24時間: 2

過去 7 日: 4

過去 30 日: 6

今までの合計 2,076