メインコンテンツにスキップ

Lenovo Edge 2-1580 Motherboard Replacement

必要な工具と部品

  1. Lenovo Edge 2-1580 Motherboard Replacement, Battery: 手順 1、 2の画像 1 Lenovo Edge 2-1580 Motherboard Replacement, Battery: 手順 1、 2の画像 2
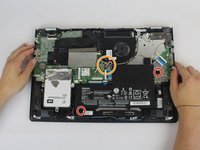
    • Using the Phillips #0 screwdriver, remove the (11) eleven 5.4 mm screws from the back panel.

  2. Lenovo Edge 2-1580 Motherboard Replacement: 手順 2、 2の画像 1 Lenovo Edge 2-1580 Motherboard Replacement: 手順 2、 2の画像 2
    • Using a plastic opening tool, pull out the back panel from the laptop.

  3. Lenovo Edge 2-1580 Motherboard Replacement: 手順 3、 3の画像 1 Lenovo Edge 2-1580 Motherboard Replacement: 手順 3、 3の画像 2 Lenovo Edge 2-1580 Motherboard Replacement: 手順 3、 3の画像 3
    • Using the Phillips #0 screwdriver, remove the (2) 5.4 mm screws.

    • Disconnect the battery connector from the motherboard.

  4. Lenovo Edge 2-1580 Motherboard Replacement: 手順 4、 1の画像 1
    • Pull the battery outward and remove it from the rest of the laptop.

  5. Lenovo Edge 2-1580 Motherboard Replacement, Hard drive: 手順 5、 2の画像 1 Lenovo Edge 2-1580 Motherboard Replacement, Hard drive: 手順 5、 2の画像 2
    • Using the Phillips #0 screwdriver, remove the (3) three 3 mm screws.

  6. Lenovo Edge 2-1580 Motherboard Replacement: 手順 6、 2の画像 1 Lenovo Edge 2-1580 Motherboard Replacement: 手順 6、 2の画像 2
    • Slide the drive away from the connector by applying pressure on the two side tabs where screws were removed. Use a plastic opening tool as a lever to lift the drive out.

  7. Lenovo Edge 2-1580 Motherboard Replacement: 手順 7、 2の画像 1 Lenovo Edge 2-1580 Motherboard Replacement: 手順 7、 2の画像 2
    • Carefully, using your hand, remove the hard drive from the laptop.

  8. Lenovo Edge 2-1580 Motherboard Replacement, Fan: 手順 8、 3の画像 1 Lenovo Edge 2-1580 Motherboard Replacement, Fan: 手順 8、 3の画像 2 Lenovo Edge 2-1580 Motherboard Replacement, Fan: 手順 8、 3の画像 3
    • Remove the 5.4 mm Phillips #0 screw holding the Wireless Network Card.

    • The network card will pop up by itself.

  9. Lenovo Edge 2-1580 Motherboard Replacement: 手順 9、 2の画像 1 Lenovo Edge 2-1580 Motherboard Replacement: 手順 9、 2の画像 2
    • Grab the network card and gently pull it out.

  10. Lenovo Edge 2-1580 Motherboard Replacement: 手順 10、 2の画像 1 Lenovo Edge 2-1580 Motherboard Replacement: 手順 10、 2の画像 2
    • Pull out the RAM metallic cover.

  11. Lenovo Edge 2-1580 Motherboard Replacement: 手順 11、 2の画像 1 Lenovo Edge 2-1580 Motherboard Replacement: 手順 11、 2の画像 2
    • Grab the black insulating tape and pull it out.

  12. Lenovo Edge 2-1580 Motherboard Replacement: 手順 12、 2の画像 1 Lenovo Edge 2-1580 Motherboard Replacement: 手順 12、 2の画像 2
    • Using the Phillips #0 screwdriver, remove the (6) six fan screws from the device.

    • (5) Five copper and (1) one silver Phillips #0 5.4mm screws.

    • Disconnect the fan from the motherboard.

  13. Lenovo Edge 2-1580 Motherboard Replacement: 手順 13、 2の画像 1 Lenovo Edge 2-1580 Motherboard Replacement: 手順 13、 2の画像 2
    • Unplug the Fan connector from its socket on the motherboard.

  14. Lenovo Edge 2-1580 Motherboard Replacement: 手順 14、 2の画像 1 Lenovo Edge 2-1580 Motherboard Replacement: 手順 14、 2の画像 2
    • Carefully remove the fan from the laptop.

  15. Lenovo Edge 2-1580 Motherboard Replacement, Motherboard: 手順 15、 2の画像 1 Lenovo Edge 2-1580 Motherboard Replacement, Motherboard: 手順 15、 2の画像 2
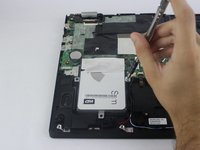
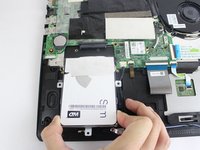
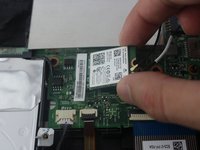
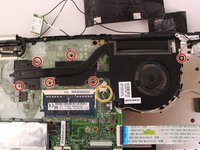
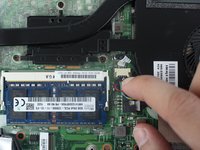
    • Using the Phillips #0 screwdriver, remove the (2) two 5.4 mm Phillips screws.

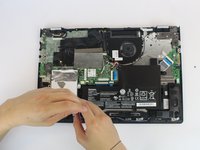
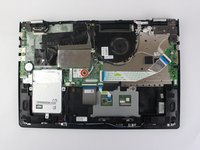
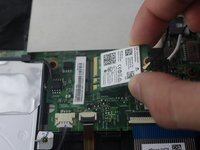
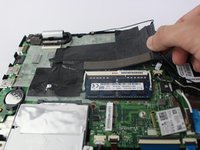
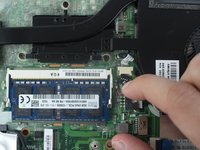
    • Disconnect these connectors from the motherboard.

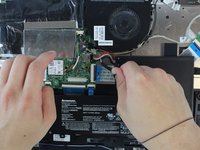
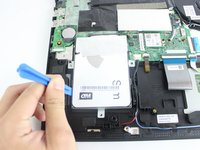
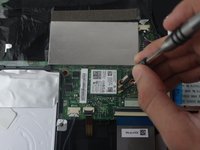
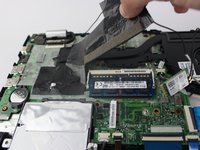
    • Disconnect the four ribbon cables from the motherboard.

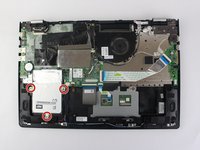
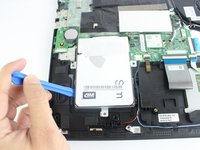
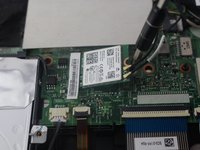
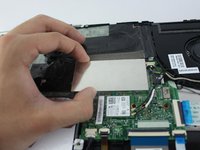
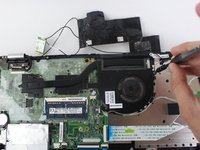
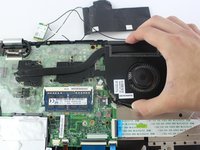
    • Unscrew and remove the (2) two Phillips #0 screws.
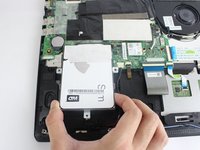
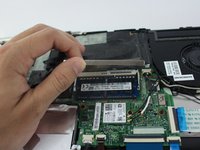
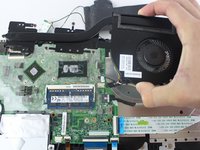
  16. Lenovo Edge 2-1580 Motherboard Replacement: 手順 16、 3の画像 1 Lenovo Edge 2-1580 Motherboard Replacement: 手順 16、 3の画像 2 Lenovo Edge 2-1580 Motherboard Replacement: 手順 16、 3の画像 3
    • Lift up the black latch of the ribbon cable with the brown tab on top by holding the cable in to the motherboard.

    • Grab the tab with a pair of pliers and pull out the cable.

  17. Lenovo Edge 2-1580 Motherboard Replacement: 手順 17、 3の画像 1 Lenovo Edge 2-1580 Motherboard Replacement: 手順 17、 3の画像 2 Lenovo Edge 2-1580 Motherboard Replacement: 手順 17、 3の画像 3
    • Lift the beige latch of the ribbon cable with the blue tab by holding the cable in to the motherboard, and with a pair of tweezers, pull out the cable.

  18. Lenovo Edge 2-1580 Motherboard Replacement: 手順 18、 3の画像 1 Lenovo Edge 2-1580 Motherboard Replacement: 手順 18、 3の画像 2 Lenovo Edge 2-1580 Motherboard Replacement: 手順 18、 3の画像 3
    • Lift up the black latch of the ribbon cable with the blue tab at the lower right corner of the motherboard and disconnect it with a pair of tweezers.

    • Grab the tab and pull out the cable.

  19. Lenovo Edge 2-1580 Motherboard Replacement: 手順 19、 3の画像 1 Lenovo Edge 2-1580 Motherboard Replacement: 手順 19、 3の画像 2 Lenovo Edge 2-1580 Motherboard Replacement: 手順 19、 3の画像 3
    • Locate the last ribbon cable with a blue tab and lift the beige latch holding the cable in to the motherboard.

    • With a pair of tweezers grab the tab and remove the cable.

  20. Lenovo Edge 2-1580 Motherboard Replacement: 手順 20、 2の画像 1 Lenovo Edge 2-1580 Motherboard Replacement: 手順 20、 2の画像 2
    • Lift the black latch of the black connector at the top left corner of the motherboard by holding it in to the motherboard.

    • Grab the cable and pull it outwards to remove it.

  21. Lenovo Edge 2-1580 Motherboard Replacement: 手順 21、 2の画像 1 Lenovo Edge 2-1580 Motherboard Replacement: 手順 21、 2の画像 2
    • Pull the wire besides the brown tab ribbon cable out and disconnect it.

  22. Lenovo Edge 2-1580 Motherboard Replacement: 手順 22、 2の画像 1 Lenovo Edge 2-1580 Motherboard Replacement: 手順 22、 2の画像 2
    • Grab the small black connector by the RAM module and disconnect it from the motherboard.

  23. Lenovo Edge 2-1580 Motherboard Replacement: 手順 23、 2の画像 1 Lenovo Edge 2-1580 Motherboard Replacement: 手順 23、 2の画像 2
    • Unplug the remaining connector besides the RAM module and remove it from the motherboard.

  24. Lenovo Edge 2-1580 Motherboard Replacement: 手順 24、 2の画像 1 Lenovo Edge 2-1580 Motherboard Replacement: 手順 24、 2の画像 2
    • Gently grab the motherboard and pull it up lightly. Then pull it towards you and remove the motherboard.

終わりに

To reassemble your device, follow these instructions in reverse order.

4 の人々がこのガイドを完成させました。

作成者

2人の作成者と共同で作成されました。

Julian Escallon

メンバー登録日: 09/27/17

714 ポイント

5のガイドは作成済み

チーム

USF Tampa, Team S14-G1, Boczar Fall 2017 USF Tampa, Team S14-G1, Boczar Fall 2017人のメンバー

USFT-BOCZAR-F17S14G1

4 メンバー

5のガイドは作成済み

0 件のコメント

コメントを追加

統計データ:

過去 24時間: 1

過去 7 日: 4

過去 30 日: 17

今までの合計 2,133