メインコンテンツにスキップ

Lenovo 300e Chromebook 2nd Gen Trackpad Replacement

必要な工具と部品

  1. Lenovo 300e Chromebook 2nd Gen Trackpad Replacement, Opening The Chromebook: 手順 1、 3の画像 1 Lenovo 300e Chromebook 2nd Gen Trackpad Replacement, Opening The Chromebook: 手順 1、 3の画像 2 Lenovo 300e Chromebook 2nd Gen Trackpad Replacement, Opening The Chromebook: 手順 1、 3の画像 3
    この手順で使用する道具:
    Phillips #0 Screwdriver
    $5.49
    購入する
    • Make sure you power off your Chromebook first as you will be disconnecting the battery!

    • Remove all 9 screws on the back of the Chromebook with a Phillips #0 screwdriver

    • The screws circled on this Chromebook's back casing are all identical!

    • Use an opening tool such as a spudgerand carefully work your way around the laptop to remove the back cover

  2. Lenovo 300e Chromebook 2nd Gen Trackpad Replacement, Disconnect the Battery: 手順 2、 2の画像 1 Lenovo 300e Chromebook 2nd Gen Trackpad Replacement, Disconnect the Battery: 手順 2、 2の画像 2
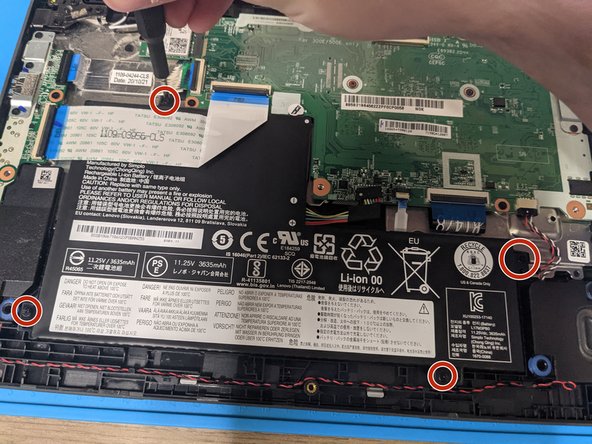
    • Remove the black tape covering the connector, then using a spudge tool, carefully unplug the battery from the motherboard

  3. Lenovo 300e Chromebook 2nd Gen Trackpad Replacement, Remove the battery: 手順 3、 2の画像 1 Lenovo 300e Chromebook 2nd Gen Trackpad Replacement, Remove the battery: 手順 3、 2の画像 2
    • Remove the 4 screws holding in the battery and set them aside

    • Make sure to separate the screws for the battery from the screws for the backing that were removed in the first step!

  4. Lenovo 300e Chromebook 2nd Gen Trackpad Replacement, Remove Trackpad Screws & Connector: 手順 4、 3の画像 1 Lenovo 300e Chromebook 2nd Gen Trackpad Replacement, Remove Trackpad Screws & Connector: 手順 4、 3の画像 2 Lenovo 300e Chromebook 2nd Gen Trackpad Replacement, Remove Trackpad Screws & Connector: 手順 4、 3の画像 3
    この手順で使用する道具:
    Phillips #0 Screwdriver
    $5.49
    購入する
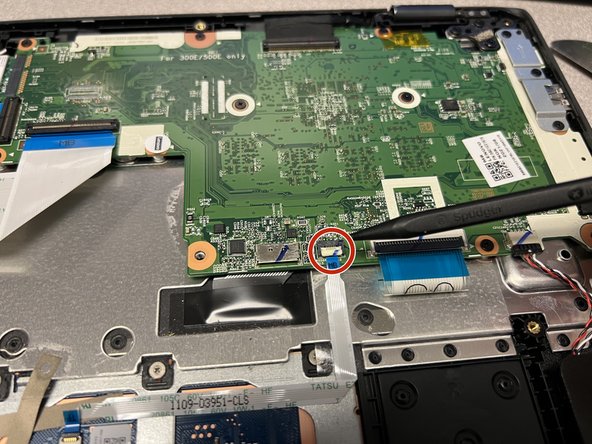
    • Disconnect the Trackpad Cable by lifting the Connector.

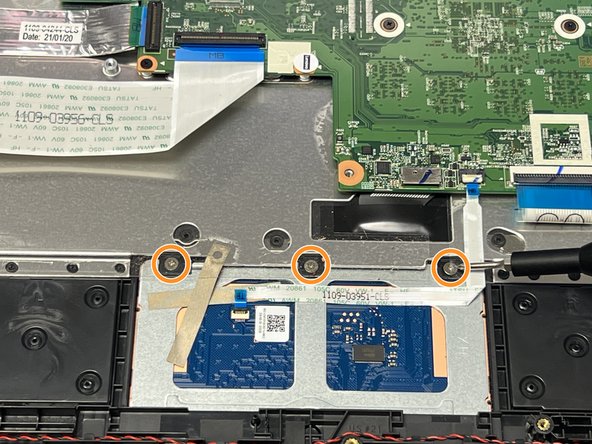
    • Remove the 3 screws holding in the top of the trackpad with a Phillips #0 screwdriver

  5. Lenovo 300e Chromebook 2nd Gen Trackpad Replacement, Remove Trackpad: 手順 5、 1の画像 1
    この手順で使用する道具:
    Spudger
    $3.99
    購入する
    • Please make sure the Chromebook is open as the trackpad will come out from the inside of the device.

    • There are 3 tabs (2 at the bottom and 1 at the top left of the trackpad), using the Spudger, push the tabs to remove the Trackpad from the case.

終わりに

To reassemble your device, follow these instructions in reverse order.

作成者

1人の作成者と共同作成されました。

Sam Addington

メンバー登録日: 09/21/22

159 ポイント

1ガイドが承認済み

0 件のコメント

コメントを追加

統計データ:

過去 24時間: 0

過去 7 日: 5

過去 30 日: 32

今までの合計 105