メインコンテンツにスキップ

LeapFrog LeapPad Ultra XDi Screen Replacement

必要な工具と部品

  1. LeapFrog LeapPad Ultra XDi Screen Replacement, Battery: 手順 1、 2の画像 1 LeapFrog LeapPad Ultra XDi Screen Replacement, Battery: 手順 1、 2の画像 2
    • Orient the tablet so it’s laying screen down and the barcode sticker is facing up.

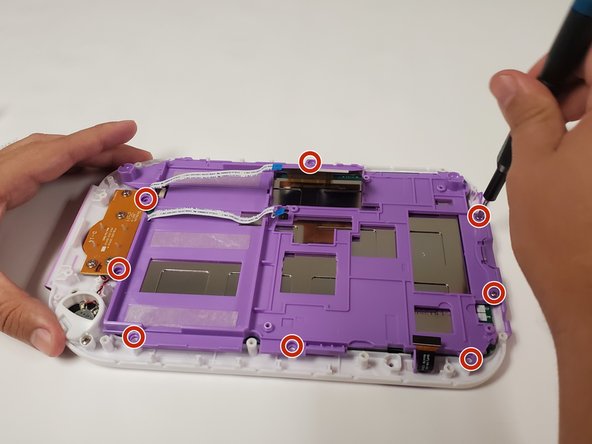
    • Remove the barcode sticker to expose the two screws.

  2. LeapFrog LeapPad Ultra XDi Screen Replacement: 手順 2、 2の画像 1 LeapFrog LeapPad Ultra XDi Screen Replacement: 手順 2、 2の画像 2
    • Remove the two 5.0mm Phillips #0 screws.

  3. LeapFrog LeapPad Ultra XDi Screen Replacement: 手順 3、 3の画像 1 LeapFrog LeapPad Ultra XDi Screen Replacement: 手順 3、 3の画像 2 LeapFrog LeapPad Ultra XDi Screen Replacement: 手順 3、 3の画像 3
    • Using the iFixit opening tool, pry off the purple and white child-proof casing to expose the twelve screws.

  4. LeapFrog LeapPad Ultra XDi Screen Replacement: 手順 4、 2の画像 1 LeapFrog LeapPad Ultra XDi Screen Replacement: 手順 4、 2の画像 2
    • Remove all twelve 7mm Phillips #1 screws located along the edges of the device.

  5. LeapFrog LeapPad Ultra XDi Screen Replacement: 手順 5、 2の画像 1 LeapFrog LeapPad Ultra XDi Screen Replacement: 手順 5、 2の画像 2
    • Remove the purple case, exposing the motherboard and battery.

  6. LeapFrog LeapPad Ultra XDi Screen Replacement: 手順 6、 3の画像 1 LeapFrog LeapPad Ultra XDi Screen Replacement: 手順 6、 3の画像 2 LeapFrog LeapPad Ultra XDi Screen Replacement: 手順 6、 3の画像 3
    • Use the Spudger to remove the glued down battery.

    • Using your fingers, grab the battery wires and carefully unplug them from the motherboard.

    • Replace the battery with a new one.

  7. LeapFrog LeapPad Ultra XDi Screen Replacement, Screen: 手順 7、 3の画像 1 LeapFrog LeapPad Ultra XDi Screen Replacement, Screen: 手順 7、 3の画像 2 LeapFrog LeapPad Ultra XDi Screen Replacement, Screen: 手順 7、 3の画像 3
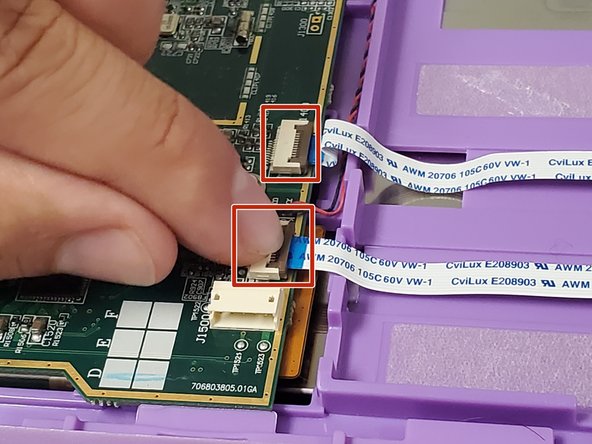
    • Locate the three ribbon cables on top of the motherboard.

    • Flip up the locking clip on the ribbon cable connector to release the cable.

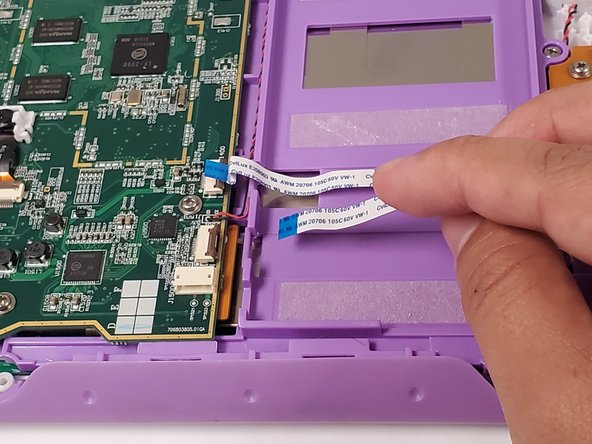
    • Disconnect the cables from their connectors.

  8. LeapFrog LeapPad Ultra XDi Screen Replacement: 手順 8、 1の画像 1
    • Unscrew the four 5.0 mm Phillips #0 screws securing the motherboard.

  9. LeapFrog LeapPad Ultra XDi Screen Replacement: 手順 9、 3の画像 1 LeapFrog LeapPad Ultra XDi Screen Replacement: 手順 9、 3の画像 2 LeapFrog LeapPad Ultra XDi Screen Replacement: 手順 9、 3の画像 3
    • Pull the two side grips up to remove them from the casing.

    • Unscrew the eight 7.0 mm Phillips #1 screws securing the base. Remove the base.

  10. LeapFrog LeapPad Ultra XDi Screen Replacement: 手順 10、 2の画像 1 LeapFrog LeapPad Ultra XDi Screen Replacement: 手順 10、 2の画像 2
    • Unscrew the eleven 7.0 mm Phillips #1 screws securing the circuit board to the case. Remove the circuit board.

  11. LeapFrog LeapPad Ultra XDi Screen Replacement: 手順 11、 1の画像 1
    • Lift the screen from the front case. Replace the screen.

終わりに

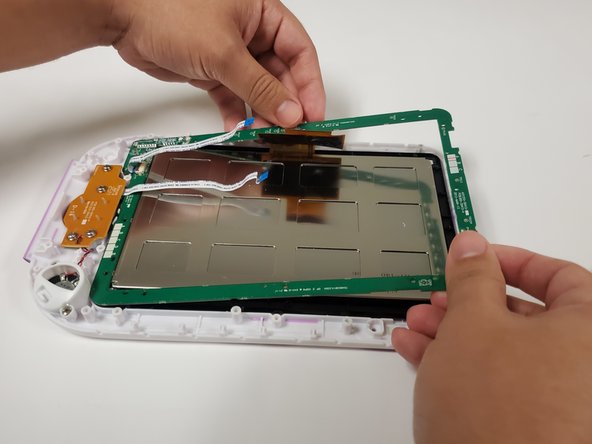
To reassemble your device, follow these instructions in reverse order.

作成者

5人の作成者と共同で作成されました。

Victoria Shew

メンバー登録日: 08/28/19

503 ポイント

2のガイドは作成済み

チーム

University of North Texas, Team S1-G4, Friess Fall 2019 University of North Texas, Team S1-G4, Friess Fall 2019人のメンバー

UNT-FRIESS-F19S1G4

3 メンバー

5のガイドは作成済み

2 件のコメント

Where exactly can I find a replacement screen? I have looked everywhere with no luck.

Siblings have a cracked one i would really like to fix so any help would be greatly appreciated.

Derp Dude - 返信

So I would suggest ebay or buy one that's not chargable on macari and use it for parts that's the route I'm taking with what ever I find .hope that helps since this post is old

Cherry -

コメントを追加

統計データ:

過去 24時間: 1

過去 7 日: 7

過去 30 日: 15

今までの合計 852